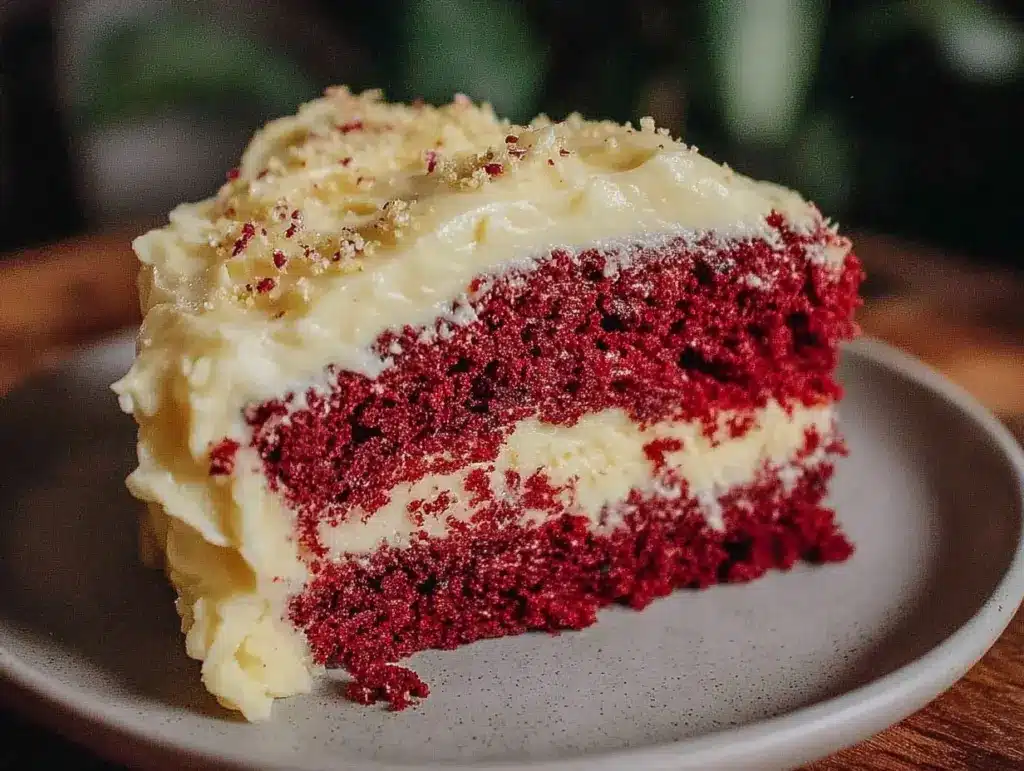
“Did you see the cake?” my sister texted me late one evening. Honestly, I was just about ready to call it a night, but curiosity got the better of me. The picture she sent was this stunning red velvet flag cake, all layered and frosted with the creamiest cream cheese frosting you can imagine. It looked like a showstopper. I’d never really attempted anything like a flag cake before—too fussy, I thought. But something about that vibrant red and white combo spoke to me (maybe it was the quiet hum of summer holiday parties around the corner).
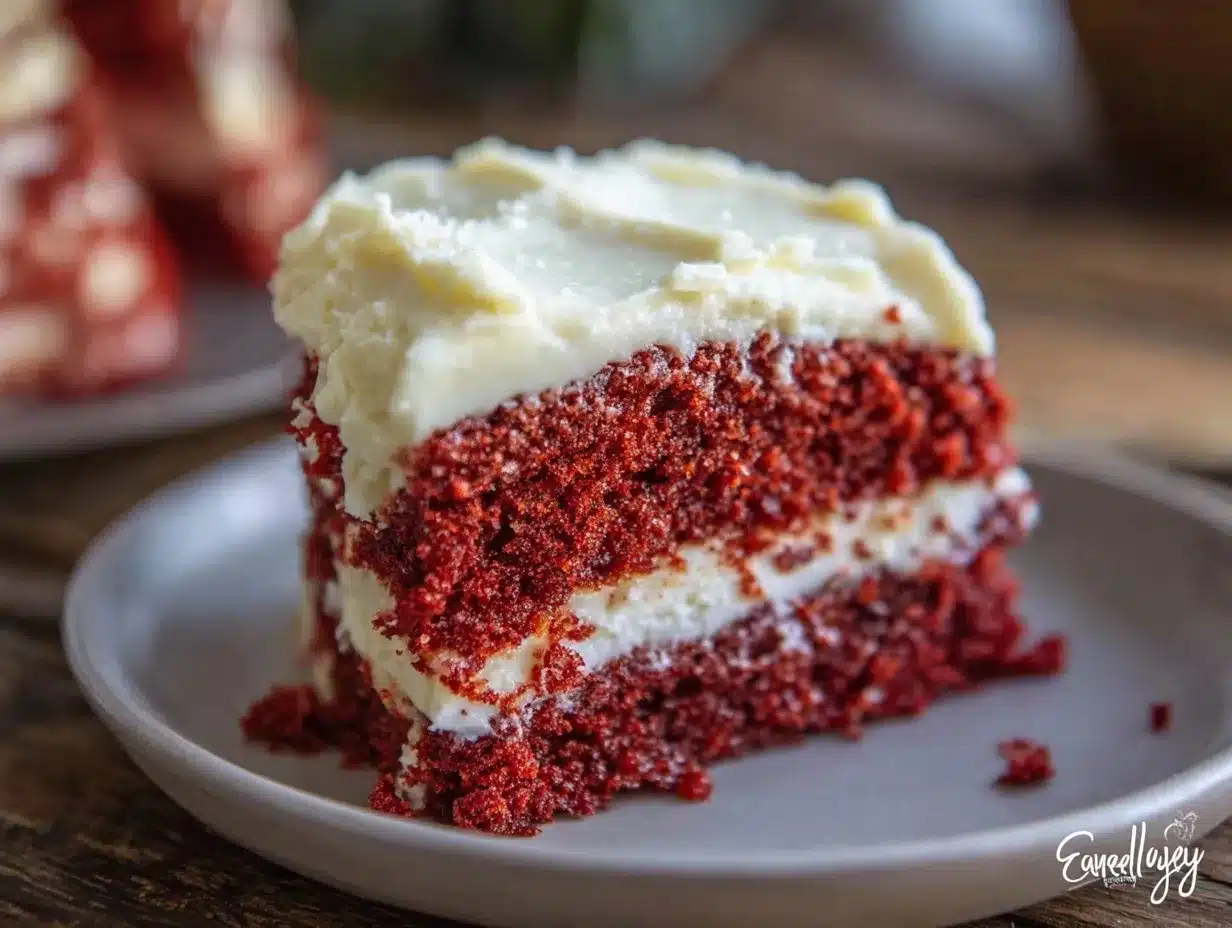
I remember the first time I tried making that red velvet flag cake; it was kind of an accident. I was aiming for a simple red velvet layer cake but ended up with leftover batter and cream cheese frosting. Instead of wasting anything, I decided to layer the cake in a flag pattern—red velvet stripes and white cream cheese in between. It turned into a fun little project that made me feel like a kid again, cutting neat little stripes and stacking them just right. The result? A cake that’s as pleasing to the eye as it is to the taste buds, and let me tell you, the cream cheese frosting on this one really steals the show.
It’s not the fanciest cake, and it definitely doesn’t need a bakery’s worth of ingredients or time, but it has this homey, festive vibe that just sticks with you. The kind of cake that makes you pause, sip your coffee, and think, “Yeah, this was worth the effort.”
Why You’ll Love This Recipe
This perfect red velvet flag cake recipe has been tested multiple times (honestly, I made it three times in one week last month) to get the balance just right—moist, tender cake with that unmistakable red velvet flavor and a luscious cream cheese frosting that’s not too sweet but perfectly tangy. Here’s why it stands out:
- Quick & Easy: You can whip up the batter and frosting in under an hour, making it totally doable even if you’re juggling a busy day.
- Simple Ingredients: No hunting down obscure stuff—basic pantry staples and a little cocoa powder are all you need.
- Perfect for Celebrations: Whether it’s a 4th of July BBQ, a birthday, or just a weekend treat, the flag design adds that special festive touch.
- Crowd-Pleaser: People (kids especially) always ask for seconds. The cream cheese frosting adds a slight tang that balances the sweet cake beautifully.
- Unbelievably Delicious: The moist crumb combined with smooth frosting is classic comfort food in cake form.
What makes this recipe different? I’ve tweaked the cream cheese frosting to be silky smooth without being overly sweet or heavy, by blending in a touch of sour cream and vanilla extract. Plus, the layering technique is straightforward, so you don’t have to be a cake pro to nail that iconic flag look. It’s a recipe that’ll quietly impress guests without the stress—kind of like crispy loaded potato skins for a savory crowd-pleaser, but in dessert form.
What Ingredients You Will Need
This recipe uses simple, wholesome ingredients to deliver bold flavor and a satisfying texture without any fuss. Most of these are pantry staples you likely have around, and the substitutions are easy if you’re catering to dietary needs.
- For the Red Velvet Cake:
- All-purpose flour – about 2 ½ cups (320 g), sifted for lightness
- Granulated sugar – 1 ½ cups (300 g)
- Cocoa powder – 2 tbsp (unsweetened, for that subtle chocolate flavor)
- Baking soda – 1 tsp
- Salt – ½ tsp
- Buttermilk – 1 ½ cups (360 ml), room temperature (adds moisture and tang)
- Vegetable oil – 1 cup (240 ml), neutral flavor
- Large eggs – 2, room temperature
- Red food coloring – 2 tbsp (liquid or gel works, but gel gives a richer color)
- Vanilla extract – 1 tsp
- White vinegar – 1 tsp (helps with rise and that signature red velvet tang)
- For the Cream Cheese Frosting:
- Cream cheese – 16 oz (450 g), softened (I like Philadelphia cream cheese for consistency)
- Unsalted butter – ½ cup (115 g), softened (adds richness)
- Powdered sugar – 4 cups (480 g), sifted
- Vanilla extract – 1 tsp
- Sour cream – 2 tbsp (optional, but recommended for creamy tang and smooth texture)
- Pinch of salt
For substitutions: you can swap all-purpose flour for a gluten-free blend if needed (just watch the texture). Use dairy-free cream cheese and butter alternatives for a vegan-friendly frosting. And if buttermilk is unavailable, mix 1 ½ cups milk with 1 ½ tbsp lemon juice or vinegar and let it sit for 5 minutes.
Equipment Needed
- Two 9-inch (23 cm) round cake pans – non-stick or well-greased to prevent sticking
- Mixing bowls – at least two, medium and large
- Electric mixer or stand mixer – for smooth batter and frosting (hand mixers work too, but might take longer)
- Measuring cups and spoons – for accuracy
- Sifter or fine mesh sieve – to aerate flour and powdered sugar
- Rubber spatula – perfect for folding and scraping bowls clean
- Cooling racks – to cool layers evenly
- Offset spatula or butter knife – for smooth frosting application
- Optional: cake leveler or serrated knife – to trim cake layers for even stacking
If you don’t have two cake pans, you can bake in batches using one pan, just adjust baking times accordingly. I’ve found that an electric mixer really helps with getting the cream cheese frosting silky and lump-free, but a sturdy whisk and elbow grease can do the trick if you’re patient. Keeping your cream cheese and butter softened at room temperature is key — otherwise, the frosting can turn out grainy.
Preparation Method
- Preheat your oven to 350°F (175°C). Grease and flour two 9-inch round cake pans or line them with parchment paper for easy removal. This step is crucial to get clean cake layers.
- Mix dry ingredients: In a large bowl, sift together 2 ½ cups (320 g) flour, 1 ½ cups (300 g) sugar, 2 tbsp cocoa powder, 1 tsp baking soda, and ½ tsp salt. Stir until evenly combined.
- Combine wet ingredients: In a separate bowl, whisk buttermilk (1 ½ cups/360 ml), vegetable oil (1 cup/240 ml), 2 large eggs, 2 tbsp red food coloring, 1 tsp vanilla extract, and 1 tsp white vinegar until smooth. The color here should be a bright, inviting red.
- Mix wet and dry: Slowly pour the wet ingredients into the dry, stirring gently with a spatula or mixer on low speed. Mix just until combined — overmixing can make the cake dense. The batter should be smooth, slightly thick, and vibrantly red.
- Divide and bake: Pour the batter evenly into the two prepared pans. Tap pans gently on the counter to release air bubbles. Bake for 30-35 minutes or until a toothpick inserted in the center comes out clean. The cake edges will start to pull away slightly from the pans.
- Cool completely: Let the cakes cool in the pans for 10 minutes, then turn out onto wire racks. Cool fully before frosting to prevent melting and sliding layers.
- Prepare the frosting: In a large bowl, beat softened cream cheese (16 oz/450 g) and butter (½ cup/115 g) until smooth and fluffy, about 3-4 minutes. Gradually add powdered sugar (4 cups/480 g), beating on low speed until incorporated. Stir in vanilla extract (1 tsp), sour cream (2 tbsp), and a pinch of salt. Beat until creamy and spreadable. If frosting seems too thick, add a teaspoon of milk at a time to loosen it.
- Assemble the flag cake: Trim cake tops if uneven. Cut one cake layer into thin strips (about 1-inch wide) for the flag stripes. Arrange strips horizontally on your serving plate, spreading a thin layer of frosting between each strip. Use the other whole cake layer as the background to create the flag field. Frost the entire cake with the remaining cream cheese frosting, smoothing the edges for a clean finish.
- Chill and serve: Refrigerate the assembled cake for at least 30 minutes to set the frosting before slicing. This helps keep the layers neat and flavors meld.
Pro tip: If you want ultra-clean slices, dip your knife in hot water and wipe it dry before cutting each slice.
Cooking Tips & Techniques
Getting the perfect red velvet flag cake takes some tricks I’ve learned the hard way. First, don’t skip sifting your cocoa powder and flour — it really lightens the batter and prevents clumps. Also, the red food coloring is mostly for show, but gel colors give a richer hue without adding too much liquid.
When mixing the batter, slow and steady wins the race. Overmixing develops gluten, making your cake tough. I usually mix just until the ingredients come together, and that’s it.
With the cream cheese frosting, patience is key. Make sure the cream cheese and butter are fully softened; otherwise, you’ll end up with lumps or a grainy texture. Plus, beating the frosting long enough—about 4 minutes—makes it fluffy and spreadable.
Layering the flag pattern is more about patience and precision than fancy equipment. I find using an offset spatula to spread thin layers of frosting between strips keeps the flag stripes crisp and clean. If the frosting is too soft, pop the cake in the fridge for 10 minutes before continuing.
Multitasking tip: While the cakes bake, start whipping up your cream cheese frosting so everything is ready to go when the layers cool.
Variations & Adaptations
- Dietary swaps: Use almond or oat flour for a gluten-free version. Swap regular cream cheese with a dairy-free variety for vegan needs.
- Flavor twists: Add a teaspoon of espresso powder to the cake batter to deepen the chocolate notes. Or mix in finely grated orange zest into the frosting for a fresh citrus zing.
- Cooking methods: If you don’t have cake pans, try baking the batter in a sheet pan and cutting strips for the flag design. This method makes a thinner, more casual flag cake.
- Personal favorite: I once mixed in chopped pecans between the layers for a subtle crunch that surprised everyone at a summer picnic.
Want to make a smaller cake? Just halve the recipe and bake in an 8-inch pan—adjust baking time accordingly. For a fun twist, you could even create a mini flag cake using cupcake liners and assemble the flag on a platter.
Serving & Storage Suggestions
This red velvet flag cake tastes best chilled or at room temperature. I usually slice it after it’s been in the fridge for a bit, then let the slices warm up for 10-15 minutes before serving—makes the frosting luscious but not melty.
It pairs wonderfully with a cup of coffee or a glass of cold milk, perfect for festive brunches or afternoon tea. For a savory balance, serve alongside easy breakfast hits like soft scrambled eggs or crispy sides like garlic hasselback potatoes.
Store leftover cake in an airtight container in the fridge for up to 4 days. You can freeze it wrapped tightly in plastic wrap and foil for up to 2 months—just thaw overnight in the fridge. When reheating, a quick 10-second zap in the microwave softens the frosting nicely without melting it.
Flavors actually deepen after a day, so it’s perfectly fine to make the cake a day ahead and let it rest. The cream cheese frosting firms up beautifully, holding that classic smooth texture.
Nutritional Information & Benefits
This red velvet flag cake with cream cheese frosting clocks in at around 350-400 calories per slice (based on 12 servings). The cake is moist but not overly heavy, thanks to the oil and buttermilk combo.
Cocoa powder brings antioxidants, while buttermilk adds calcium and protein. Cream cheese provides a moderate amount of calcium and vitamin A, though it’s best enjoyed as an occasional treat due to its fat content.
This recipe can be adapted to be gluten-free or dairy-free, making it accessible for more dietary needs. Just keep in mind the frosting changes slightly depending on substitutions.
Personally, I appreciate that this cake isn’t overly sweet or laden with artificial additives. It strikes a nice balance between indulgence and comfort, which fits well when I want something special but not too heavy.
Conclusion
So, if you want a show-stopping yet approachable dessert that brings a touch of fun and festivity, this perfect red velvet flag cake with cream cheese frosting is for you. It’s a recipe that’s easy enough for a weeknight but impressive enough for celebrations, with that classic red velvet flavor and a frosting that’s just right—not too sweet, not too tangy.
Make it your own by trying the variations or pairing it with your favorite breakfast sides or snacks. Honestly, this cake is one I keep coming back to, whether for a holiday, a potluck, or just because the moment calls for something a little special.
If you try it, I’d love to hear how it turns out or what twists you added. Baking is always better when shared, right? Here’s to many sweet slices and fond memories.
Frequently Asked Questions
Can I make the red velvet cake layers ahead of time?
Yes! You can bake the layers up to 2 days ahead. Wrap them tightly in plastic wrap and store at room temperature or refrigerate. Bring to room temperature before frosting.
What if I don’t have buttermilk?
Mix regular milk with 1 tbsp lemon juice or vinegar per cup, let it sit 5 minutes, and use as a substitute. This adds the tang and acidity needed for the red velvet’s texture.
How do I get the cream cheese frosting smooth and lump-free?
Make sure cream cheese and butter are fully softened. Beat them together for several minutes before adding powdered sugar gradually. Sifting powdered sugar helps too.
Can I make this cake gluten-free?
Absolutely. Use a 1-to-1 gluten-free baking flour blend. The texture may be slightly different, but it still tastes delicious.
How do I store leftover cake?
Store in an airtight container in the fridge for up to 4 days. You can freeze slices wrapped tightly for up to 2 months and thaw in the fridge before serving.
Pin This Recipe!
Perfect Red Velvet Flag Cake Recipe Easy Homemade Cream Cheese Frosting Tutorial

A moist and tender red velvet cake layered in a festive flag pattern with a luscious, tangy cream cheese frosting that’s easy to make and perfect for celebrations.
- Prep Time: 20 minutes
- Cook Time: 35 minutes
- Total Time: 55 minutes
- Yield: 12 servings 1x
- Category: Dessert
- Cuisine: American
Ingredients
- 2 ½ cups (320 g) all-purpose flour, sifted
- 1 ½ cups (300 g) granulated sugar
- 2 tbsp unsweetened cocoa powder
- 1 tsp baking soda
- ½ tsp salt
- 1 ½ cups (360 ml) buttermilk, room temperature
- 1 cup (240 ml) vegetable oil
- 2 large eggs, room temperature
- 2 tbsp red food coloring (liquid or gel)
- 1 tsp vanilla extract
- 1 tsp white vinegar
- 16 oz (450 g) cream cheese, softened
- ½ cup (115 g) unsalted butter, softened
- 4 cups (480 g) powdered sugar, sifted
- 1 tsp vanilla extract
- 2 tbsp sour cream (optional)
- Pinch of salt
Instructions
- Preheat your oven to 350°F (175°C). Grease and flour two 9-inch round cake pans or line them with parchment paper.
- In a large bowl, sift together flour, sugar, cocoa powder, baking soda, and salt. Stir until evenly combined.
- In a separate bowl, whisk buttermilk, vegetable oil, eggs, red food coloring, vanilla extract, and white vinegar until smooth.
- Slowly pour the wet ingredients into the dry ingredients, stirring gently with a spatula or mixer on low speed until just combined.
- Pour the batter evenly into the two prepared pans. Tap pans gently to release air bubbles.
- Bake for 30-35 minutes or until a toothpick inserted in the center comes out clean.
- Let the cakes cool in the pans for 10 minutes, then turn out onto wire racks and cool completely.
- In a large bowl, beat softened cream cheese and butter until smooth and fluffy, about 3-4 minutes.
- Gradually add powdered sugar, beating on low speed until incorporated.
- Stir in vanilla extract, sour cream, and a pinch of salt. Beat until creamy and spreadable. Add milk if frosting is too thick.
- Trim cake tops if uneven. Cut one cake layer into 1-inch wide strips for the flag stripes.
- Arrange strips horizontally on serving plate, spreading a thin layer of frosting between each strip.
- Use the other whole cake layer as the background to create the flag field.
- Frost the entire cake with remaining cream cheese frosting, smoothing edges for a clean finish.
- Refrigerate the assembled cake for at least 30 minutes to set the frosting before slicing.
- For clean slices, dip knife in hot water and wipe dry before cutting each slice.
Notes
Sift flour and cocoa powder to prevent clumps and lighten batter. Use gel food coloring for richer red color. Do not overmix batter to avoid dense cake. Ensure cream cheese and butter are fully softened for smooth frosting. Chill cake after assembly for neat slices. Dip knife in hot water before slicing for clean cuts.
Nutrition
- Serving Size: 1 slice (1/12 of cak
- Calories: 375
- Sugar: 30
- Sodium: 320
- Fat: 22
- Saturated Fat: 9
- Carbohydrates: 42
- Fiber: 1
- Protein: 4
Keywords: red velvet cake, cream cheese frosting, flag cake, easy cake recipe, festive dessert, homemade frosting, celebration cake


