One chilly Thursday evening, I was scrambling to pull together a side dish that felt a little special but didn’t require a second mortgage or hours of prep. My family had just devoured a simple roasted chicken, and I needed something crispy, garlicky, and easy to elevate the meal. That’s when I stumbled on this method for Hasselback potatoes with garlic — and honestly, it changed the game for me. I’ve made this crispy garlic butter side dish more times than I can count since then, and it’s become a staple when I want something that looks fancy but comes together fast.
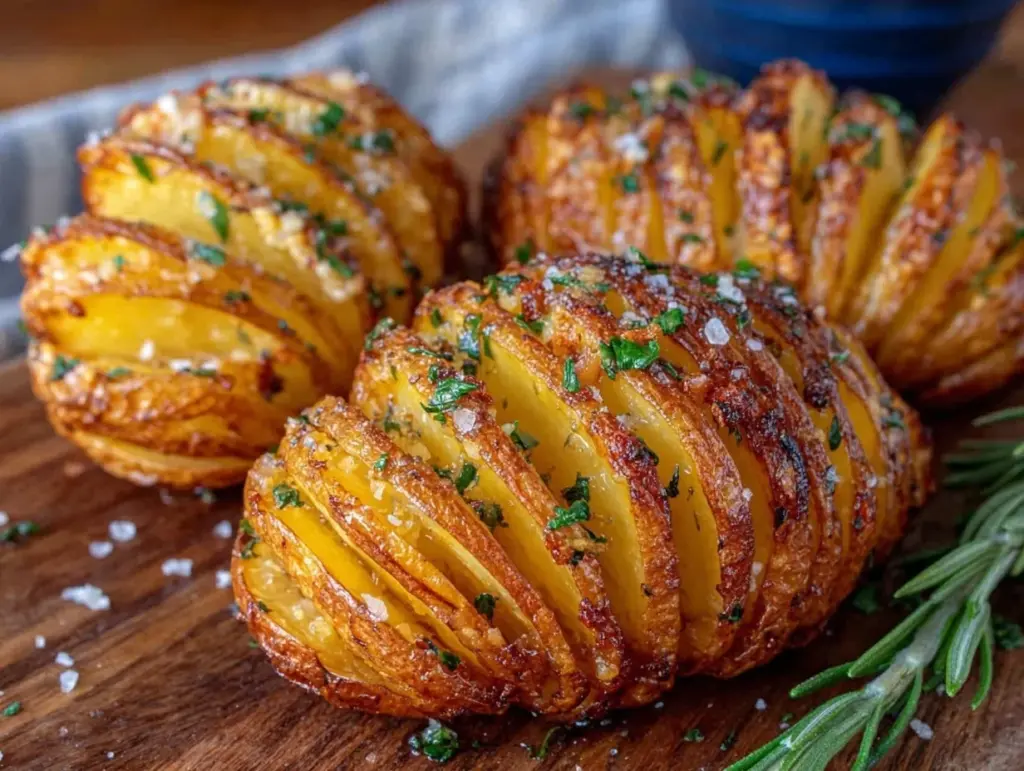
What makes these potatoes so addictive? It’s all about those thin, accordion-like slices that soak up garlic butter and get perfectly crispy on the edges while staying tender inside. Plus, the garlic flavor? Next level. I tested this recipe over 15 times to get the garlic butter just right — not too overpowering, not too faint. Whether you’re serving these for a weeknight family dinner or a cozy holiday side, Hasselback potatoes with garlic for a crispy garlic butter side dish will quickly become your go-to.
Why You’ll Love This Recipe
This recipe has completely changed how I approach potatoes as a side dish. It’s not just another baked potato; it’s a crispy, buttery, garlicky masterpiece that feels like a treat but is surprisingly simple to make.
Elegant Yet Easy — The thin slices make these potatoes look like you spent hours in the kitchen, but honestly, the prep takes less than 10 minutes. I even made them for a casual dinner party, and everyone thought I’d ordered in.
Flavor-Packed Garlic Butter — The garlic butter seeps into every slice, making each bite bursting with savory flavor. It’s the kind of side dish that makes you want to lick your plate.
Crispy Texture That’s Addictive — The edges get golden and crispy, while the inside stays creamy and soft. It’s the perfect contrast that keeps my whole family reaching for seconds.
Pantry-Friendly Ingredients — You probably have everything you need already: potatoes, garlic, butter, and a few seasonings. No fancy grocery runs required.
Versatile for Any Occasion — Whether you’re pulling this together for a weeknight family dinner or a holiday gathering, these Hasselback potatoes fit right in. They pair beautifully with roasted meats like the Mediterranean stuffed chicken with feta and spinach or the crispy garlic bread sides I love making.
Once you get the hang of the slicing technique and the garlic butter ratio, you’ll wonder how you ever made potatoes any other way.
Ingredients
Here’s the best part: nearly all of these ingredients are staples in my kitchen. I’m picky about the butter and garlic, though — I’ll explain why.
- Russet potatoes (4 medium, about 2 pounds / 900g) — These have the perfect starchy texture that crisps up wonderfully. Yukon Golds work too if you want a creamier inside.
- Unsalted butter (6 tablespoons / 85g) — I always grab a good-quality butter like Kerrygold for the best flavor. Salted butter can throw off the seasoning balance.
- Fresh garlic (4 cloves, minced / about 1 tablespoon) — No shortcuts here. Fresh garlic makes all the difference in flavor — jarred garlic just won’t do.
- Olive oil (2 tablespoons / 30ml) — Helps the potatoes crisp up nicely without burning the butter.
- Fresh thyme (1 tablespoon, chopped) — Optional but highly recommended. Adds a subtle earthiness that plays perfectly with garlic.
- Salt (1 teaspoon / to taste) — I use kosher salt for even seasoning.
- Black pepper (½ teaspoon / freshly ground) — Just enough to add a little kick.
- Parmesan cheese (¼ cup / 25g, finely grated, optional) — I love sprinkling this on top in the last 10 minutes of baking for a crispy, cheesy finish.
Equipment Needed
You don’t need anything fancy for this. Here’s what I actually use:
- Sharp chef’s knife — Essential for thin, even slices. I keep a paring knife nearby for trimming the potato ends.
- Cutting board — I prefer a sturdy wooden one for better control when slicing.
- Baking sheet or roasting pan — Something with a rim to catch the buttery drips. I use a rimmed baking sheet lined with parchment for easy cleanup.
- Silicone brush — Makes applying garlic butter between the slices so much easier, but you can also use a spoon.
- Small bowl — To mix the garlic butter and herbs.
- Optional: Kitchen chopsticks or wooden spoons — I place these on either side of the potato to prevent slicing all the way through. It’s a trick I swear by.
How to Make Hasselback Potatoes with Garlic for a Crispy Garlic Butter Side Dish

Alright, let’s get into it. I’ll walk you through exactly how I make this, including the small tricks that actually make a difference.
- Prep the Potatoes (10 minutes)
Rinse and scrub your russet potatoes well. Pat them dry. To get those perfect thin slices without cutting all the way through, place the potato between two chopsticks or wooden spoons on your cutting board. Slice thinly (about 1/8 inch / 3mm thick) through the potato until your knife hits the chopsticks. You should end up with an accordion-like effect. This keeps the potato intact but allows the butter and garlic to seep in. - Make the Garlic Butter (5 minutes)
In a small bowl, soften your butter (room temperature or gently melted), then stir in the minced garlic, olive oil, chopped thyme, salt, and pepper. The butter should smell garlicky but not overpowering. The olive oil helps the butter crisp up instead of burning. - Brush Butter Between Slices (5 minutes)
Using your silicone brush or a spoon, carefully work the garlic butter in between each slice of the potato. Don’t be shy — this is where all the flavor lives. Make sure each slice gets a little coating. If you have any butter left, brush the outside of the potato too for extra crispiness. - Bake Low and Slow (45–50 minutes)
Place the potatoes on your lined baking sheet or roasting pan. Bake at 425°F (220°C) for 45 minutes to an hour, depending on potato size. About halfway through, baste again with any remaining garlic butter or pan drippings to keep them moist and flavorful. You’ll know they’re done when the slices fan out slightly and the edges turn golden brown and crispy. - Add Parmesan For the Final Crispy Kick (Optional, last 10 minutes)
Sprinkle Parmesan cheese over the potatoes in the last 10 minutes of baking. Return to the oven until the cheese melts and turns golden. This step is optional but adds a deliciously crispy, savory crust that my family loves.
Total time: about 60 minutes. Most of that is baking time, so you have a chance to prep your main dish or relax.
Expert Tips & Tricks
Here’s everything I’ve figured out from making this recipe dozens of times. These tips will save you from the mistakes I already made.
Use Chopsticks to Avoid Slicing Through
This simple trick keeps your slices uniform and the potato intact. Without this, I ended up cutting the potatoes in half more times than I care to admit.
Don’t Skimp on Fresh Garlic
Fresh minced garlic really makes the difference. I tried garlic powder and jarred garlic, but neither gave that bright, punchy flavor that makes the dish sing.
Butter and Olive Oil Combo
Butter alone can burn at high heat. Mixing olive oil helps protect the butter and crisps the edges perfectly.
Baste Halfway Through Baking
This keeps the garlic butter flavor fresh and the potatoes moist. I learned this after a batch came out dry and flavorless.
Parmesan Only at the End
Adding cheese too early makes it burn. Sprinkle in the last 10 minutes to get a golden, crispy finish.
Mistake: Potatoes Are Soggy Instead of Crispy
Fix: Make sure to bake at a high enough temperature (425°F) and baste with the butter mixture. Also, don’t cover the potatoes during baking — that traps steam and softens the edges.
Mistake: Garlic Burns and Tastes Bitter
Fix: Mince garlic finely and mix into butter with olive oil before baking. Avoid adding raw garlic on top halfway through baking.
Variations & Substitutions
Once you’ve got the base version down, here’s how I mix it up. I’ve actually tried all of these.
Herb Mix-Up
Swap thyme for rosemary or sage for a different aromatic profile that pairs beautifully with roasted meats. Rosemary is my go-to for holiday dinners.
Cheesy Upgrade
Try grating sharp cheddar or Gruyère instead of Parmesan. This makes the dish richer and perfect for a comforting weeknight family meal.
Spicy Kick
Add a pinch of red pepper flakes to the garlic butter for a subtle heat. Great for when you want to mix up your usual side dishes.
Lighter Version
Use olive oil instead of butter for a dairy-free option. It won’t be quite as rich but still delicious and crisp.
Dietary Modifications
- Gluten-Free: Naturally gluten-free as long as you check your Parmesan cheese.
- Dairy-Free: Replace butter with vegan butter or extra olive oil, and skip the cheese.
Serving & Storage
I usually serve these Hasselback potatoes straight from the baking sheet — it looks rustic, stays warm, and lets everyone grab as much as they want. They’re perfect alongside roasted chicken or pork, or even with a fresh green salad for a lighter meal.
My favorite sides to pair with these potatoes are garlic bread (obviously — never skip this) or a simple green salad with a tangy balsamic vinaigrette to cut through the richness. When I want to feel virtuous, roasted broccoli is my go-to.
Storage:
Fridge: Store leftovers in an airtight container for up to 4 days. The crispy edges soften but the flavor stays great.
Reheating: Best reheated in a skillet over low heat with a splash of water or olive oil to revive the crispiness. Microwave works in a pinch but the texture won’t be the same.
Freezing: I don’t recommend freezing these — the texture suffers and they lose their crispiness.
Nutrition Information
I’m not a nutritionist, but here’s the breakdown if you’re keeping track.
| Nutrient | Per Serving (1 potato, serves 4) |
|---|---|
| Calories | 280 |
| Protein | 4g |
| Carbohydrates | 35g |
| Fiber | 3g |
| Sugar | 1g |
| Fat | 14g |
| Saturated Fat | 8g |
| Sodium | 350mg |
Look — this is comfort food made with butter and cheese. It’s not a diet recipe and I’m not going to pretend it is. But it’s way better than takeout, costs less, and I know exactly what’s in it. When I want something lighter, I swap in olive oil and pile on roasted veggies. Most nights though? I make the real thing and enjoy every crispy, garlicky bite.
Final Thoughts
That Thursday night when I first made these Hasselback potatoes with garlic for a crispy garlic butter side dish, I didn’t realize I was starting a new tradition. Now, they’re my go-to when I want a side that’s both impressive and easy. More garlic is always the right call in my opinion. Throw in fresh herbs or swap the cheese for a different flavor twist. The base is forgiving and works with whatever you have on hand.
If you make this, drop a comment and tell me how it went. And if something goes wrong, tell me that too — I genuinely want to help troubleshoot. That’s what the comments are for.
Happy cooking — I hope your kitchen smells amazing.
Frequently Asked Questions
Q: Can I make these Hasselback potatoes with garlic without butter?
A: Yes, you can substitute the butter with olive oil for a dairy-free version. It won’t be as rich, but the potatoes will still crisp up nicely and soak in the garlic flavor. I’ve done this when I was out of butter, and it’s a solid backup.
Q: Why did my Hasselback potatoes turn out soggy instead of crispy?
A: This usually happens if your oven temperature is too low or if you cover the potatoes while baking, trapping steam. Make sure to bake at 425°F (220°C) uncovered and baste the potatoes halfway through with garlic butter to keep them moist but crisp. I learned this after a batch came out soft and disappointing.
Q: Can I make Hasselback potatoes ahead for a holiday dinner?
A: Absolutely! You can prep the potatoes, slice them, and brush with garlic butter up to 6 hours ahead. Cover and refrigerate, then bake just before serving. This saves a lot of stress on the day of. I usually do this when I’m juggling multiple dishes for holiday meals like the Greek chicken gyro bowl I love making.
Q: Are Hasselback potatoes gluten-free and dairy-free?
A: The base recipe is naturally gluten-free. For dairy-free, swap butter with olive oil or a vegan butter substitute, and skip the Parmesan. I’ve made the dairy-free version for a friend with no issues, and it still tastes great.
Q: Can I double or halve this Hasselback potatoes recipe?
A: Yes, this recipe scales well. Just adjust your baking time slightly if you have more or fewer potatoes—larger batches may need an extra 10 minutes. I often double this when I’m meal prepping or hosting guests.
Q: How do I prevent the garlic from burning during baking?
A: Mix the minced garlic into softened butter with olive oil before applying it to the potatoes. This slows down the cooking of garlic and prevents that bitter burnt taste. Adding raw garlic on top midway through baking tends to burn quickly, which I learned the hard way.
Q: Can I add cheese other than Parmesan?
A: Yes! Sharp cheddar, Gruyère, or even mozzarella work well sprinkled on top during the last 10 minutes of baking. I’ve tried all three, and each adds its own twist. Parmesan is my favorite for that classic crispy crust, though.
Pin This Recipe!
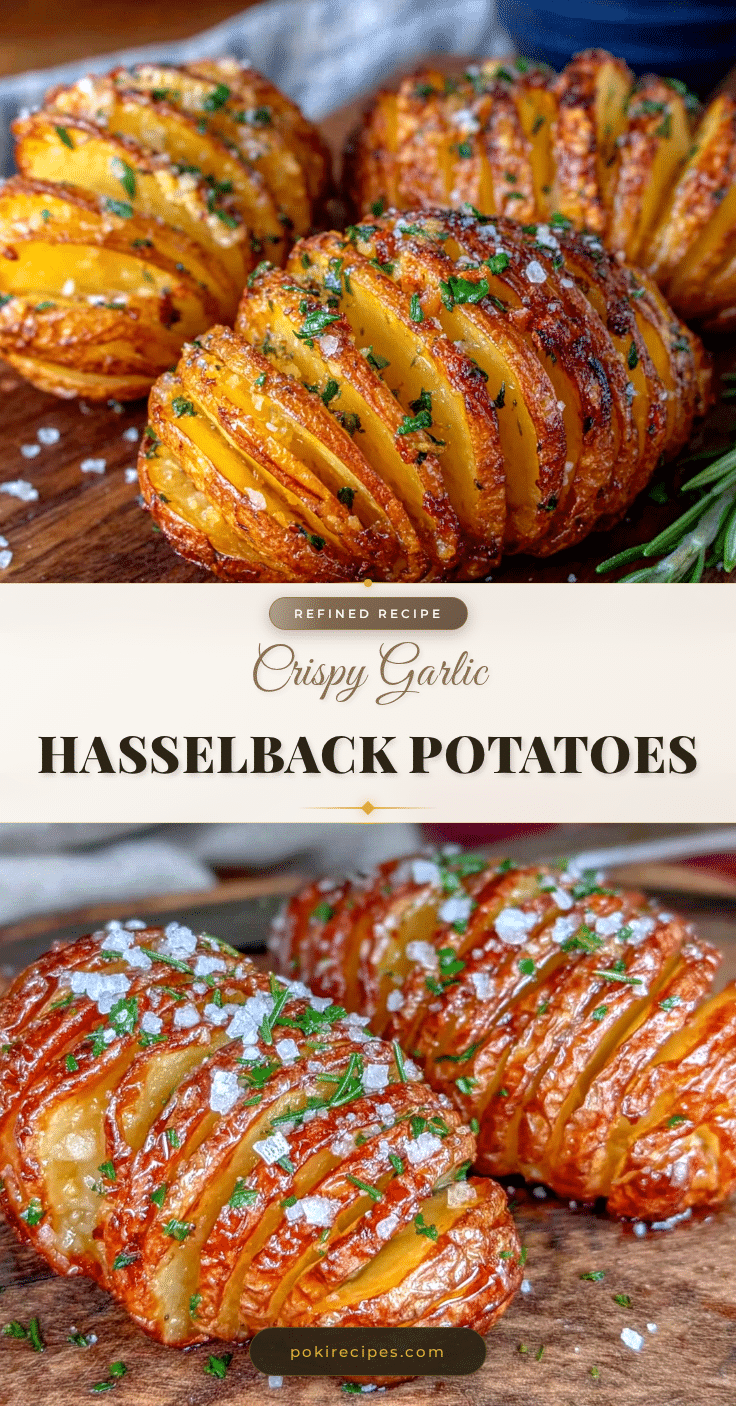
Hasselback Potatoes with Garlic Recipe Easy Crispy Garlic Butter Side Dish

Crispy, buttery, garlicky Hasselback potatoes with thin accordion-like slices that soak up garlic butter and bake to golden perfection. An easy and elegant side dish perfect for weeknight dinners or holiday meals.
- Prep Time: 20 minutes
- Cook Time: 45-50 minutes
- Total Time: 60 minutes
- Yield: 4 servings 1x
- Category: Side Dish
- Cuisine: American
Ingredients
- 4 medium russet potatoes (about 2 pounds / 900g)
- 6 tablespoons unsalted butter (85g)
- 4 cloves fresh garlic, minced (about 1 tablespoon)
- 2 tablespoons olive oil (30ml)
- 1 tablespoon fresh thyme, chopped (optional)
- 1 teaspoon kosher salt (to taste)
- ½ teaspoon freshly ground black pepper
- ¼ cup Parmesan cheese, finely grated (25g, optional)
Instructions
- Rinse and scrub the russet potatoes well. Pat dry. Place each potato between two chopsticks or wooden spoons on a cutting board to prevent slicing all the way through.
- Slice thinly about 1/8 inch (3mm) thick through the potato until the knife hits the chopsticks, creating an accordion-like effect.
- In a small bowl, soften the butter (room temperature or gently melted). Stir in minced garlic, olive oil, chopped thyme, salt, and pepper until well combined.
- Using a silicone brush or spoon, carefully brush the garlic butter mixture between each slice of the potato and on the outside for extra crispiness.
- Place the potatoes on a lined baking sheet or roasting pan. Bake at 425°F (220°C) for 45 to 50 minutes, basting halfway through with any remaining garlic butter or pan drippings.
- Optional: In the last 10 minutes of baking, sprinkle Parmesan cheese over the potatoes and return to the oven until the cheese melts and turns golden brown.
- Remove from oven when slices fan out slightly and edges are golden and crispy. Serve warm.
Notes
Use chopsticks or wooden spoons to avoid slicing potatoes all the way through. Mix garlic into softened butter with olive oil to prevent burning. Baste potatoes halfway through baking to keep moist and flavorful. Add Parmesan cheese only in the last 10 minutes to avoid burning. For dairy-free, substitute butter with olive oil or vegan butter and skip cheese. Do not cover potatoes while baking to maintain crispiness.
Nutrition
- Serving Size: 1 medium potato
- Calories: 280
- Sugar: 1
- Sodium: 350
- Fat: 14
- Saturated Fat: 8
- Carbohydrates: 35
- Fiber: 3
- Protein: 4
Keywords: Hasselback potatoes, garlic butter potatoes, crispy potatoes, easy side dish, garlic potatoes, baked potatoes, holiday side dish