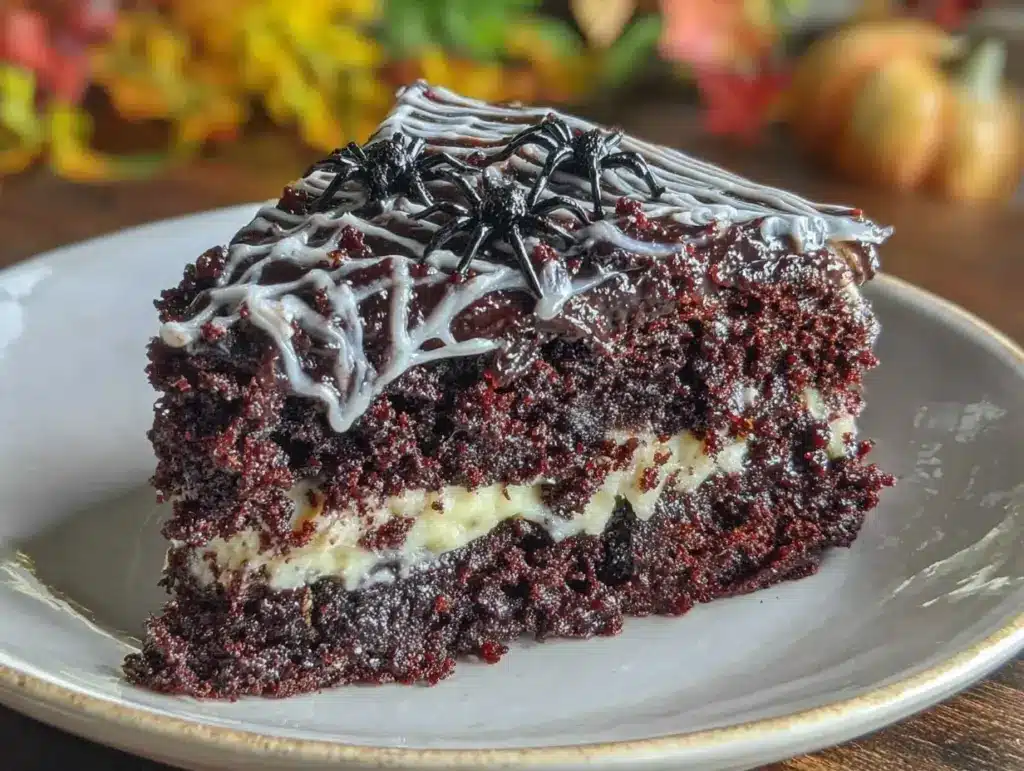
Midnight drapes the October sky in its thick velvet cloak, and the only thing I want is a slice of something dark, rich, and a little mysterious. The kitchen smells faintly of cocoa and vanilla, a quiet ritual unfolding under the low hum of the refrigerator. There’s a particular stillness around this time of year—when the days shorten and the shadows stretch longer—that calls for a dessert as indulgent as it is fitting for the season. This Decadent Black Velvet Halloween Cake with Spiderweb Frosting has quietly become my go-to for those late-night baking moments when I crave something more than the usual sweet treat.
It’s not flashy or over-the-top; instead, it’s the kind of cake that feels like a secret, a whispered indulgence that suits a solitary evening or a small gathering with close friends. The deep black crumb—far from bitter—holds a softness that surprises you, while the spiderweb frosting adds a delicate touch of whimsy without feeling forced. Honestly, making this cake feels like slipping into a cozy sweater you forgot you had, one that’s just the right fit and perfect for the crisp air outside.
There’s a quiet joy in mixing the batter, knowing the dark hues will set the stage for a hauntingly beautiful dessert. I suppose that’s why this recipe lingers in my mind well beyond Halloween night. It’s not just about the look or the season; it’s about crafting something that invites a pause. Something worth savoring slowly, bite by bite.
So, if you’re drawn to a cake that’s as much about the mood as the flavor, this black velvet cake might just become your own little tradition—one that promises comfort wrapped in a touch of spooky charm.
Why You’ll Love This Recipe
Having tested this black velvet Halloween cake through several seasons and tweaks, I can say it’s one of those recipes that keeps surprising me in the best way. Whether you’re baking for yourself or aiming to impress a crowd, this cake delivers on multiple fronts:
- Quick & Easy: The batter comes together in under 20 minutes, perfect for last-minute celebrations or spontaneous cravings.
- Simple Ingredients: You don’t need rare spices or fancy extracts—just pantry staples you probably already have (which makes it even more satisfying to whip up).
- Perfect for Halloween: The dramatic black crumb paired with spiderweb frosting fits the spooky season without feeling gimmicky or overdone.
- Crowd-Pleaser: Kids and adults alike are drawn to the moist texture and balanced sweetness, making it a popular choice at parties.
- Unbelievably Delicious: The cake’s velvet-like crumb paired with the creamy frosting creates a silky mouthfeel that’s pure comfort food.
What sets this cake apart is the way the black velvet base holds just enough moisture to feel indulgent but never dense or heavy. I’ve found that using a touch of vinegar and buttermilk gives it that tender crumb that melts in your mouth. The spiderweb frosting? It’s a simple swirl technique, but it adds a playful, eerie elegance that looks fancy without taking hours of decorating skills.
This isn’t just another Halloween dessert for show—it’s a recipe I come back to when I want something cozy but with a little theatrical flair. It’s perfect for those quiet moments, where the cake’s rich flavor feels like a small celebration just for you.
What Ingredients You Will Need
This recipe relies on straightforward, wholesome ingredients to create a bold flavor and satisfyingly soft texture without fuss or frills. Most are pantry staples, and substitutions are easy if you need to adapt.
- All-purpose flour – 2 ½ cups (312 grams); for structure and tenderness
- Cocoa powder – ¼ cup (25 grams), unsweetened, preferably Dutch-processed for deeper color and smoother flavor
- Baking soda – 1 teaspoon; helps the cake rise and stay light
- Baking powder – 1 teaspoon; for additional lift
- Salt – ½ teaspoon; balances sweetness and enhances flavor
- Granulated sugar – 2 cups (400 grams); classic sweetener that caramelizes slightly for depth
- Vegetable oil – 1 cup (240 ml); keeps the crumb moist and tender (can substitute with melted coconut oil for subtle flavor)
- Large eggs – 3, at room temperature; adds structure and richness
- Buttermilk – 1 cup (240 ml), room temperature; tenderizes the crumb and adds tang (can swap with dairy-free milk plus 1 tablespoon lemon juice for a vegan option)
- Vanilla extract – 2 teaspoons; for aroma and warmth (I prefer Nielsen-Massey for consistent quality)
- White vinegar – 1 tablespoon; reacts with baking soda for lift and subtle tang
- Black gel food coloring – 1 tablespoon; for that signature deep black color without altering flavor (use sparingly to avoid bitterness)
For the Spiderweb Frosting:
- Cream cheese – 8 ounces (226 grams), softened; adds tang and creaminess
- Unsalted butter – ½ cup (113 grams), softened; for smooth texture and richness
- Powdered sugar – 3 cups (360 grams), sifted; sweetens and thickens the frosting
- Vanilla extract – 1 teaspoon; flavor enhancer
- Milk or cream – 1 to 2 tablespoons; adjust consistency
The ingredients are pretty flexible—you can swap regular flour with almond flour for a gluten-free twist, or use coconut sugar if you want a less refined sweetener. I usually avoid artificial flavors here because the cocoa and cream cheese carry enough natural depth. For the frosting’s spiderweb effect, you just need a steady hand and a piping bag or a simple zip-top bag with a snipped corner.
Equipment Needed
- Two 9-inch (23 cm) round cake pans: I recommend non-stick or well-greased metal pans for even heat distribution. Glass pans work but may alter baking time slightly.
- Mixing bowls: One large for the batter and another for the frosting.
- Electric mixer or stand mixer: While you can mix by hand, this speeds up the process and helps achieve a smoother batter and frosting.
- Measuring cups and spoons: Precise measurements matter here, especially with baking soda and vinegar.
- Rubber spatula: For folding ingredients gently and scraping bowls.
- Cooling racks: Essential for letting the cake layers cool evenly before frosting, preventing melting or sliding.
- Piping bag or sturdy plastic bag: For creating the spiderweb design with the frosting.
For those on a budget, a hand mixer works fine, and if you don’t have cake pans, you can use square pans but adjust baking time accordingly. I’ve found that keeping pans well-greased and lined with parchment paper helps the cakes come out cleanly, which is especially important for presentation. And if you’re a fan of multitasking in the kitchen, prepping the frosting while the cakes bake can save time and keep the momentum going.
Preparation Method
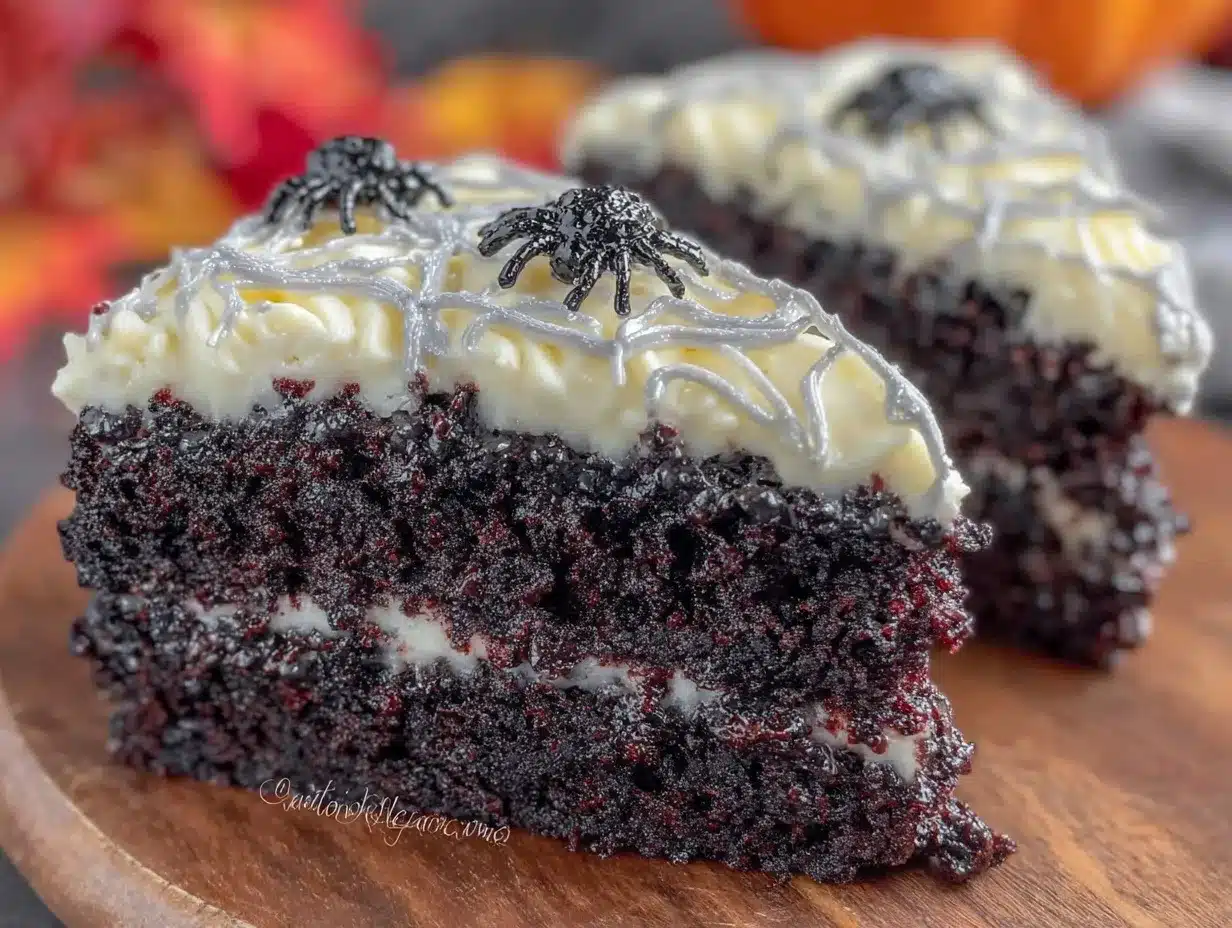
- Preheat your oven to 350°F (175°C). Grease and flour your two 9-inch round cake pans, then line the bottom with parchment paper to prevent sticking. This step ensures easy removal and keeps the cake layers intact.
- In a medium bowl, whisk together dry ingredients: 2 ½ cups all-purpose flour, ¼ cup unsweetened cocoa powder, 1 teaspoon baking soda, 1 teaspoon baking powder, and ½ teaspoon salt. Make sure they’re well combined to avoid uneven pockets of baking soda or cocoa.
- In a large bowl, beat the wet ingredients: 2 cups granulated sugar with 1 cup vegetable oil until smooth. Add 3 room-temperature eggs one at a time, beating well after each addition. Stir in 1 cup buttermilk, 2 teaspoons vanilla extract, 1 tablespoon white vinegar, and 1 tablespoon black gel food coloring. The batter will look dark but vibrant—don’t worry if it seems runny; that’s normal.
- Slowly add the dry ingredients to the wet mixture, mixing just until combined. Overmixing can lead to a tough crumb, so stop as soon as you see no streaks of flour.
- Divide the batter evenly between the two pans. Tap the pans gently on the counter to release any large air bubbles. Place in the oven and bake for 30-35 minutes, or until a toothpick inserted in the center comes out clean or with a few moist crumbs.
- While the cakes bake, prepare the spiderweb frosting: Beat 8 ounces softened cream cheese with ½ cup softened unsalted butter until smooth and creamy. Gradually add 3 cups powdered sugar and 1 teaspoon vanilla extract. If the frosting is too thick, add 1 to 2 tablespoons milk or cream until it spreads nicely but still holds its shape.
- Let the cakes cool in the pans for 10 minutes, then run a knife around the edges and invert onto cooling racks. Cool completely before frosting, or the cream cheese frosting might melt.
- Assemble the cake by placing one layer on your serving plate. Spread a generous layer of frosting evenly over the top. Add the second layer and cover the entire cake with a thin crumb coat. Chill for 15 minutes to set.
- Apply a final thick layer of frosting. To create the spiderweb design, pipe concentric circles of frosting or chocolate glaze starting from the center. Use a toothpick or skewer to drag lines from the center outward, forming the web pattern. It’s easier than it looks—steady hands help, but a little imperfection adds charm.
Pro tip: If your frosting feels too soft to pipe, pop it in the fridge for 10 minutes to firm up. Also, when mixing in the food coloring, add it gradually to avoid going too dark or bitter. The cake should feel moist to the touch but springy when gently pressed.
Cooking Tips & Techniques
Getting the perfect black velvet cake texture takes some patience, but a few tricks make it easier. First, make sure your ingredients are at room temperature. Eggs and buttermilk blend more evenly this way, lending to a tender crumb. When mixing dry ingredients into wet, go slow and don’t overdo it—overmixing can make the crumb tough, which is the last thing you want in a velvet cake.
The black food coloring is key for that dramatic effect, but be careful not to add too much; gel colors work best to avoid thinning your batter. I learned the hard way that liquid food coloring can make the batter runny and the crumb dense. Also, vinegar and buttermilk react with baking soda to create a light, airy texture, so don’t skip them!
For the spiderweb frosting, using a piping bag with a small round tip gives you the most control. If you don’t have one, a zip-top bag with a tiny corner cut off works just fine. When dragging the toothpick through the circles, do it in one smooth motion for the best web effect. If the frosting softens too much, chill it briefly to firm up before decorating.
Finally, always cool your cake layers completely before frosting. Otherwise, the cream cheese frosting can melt into a sticky mess. I sometimes chill the layers in the fridge for 20 minutes if I’m in a hurry—it helps the cake hold its shape better during assembly.
Variations & Adaptations
This black velvet cake recipe is quite versatile, so feel free to play around with it depending on your preferences or dietary needs.
- Gluten-Free: Substitute the all-purpose flour with a gluten-free baking blend 1:1. Just make sure it contains xanthan gum or add 1 teaspoon for structure.
- Vegan Version: Use flax eggs (3 tablespoons ground flaxseed mixed with 6 tablespoons water) instead of eggs, swap buttermilk for almond or soy milk plus lemon juice, and use vegan cream cheese and butter substitutes for the frosting.
- Flavor Twists: Add a teaspoon of espresso powder to the batter for a mocha undertone that pairs beautifully with the cocoa. Or mix in orange zest for a bright autumnal note.
- Alternative Frostings: Try a dark chocolate ganache or whipped coconut cream if you want a lighter, dairy-free topping.
- Seasonal Decorations: Instead of the spiderweb, you can decorate with edible candy spiders, pumpkin-shaped candies, or even a drizzle of caramel for a spooky-sweet touch.
Personally, one year I swapped the black food coloring for natural activated charcoal powder. It gave a slightly different texture and earthier flavor but was a hit for those avoiding artificial colors. I also experimented with layering this cake alongside a no-bake pumpkin cheesecake for a Halloween dessert table that balanced richness and lightness perfectly.
Serving & Storage Suggestions
This cake is best served at room temperature so the frosting is soft and the crumb tender. I like to slice it just before guests arrive to keep it fresh. For presentation, a simple black or orange cake stand with a few autumn leaves or mini pumpkins nearby sets the mood without overdoing it.
Pair this dessert with a cup of strong coffee or a spiced chai latte to complement the rich cocoa flavors. If you want to keep things festive, a sparkling cranberry cocktail adds a nice contrast.
Store leftover cake tightly covered in the refrigerator for up to 4 days. For longer storage, you can freeze individual slices wrapped in plastic wrap and foil for up to 2 months. When ready to enjoy, thaw overnight in the fridge and bring to room temperature before serving to regain that signature softness.
Interestingly, the flavors tend to mellow and deepen a bit after a day, making the cake taste even more harmonious if you can wait. Just remember the frosting can firm up in the fridge, so a few minutes at room temperature helps before slicing.
Nutritional Information & Benefits
Each slice of this Decadent Black Velvet Halloween Cake offers approximately:
| Nutrient | Amount (per slice) |
|---|---|
| Calories | 320 kcal |
| Fat | 18 g |
| Saturated Fat | 7 g |
| Carbohydrates | 38 g |
| Sugar | 28 g |
| Protein | 4 g |
| Fiber | 1.5 g |
The key ingredients bring some nutritional perks: cocoa powder is rich in antioxidants and adds a subtle complexity without extra sugar. Using buttermilk introduces probiotics and calcium, while cream cheese provides a dose of protein and vitamin A. If you swap regular sugar for coconut sugar or a natural sweetener, you can reduce the glycemic impact slightly.
One note: This recipe contains dairy and eggs, so it’s not suitable for those with allergies to these ingredients unless adapted. For gluten-free eaters, using a certified gluten-free flour blend works well, as does the vegan adaptation mentioned earlier.
From a wellness perspective, I find this cake a satisfying treat that doesn’t feel like overindulgence—just a rich, well-balanced dessert you can enjoy without guilt when shared thoughtfully.
Conclusion
This Decadent Black Velvet Halloween Cake with Spiderweb Frosting is more than just a seasonal dessert—it’s a quiet celebration of texture, flavor, and atmosphere all rolled into one. Whether you’re baking it for a small gathering or as your own late-night treat, it’s a recipe that invites you to slow down and savor each bite.
Feel free to customize it with your favorite twists or pair it with comforting dishes like the loaded baked potato soup for a full cozy meal. Personally, I love how the spiderweb frosting adds just the right touch of Halloween whimsy without feeling overdone—like the perfect little secret in every slice.
Give this cake a try, and don’t hesitate to share your variations or questions below. There’s something special about recipes that bring people together, even if it’s just in spirit, one slice at a time.
FAQs
Can I make this black velvet cake without food coloring?
You can try using natural colorants like activated charcoal powder, but the classic black velvet look comes from the gel food coloring. Without it, the cake will be more of a dark chocolate brown.
How long can I store the cake after baking?
Store the cake covered in the refrigerator for up to 4 days. For longer storage, freeze slices wrapped tightly for up to 2 months.
Can I prepare this cake in advance for a party?
Absolutely. Bake the layers a day ahead and refrigerate them well wrapped. Assemble and frost the cake on the day of the event for the freshest taste.
What if I don’t have buttermilk?
Mix 1 cup of milk with 1 tablespoon of lemon juice or white vinegar and let it sit for 5 minutes. This homemade buttermilk substitute works great in the recipe.
Is the spiderweb frosting difficult to make?
Not at all! The spiderweb effect is a simple piping technique that anyone can master with a little patience. Using a toothpick to drag lines through concentric circles creates the illusion of a web in just a few minutes.
Pin This Recipe!
Decadent Black Velvet Halloween Cake Recipe with Easy Spiderweb Frosting
A rich, moist black velvet cake with a dramatic black crumb and creamy spiderweb cream cheese frosting, perfect for Halloween or cozy gatherings.
- Prep Time: 20 minutes
- Cook Time: 30-35 minutes
- Total Time: 55-60 minutes
- Yield: 12 servings 1x
- Category: Dessert
- Cuisine: American
Ingredients
- 2 ½ cups (312 grams) all-purpose flour
- ¼ cup (25 grams) unsweetened cocoa powder, preferably Dutch-processed
- 1 teaspoon baking soda
- 1 teaspoon baking powder
- ½ teaspoon salt
- 2 cups (400 grams) granulated sugar
- 1 cup (240 ml) vegetable oil (can substitute with melted coconut oil)
- 3 large eggs, room temperature
- 1 cup (240 ml) buttermilk, room temperature (or dairy-free milk plus 1 tablespoon lemon juice for vegan option)
- 2 teaspoons vanilla extract
- 1 tablespoon white vinegar
- 1 tablespoon black gel food coloring
- 8 ounces (226 grams) cream cheese, softened (for frosting)
- ½ cup (113 grams) unsalted butter, softened (for frosting)
- 3 cups (360 grams) powdered sugar, sifted (for frosting)
- 1 teaspoon vanilla extract (for frosting)
- 1 to 2 tablespoons milk or cream (for frosting consistency)
Instructions
- Preheat your oven to 350°F (175°C). Grease and flour two 9-inch round cake pans and line the bottoms with parchment paper.
- In a medium bowl, whisk together the dry ingredients: flour, cocoa powder, baking soda, baking powder, and salt.
- In a large bowl, beat the granulated sugar and vegetable oil until smooth. Add eggs one at a time, beating well after each addition.
- Stir in buttermilk, vanilla extract, white vinegar, and black gel food coloring until combined.
- Slowly add the dry ingredients to the wet mixture, mixing just until combined. Avoid overmixing.
- Divide the batter evenly between the prepared pans. Tap pans gently to release air bubbles.
- Bake for 30-35 minutes or until a toothpick inserted in the center comes out clean or with a few moist crumbs.
- While cakes bake, prepare the frosting: Beat cream cheese and butter until smooth. Gradually add powdered sugar and vanilla extract. Add milk or cream as needed for spreading consistency.
- Let cakes cool in pans for 10 minutes, then invert onto cooling racks and cool completely.
- Assemble the cake by placing one layer on a serving plate. Spread a generous layer of frosting on top.
- Add the second layer and cover the entire cake with a thin crumb coat. Chill for 15 minutes to set.
- Apply a final thick layer of frosting. Pipe concentric circles of frosting or chocolate glaze starting from the center.
- Use a toothpick or skewer to drag lines from the center outward to create a spiderweb design.
- If frosting is too soft to pipe, chill it in the fridge for 10 minutes before decorating.
Notes
Use gel food coloring sparingly to avoid bitterness. Ensure ingredients are at room temperature for best texture. Avoid overmixing batter to keep crumb tender. Chill frosting if too soft to pipe. Cool cake layers completely before frosting to prevent melting.
Nutrition
- Serving Size: 1 slice (1/12 of cak
- Calories: 320
- Sugar: 28
- Fat: 18
- Saturated Fat: 7
- Carbohydrates: 38
- Fiber: 1.5
- Protein: 4
Keywords: black velvet cake, Halloween cake, spiderweb frosting, cream cheese frosting, spooky dessert, easy Halloween recipe, moist chocolate cake