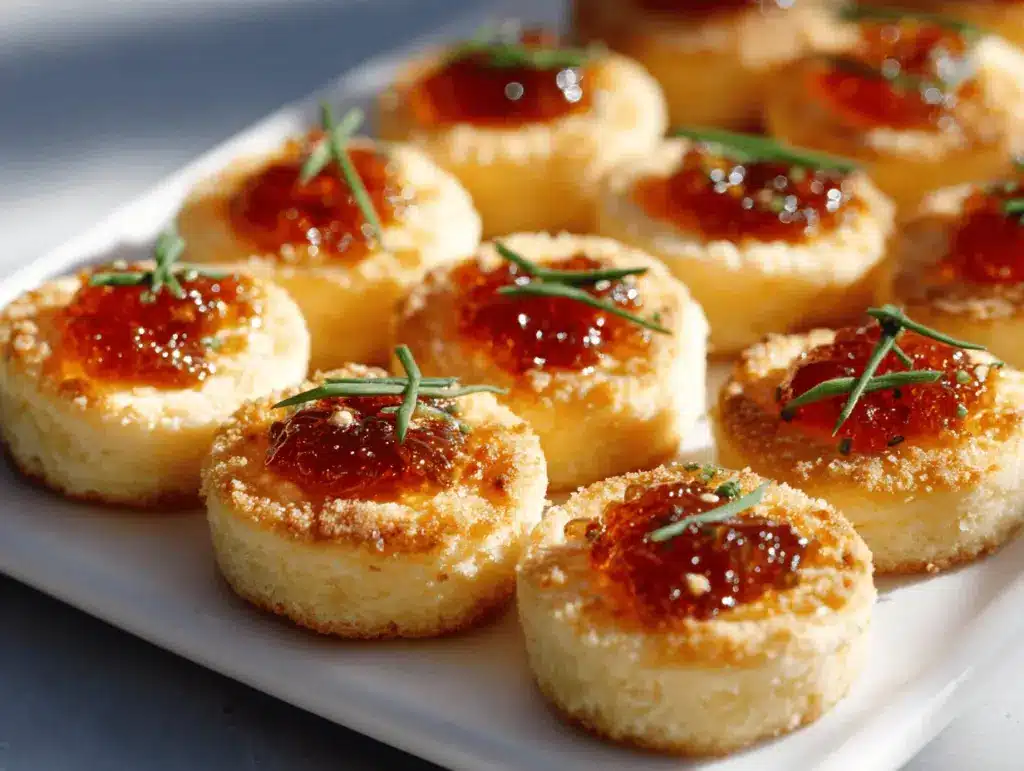
The first time I pulled a tray of these cheesy thumbprint appetizers out of the oven, the kitchen filled with the buttery scent of sharp cheddar and a little hit of pepper jelly warmth. It’s one of those smells that almost makes you forget about the guests and just grab a bite right off the baking sheet—seriously, it’s hard to resist! I stumbled into this recipe one holiday season when I needed a last-minute party snack, and oh boy, did it steal the show. These little bites look fancy, but they’re actually so easy, and the flavor combination is just… wow.
I’ve always loved the classic thumbprint cookie, but honestly, I’m more of a savory snacker. That’s when the idea hit me—why not swap out the sweet jam for a fiery hot pepper jelly and make the base cheesy and crumbly? The result? An appetizer that hits every note: crispy edges, melty cheese, a hint of tang, and that addictive sweet-heat center. Whether it’s game day, a holiday gathering, or just a Friday night with friends, these cheesy thumbprint appetizers are my go-to recipe. They’re perfect for picky eaters and adventurous ones alike (plus, you can make them ahead—hello, stress-free hosting!).
After testing this cheesy thumbprint appetizers recipe more times than I can count, I can tell you it’s foolproof, flexible, and always gets compliments. You don’t need any fancy ingredients, and you can totally make them your own. Trust me, if you want to be the person everyone raves about at the next party, just show up with a plate of these cheesy thumbprint appetizers with hot pepper jelly. Let’s get into what makes them so magical!
Why You’ll Love This Cheesy Thumbprint Appetizers Recipe
There’s a reason this recipe keeps making its way back to my table for every celebration (and sometimes just a Tuesday night). I’ve tested loads of party snacks, but these cheesy thumbprint appetizers are always the first to disappear. Here’s why you’ll find yourself making them again and again:
- Quick & Easy Prep: You can whip these up in under 30 minutes—no chilling, no waiting. Just mix, shape, bake, and fill.
- Simple Pantry Ingredients: Everything you need is probably already in your fridge or pantry. No last-minute grocery runs required!
- Perfect for Any Occasion: Brunch, holiday parties, potlucks, or even tailgates—these thumbprints fit right in and always look impressive.
- Crowd-Pleasing Flavors: The melty cheese paired with spicy-sweet hot pepper jelly is a combo that everyone loves (even the picky eaters in my family ask for seconds).
- Make-Ahead Friendly: You can prep the dough in advance or even freeze the baked thumbprints. Just add the jelly when you’re ready to serve.
- A Little Fancy, But Not Fussy: These appetizers look like something you’d get at a trendy bistro, but honestly, they’re as easy as making drop cookies.
- Customizable: Swap the cheese, try a different jelly, or make them gluten-free if you need to. The base recipe is super forgiving.
What really sets these cheesy thumbprint appetizers apart is the technique: blending the cheese right into the dough gives you a rich, crumbly texture that’s nothing like a regular cracker. And by using hot pepper jelly, you get that pop of color and flavor in every bite. It’s a playful twist that feels a little nostalgic (like those jam thumbprints your grandma made), but 100% grown-up. If you’re looking for an appetizer that’s as fun to make as it is to eat, this is it.
What Ingredients You Will Need for Cheesy Thumbprint Appetizers
This recipe uses a handful of simple, flavorful ingredients to create bite-sized cheesy perfection—plus a little kick from hot pepper jelly! I love that you won’t need anything out of the ordinary, and there’s room to experiment if you’re feeling creative.
- Sharp Cheddar Cheese, freshly grated (1 1/2 cups / 170g) (the sharper, the better for bold flavor—Cabot or Tillamook are my go-to brands)
- All-Purpose Flour (1 cup / 125g) (you can swap in a gluten-free blend if needed)
- Unsalted Butter, softened (1/2 cup / 113g) (room temperature makes it easy to mix)
- Egg Yolk (1 large) (adds richness and helps bind the dough)
- Salt (1/2 teaspoon) (balances the flavors—don’t skip it!)
- Cayenne Pepper (1/4 teaspoon, optional) (adds a gentle heat, but you can leave it out if you’re sensitive to spice)
- Hot Pepper Jelly (about 1/2 cup / 120ml) (I’ve used both store-bought and homemade—look for red or green pepper jelly for that bright, festive look)
- Fresh Chives or Parsley, finely chopped (for garnish, optional) (adds a pop of color and flavor on top)
If you want to get creative, you can mix things up:
- Swap cheddar for gouda, pepper jack, or even a smoked cheese for a twist.
- Try a different jelly—apricot or fig preserves are delicious with cheese, too!
- For a gluten-free version, I’ve had good luck with King Arthur’s Measure-for-Measure blend.
- If you need a dairy-free version, try a plant-based butter and shredded vegan cheese (results vary, but it works in a pinch).
Honestly, you can’t go wrong with the basics here. The real magic is that cheesy, crumbly dough with that dollop of spicy-sweet jelly in the middle—yum.
Equipment Needed
One of the best parts about this cheesy thumbprint appetizers recipe is that you don’t need a bunch of fancy gadgets. Here’s what I use every time:
- Mixing Bowl: A medium-sized bowl for mixing everything together. Stainless steel or glass works well.
- Box Grater or Food Processor: Freshly grated cheese melts better and tastes richer than pre-shredded. A box grater is perfect, but a food processor saves time (and your knuckles!) if you’re doubling the batch.
- Hand Mixer or Sturdy Wooden Spoon: If you don’t have a mixer, good old elbow grease works just fine. I’ve even made these with just a fork in a pinch.
- Baking Sheet: Lined with parchment paper for easy cleanup (a silicone baking mat works, too).
- Measuring Cups & Spoons: For accuracy, especially on the flour and butter. I love my collapsible set for small kitchens.
- Small Spoon or Melon Baller: For making those perfect thumbprint wells—your thumb works, but a melon baller makes them uniform.
- Cooling Rack: Optional, but helps keep the bottoms crisp after baking.
If you’re missing a tool, don’t stress. I’ve shaped these by hand, skipped the cooling rack when I was short on space, and even used a wine cork to make the thumbprints once (hey, whatever works!). Just give your baking sheet a quick wipe-down between batches to keep things crisp.
How to Make Cheesy Thumbprint Appetizers with Hot Pepper Jelly

-
Preheat and Prep:
- Preheat your oven to 350°F (180°C). Line a baking sheet with parchment paper or a silicone baking mat for easy cleanup.
-
Grate the Cheese:
- Freshly grate 1 1/2 cups (170g) sharp cheddar cheese. Trust me, skip the bagged stuff—it clumps less and melts beautifully.
-
Cream the Butter and Cheese:
- In a medium bowl, beat together 1/2 cup (113g) softened unsalted butter and the grated cheese until well combined. This takes about 2-3 minutes with a hand mixer. The mixture should be creamy and a little fluffy.
-
Add the Egg Yolk:
- Mix in 1 large egg yolk. Beat until incorporated. The dough will look a little sticky at this point—totally normal.
-
Combine Dry Ingredients:
- In a separate small bowl, whisk together 1 cup (125g) all-purpose flour, 1/2 teaspoon salt, and 1/4 teaspoon cayenne pepper (if using).
-
Mix It All Together:
- Add the dry ingredients to the butter-cheese mixture. Stir until a soft dough forms. If it’s too sticky, add a tablespoon of flour at a time until it’s workable, but don’t overdo it.
-
Shape the Dough:
- Pinch off walnut-sized pieces (about 1 tablespoon) and roll into balls. Place them about 2 inches apart on your prepared baking sheet.
-
Make Thumbprints:
- Press your thumb, a small spoon, or a melon baller gently into the center of each ball to create a well. Don’t press all the way through—just enough to hold the jelly later.
-
Bake:
- Bake for 13-15 minutes, or until the edges are golden and the tops look set. Ovens vary—mine are perfect at 14 minutes. If any thumbprints puff up too much, gently press the wells again with the back of a spoon right after baking.
-
Fill with Jelly:
- Let the thumbprints cool for 2-3 minutes, then spoon about 1/2 teaspoon hot pepper jelly into the center of each one. If you overfill, the jelly will run, so keep it neat.
-
Garnish and Serve:
- Sprinkle with chopped chives or parsley for a fresh finish. Cool slightly before serving—these taste amazing warm or at room temp.
Prep Tips: If your dough is too soft, pop it in the fridge for 10 minutes before shaping. And don’t skip the parchment—cleanup is a breeze, and the bottoms won’t stick. If you’re making these ahead, bake and cool the thumbprints, then fill with jelly right before serving for the best texture.
Cooking Tips & Techniques for Perfect Cheesy Thumbprint Appetizers
There are a few tricks I’ve learned (some the hard way!) to make sure these cheesy thumbprints come out just right every time:
- Use freshly grated cheese—the pre-shredded kind has a coating that makes the dough drier and less flavorful.
- Don’t overwork the dough. Mix until just combined; too much handling makes the thumbprints dense instead of tender.
- Chill if necessary. If your kitchen is warm, or the dough feels sticky, a quick chill helps everything hold shape in the oven.
- Watch the bake time closely. You want golden edges, not dark brown. Start checking at the 12-minute mark.
- Re-press thumbprints after baking if they puff up—just a gentle press with a spoon is all you need.
- For even filling: Use a small spoon or piping bag to add the jelly. It’s less messy, and you get that perfect pop of color.
- Batch tip: If you’re making a double batch, bake one tray at a time for the most even browning.
I’ve definitely burned a few bottoms by baking too long (oops)—so keep an eye on them! And don’t be afraid to adjust the jelly filling amount to your taste. Some folks love extra heat, others prefer a tiny dab. The best part? Once you get the feel for these, you can whip them up on autopilot.
Variations & Adaptations for Cheesy Thumbprint Appetizers
One of the reasons I keep coming back to this cheesy thumbprint appetizers recipe is how easy it is to switch things up. Here are some of my favorite variations:
- Gluten-Free: Sub in a cup-for-cup gluten-free flour blend. I’ve had best results with King Arthur’s or Bob’s Red Mill; texture is still crumbly and delicious.
- Different Cheeses: Try smoked gouda for a deeper flavor, pepper jack for extra heat, or even a blend of cheddar and parmesan for a sharper bite. Just keep the total cheese amount the same.
- Jelly Swap: If hot pepper jelly isn’t your thing, use apricot preserves, fig jam, or even cranberry sauce for a sweet-tart twist. I once tried bacon jam—no regrets!
- Dairy-Free: Use plant-based butter and your favorite shredded vegan cheese. The texture changes a bit, but the flavor is still party-worthy.
- Herb Infusion: Add 1 teaspoon finely chopped fresh rosemary or thyme to the dough for a savory, aromatic kick.
- Mini Muffin Pan Method: For a uniform shape, press dough balls into a mini muffin tin and make a well in the center. Bakes up perfectly round every time.
One of my go-tos is a combo of sharp white cheddar and a spoonful of jalapeño jelly—especially good for summer BBQs. Don’t be afraid to play around with what you have on hand. The base is super forgiving, and every version I’ve tested has been a winner.
Serving & Storage Suggestions
These cheesy thumbprint appetizers are at their absolute best served slightly warm—right off the tray is ideal. I love arranging them on a rustic wooden board with extra jelly on the side and a few sprigs of fresh herbs. They pair beautifully with crisp white wine, sparkling water with lime, or even a cold beer for casual gatherings.
If you’re prepping ahead, bake the thumbprints and let them cool completely. Store in an airtight container at room temperature for up to 2 days, or in the fridge for up to 5 days. Hold off on adding the jelly until just before serving to keep them from getting soggy. Reheat in a 300°F (150°C) oven for 5-7 minutes to crisp them up again, then fill with jelly. They also freeze well (unfilled)—just thaw, reheat, and finish with jelly before serving. Honestly, the flavors deepen after a day, making leftovers (if you have any) extra tasty.
Nutritional Information & Benefits
Each cheesy thumbprint appetizer (with jelly) comes in around 85 calories, with about 5g fat, 6g carbs, and 3g protein per piece. Using sharp cheddar means you get a good boost of calcium and a bit of protein, so they’re not just empty carbs. Hot pepper jelly adds a little sweetness and heat, but you can use a lighter jelly or sugar-free version if you want to cut back.
This recipe is naturally vegetarian, and you can make it gluten-free or dairy-free with the swaps mentioned earlier. Be aware of cheese and flour allergens, and check your pepper jelly ingredients if you need to avoid certain additives. I love that you can sneak in extra herbs for a wellness boost—plus, the portion control makes it easy to enjoy a little treat without overdoing it.
Conclusion
Cheesy thumbprint appetizers with hot pepper jelly are more than just a party snack—they’re the kind of treat people remember and ask for again and again. They’re easy, endlessly customizable, and packed with flavor in every bite. I love making these for friends and family, and honestly, they never let me down.
Don’t be afraid to tweak the recipe to make it your own. Try different cheeses, swap the jelly, or add your favorite herbs. I hope you’ll fall in love with these cheesy thumbprint appetizers as much as I have—let me know in the comments if you try them, and tag me if you share a pic on Pinterest or Instagram!
Happy baking, and may your next gathering be filled with good food, laughter, and (of course) a plate of these irresistible bites!
FAQs About Cheesy Thumbprint Appetizers with Hot Pepper Jelly
Can I make these cheesy thumbprint appetizers ahead of time?
Yes! Bake the thumbprints and store them (unfilled) in an airtight container. Just add the hot pepper jelly right before serving for the best crunch and flavor.
What if I don’t have hot pepper jelly?
No worries—try apricot preserves, red pepper jelly, or even a spicy tomato jam. The sweet-spicy combo is what makes these pop, but use what you love.
Can I freeze cheesy thumbprint appetizers?
Absolutely. Freeze the baked (but unfilled) thumbprints in a zip-top bag for up to 1 month. Thaw, reheat, and fill with jelly when you’re ready to serve.
What’s the best cheese for this recipe?
Sharp cheddar is my favorite for bold flavor, but gouda, pepper jack, or even a blend with parmesan work well. Just avoid soft, melty cheeses like mozzarella—they don’t hold the dough together as well.
How do I keep the thumbprints from spreading too much?
If your dough feels soft or the kitchen is warm, chill the shaped dough balls for 10-15 minutes before baking. This helps them keep their shape and gives you perfect wells for the jelly every time.
Pin This Recipe!

Cheesy Thumbprint Appetizers with Hot Pepper Jelly

These cheesy thumbprint appetizers combine a buttery, crumbly cheddar base with a dollop of spicy-sweet hot pepper jelly for the ultimate party snack. Quick to make, endlessly customizable, and always a crowd-pleaser, they’re perfect for any gathering.
- Prep Time: 15 minutes
- Cook Time: 15 minutes
- Total Time: 30 minutes
- Yield: 24 appetizers 1x
- Category: Appetizer
- Cuisine: American
Ingredients
- 1 1/2 cups (6 oz) sharp cheddar cheese, freshly grated
- 1 cup (4.25 oz) all-purpose flour
- 1/2 cup (1 stick) unsalted butter, softened
- 1 large egg yolk
- 1/2 teaspoon salt
- 1/4 teaspoon cayenne pepper (optional)
- 1/2 cup hot pepper jelly (red or green)
- Fresh chives or parsley, finely chopped (for garnish, optional)
Instructions
- Preheat your oven to 350°F (180°C). Line a baking sheet with parchment paper or a silicone baking mat.
- Freshly grate the cheddar cheese.
- In a medium bowl, beat together the softened butter and grated cheese until well combined and creamy (about 2-3 minutes with a hand mixer).
- Mix in the egg yolk until incorporated. The dough will look a little sticky.
- In a separate small bowl, whisk together the flour, salt, and cayenne pepper (if using).
- Add the dry ingredients to the butter-cheese mixture. Stir until a soft dough forms. If too sticky, add a tablespoon of flour at a time until workable.
- Pinch off walnut-sized pieces (about 1 tablespoon) and roll into balls. Place 2 inches apart on the prepared baking sheet.
- Press your thumb, a small spoon, or a melon baller gently into the center of each ball to create a well (do not press all the way through).
- Bake for 13-15 minutes, or until the edges are golden and the tops look set. If any thumbprints puff up, gently press the wells again with the back of a spoon right after baking.
- Let the thumbprints cool for 2-3 minutes, then spoon about 1/2 teaspoon hot pepper jelly into the center of each one.
- Sprinkle with chopped chives or parsley for garnish. Serve warm or at room temperature.
Notes
For best results, use freshly grated cheese and avoid overworking the dough. If the dough is too soft, chill for 10 minutes before shaping. Fill with jelly just before serving to keep the thumbprints crisp. These freeze well unfilled; thaw, reheat, and fill before serving. Try different cheeses or jellies for fun variations.
Nutrition
- Serving Size: 1 appetizer
- Calories: 85
- Sugar: 1
- Sodium: 110
- Fat: 5
- Saturated Fat: 3
- Carbohydrates: 6
- Protein: 3
Keywords: cheesy thumbprint appetizers, hot pepper jelly, party snack, cheddar, savory thumbprint, easy appetizer, make ahead, vegetarian, finger food


