
“You’ve got to see this!” my friend texted me one lazy Saturday afternoon. Honestly, I wasn’t expecting much—just another cute holiday appetizer idea. But when I saw that Flavorful Bunny Shaped Cheese Ball with Crackers, my skepticism melted away as fast as the cream cheese in the mix. I remember thinking, “Who even has the time or patience to shape cheese into a bunny?” Well, it turns out, this recipe is exactly the kind of playful yet simple dish that sneaks onto your table and becomes the star—no fancy skills required.
That weekend, with a few basic ingredients and some crackers on hand, I gave it a shot. The process was surprisingly quick, and the results? Let’s just say the bunny didn’t last long before everyone was digging in. The savory blend of cheeses, herbs, and spices packed a punch that felt both comforting and festive. Plus, there’s something undeniably fun about a cheese ball shaped like a bunny hopping onto your holiday spread.
What really stuck with me was how this recipe turned a casual snack into a conversation starter. Every detail, from the creamy texture to the crunchy crackers served alongside, felt like a little surprise for my guests. I find myself making it not just for holidays but whenever I want to lift spirits without fuss. It’s one of those recipes that feels like a cozy secret—simple, yet memorable.
Why You’ll Love This Recipe
Here’s why this Flavorful Bunny Shaped Cheese Ball isn’t your average cheese ball—and why it’s become a personal go-to for festive snacking:
- Quick & Easy: Ready in about 20 minutes, it’s perfect for those last-minute gatherings or when you’re craving something cheesy and fun.
- Simple Ingredients: No need for specialty stores—just cream cheese, cheddar, fresh herbs, and a handful of pantry staples.
- Perfect for Holidays & Parties: The bunny shape makes it a charming centerpiece for spring celebrations, Easter brunches, or any cozy get-together.
- Crowd-Pleaser: Kids and adults alike love it—probably because it’s both adorable and packed with flavor.
- Unbelievably Delicious: The blend of sharp cheddar, garlic, and fresh chives creates a savory bite that’s way better than store-bought options.
What sets this cheese ball apart is the playful presentation combined with a thoughtfully balanced flavor profile. I’ve tried countless cheese ball recipes, but this one nails that creamy yet slightly tangy texture, with herbs that bring a fresh note to every bite. Plus, shaping it like a bunny adds this unexpected charm that always gets smiles.
Whether I’m pairing it with buttery crackers or fresh veggies, this recipe never fails to surprise me with how easy it is to put together and how quickly it disappears. Honestly, it’s become a staple when I want to impress guests without turning the kitchen upside down.
What Ingredients You Will Need
This recipe uses simple, wholesome ingredients to deliver bold flavor and a fun shape without any fuss. Most are pantry staples, making it easy to throw together even on short notice.
- Cream Cheese (8 oz / 225 g), softened: The creamy base that makes the cheese ball smooth and spreadable. I prefer Philadelphia brand for its consistent texture.
- Sharp Cheddar Cheese (1 cup / 110 g), shredded: Adds that classic tangy kick and a bit of color.
- Garlic Powder (1 tsp): Just enough to bring warmth without overpowering.
- Fresh Chives (2 tbsp), finely chopped: Brings a mild onion flavor and vibrant green flecks. If fresh chives aren’t available, green onion works too.
- Worcestershire Sauce (1 tsp): Adds a subtle depth and umami note.
- Salt (½ tsp): To balance flavors.
- Black Pepper (¼ tsp), freshly ground: A subtle kick that livens up the mix.
- Crackers for serving: Choose sturdy crackers like water crackers or buttery rounds that hold up well to spreading.
Optional toppings and decorations:
- Black peppercorns or whole cloves for eyes
- Small sliced olives or cherry tomato pieces for the nose
- Fresh parsley or dill sprigs as “fur” texture
For a gluten-free option, you can swap the crackers for gluten-free varieties or crisp veggie sticks. I also experimented once with adding a dash of smoked paprika for a smoky twist that worked surprisingly well.
Equipment Needed
- Mixing Bowl: A medium-sized bowl to combine all your ingredients comfortably.
- Hand Mixer or Stand Mixer: Helpful for blending the cream cheese and cheddar smoothly, but you can also use a sturdy spoon if you prefer.
- Plastic Wrap or Parchment Paper: To shape and chill the cheese ball without sticking.
- Small Knife or Toothpicks: Perfect for adding facial details and shaping ears.
- Serving Plate or Platter: To display your bunny cheese ball with crackers around it.
If you don’t have a mixer, no worries—just make sure the cream cheese is softened well to avoid lumps. I’ve also used silicone molds once when pressed for time, but hand-shaping is more satisfying and personal. For cleanup, plastic wrap is a lifesaver to keep everything tidy.
Preparation Method
- Soften the Cream Cheese: Leave the cream cheese out at room temperature for about 30 minutes beforehand to ensure it’s soft enough to mix easily.
- Combine Ingredients: In your mixing bowl, beat the softened cream cheese and shredded cheddar until smooth and creamy—about 2 to 3 minutes with a hand mixer (or 5 minutes by hand). The mixture should be well blended with no lumps.
- Add Flavorings: Stir in the garlic powder, Worcestershire sauce, salt, pepper, and chopped chives. Mix gently until everything is evenly incorporated.
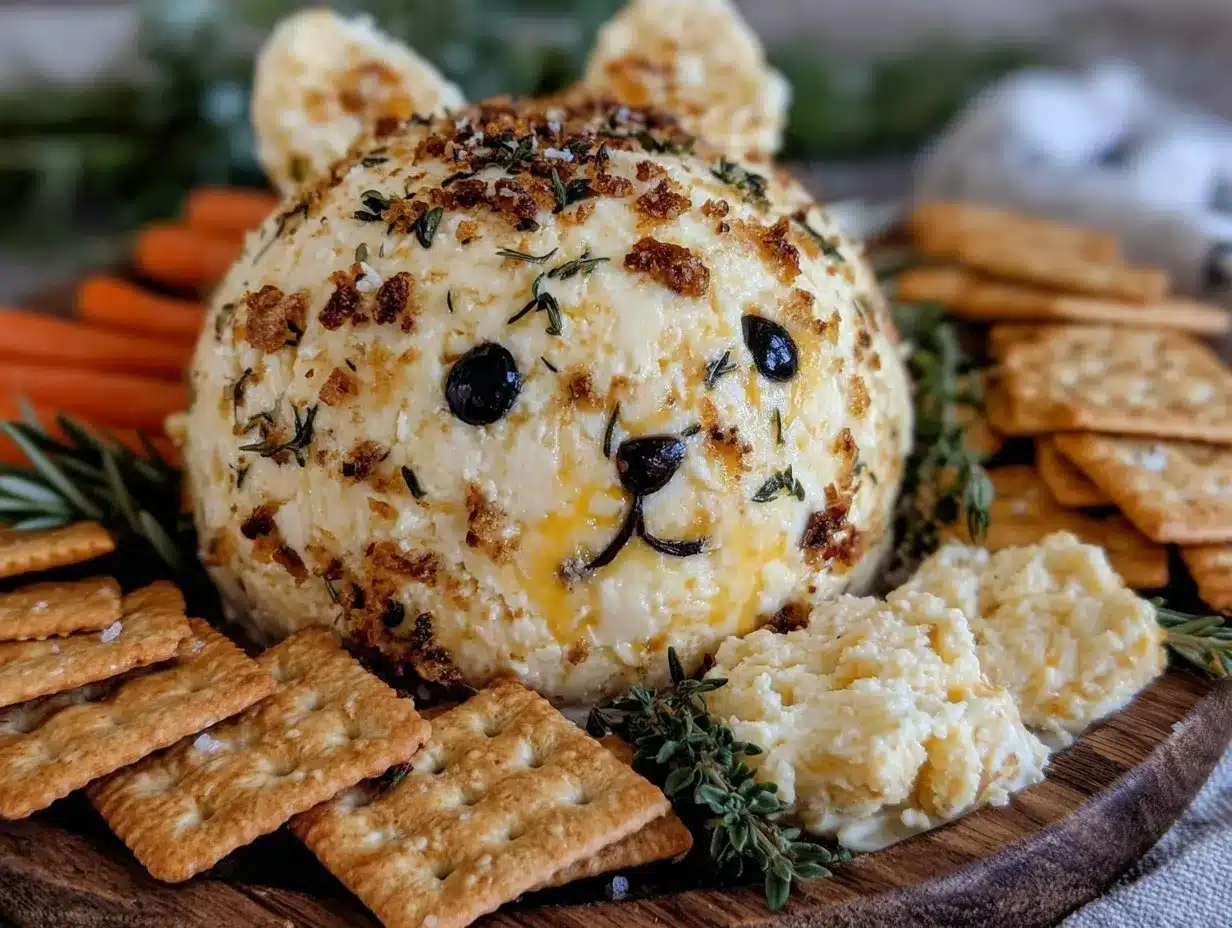
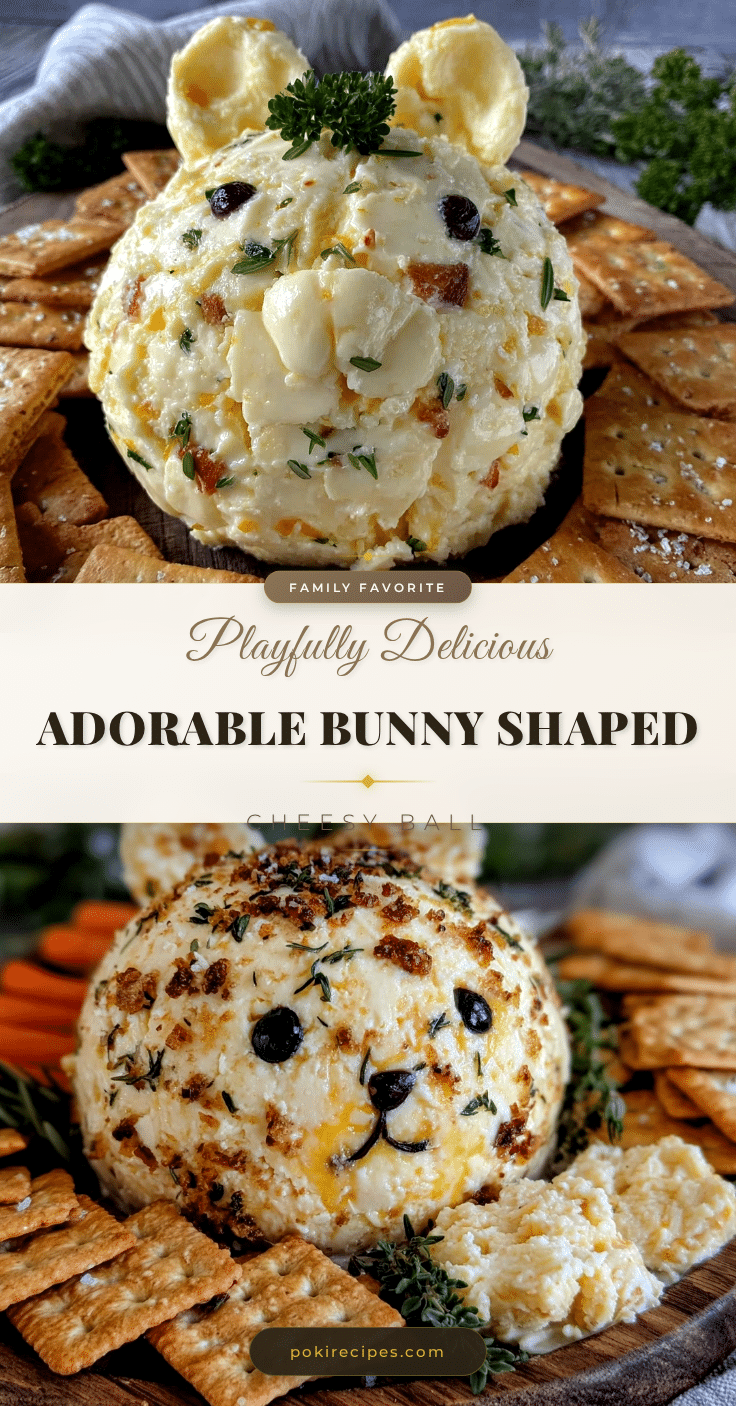
- Shape the Bunny: Lay out a large piece of plastic wrap on your counter. Spoon the cheese mixture onto the center and start molding it into an oval shape for the body. Pinch two smaller sections on top for ears and shape a rounded head area. Don’t worry if it’s not perfect—the charm is in the handmade look.
- Chill the Cheese Ball: Wrap the shaped bunny tightly with plastic wrap and refrigerate for at least 2 hours, or until firm. This step is crucial for the cheese ball to hold its shape when serving.
- Add Details: Once chilled, unwrap and place on your serving platter. Use black peppercorns or cloves for eyes, an olive slice or cherry tomato piece for the nose, and fresh parsley or dill sprigs to mimic fur texture. You can also use thin carrot sticks for whiskers if you’re feeling creative.
- Serve with Crackers: Arrange your favorite crackers around the bunny and watch it disappear fast!
Tip: If the cheese mixture feels too soft to shape, pop it back in the fridge for 15-20 minutes and try again. The chilled texture makes sculpting much easier. Also, if you’re making this ahead, the flavors meld beautifully overnight.
Cooking Tips & Techniques
Creating a smooth, flavorful cheese ball can be tricky, but a few insider tips can make your bunny look and taste fantastic every time.
- Softening Cream Cheese: Don’t rush this step. Cold cream cheese resists mixing and leaves lumps. If you forgot to take it out, microwave in 5-second bursts with careful stirring.
- Mixing Cheese: Use a hand mixer on medium speed to avoid over-beating, which can make the texture grainy. If mixing by hand, patiently fold until smooth.
- Chilling Time: Let the cheese ball chill long enough to firm up; otherwise, it might lose shape when served.
- Shaping Tips: Use plastic wrap to mold your bunny—this keeps hands clean and helps smooth out the surface. Don’t worry about perfect symmetry; the charm lies in its handmade look.
- Adding Details: Use toothpicks to place small decorations like peppercorn eyes or olive noses securely.
- Serving: Serve the cheese ball cold with crackers straight from the fridge for the best texture contrast.
One time, I tried to shape the bunny right after mixing without chilling. It was a total flop—the cheese stuck everywhere and the ears drooped. Lesson learned: patience pays off! Also, pairing this with crunchy crackers like the ones I use for my instant pot mac and cheese nights adds a satisfying crunch that guests love.
Variations & Adaptations
Want to switch things up? Here are some ways to customize your bunny cheese ball:
- Herb & Spice Variations: Swap chives for dill or parsley, add a pinch of smoked paprika or cayenne for a spicy kick.
- Cheese Options: Use pepper jack for a mild heat or blend in some blue cheese crumbles for a tangy surprise.
- Dietary Adjustments: Make it dairy-free by replacing cream cheese with a plant-based version and using vegan cheddar alternatives.
- Shape Alternatives: If you’re short on time or patience, shape the mixture into simple balls and roll them in crushed nuts or herbs for festive flair.
- Seasonal Touch: Add finely chopped sun-dried tomatoes or roasted red peppers for a Mediterranean twist.
Personally, I once made a mini version of this bunny cheese ball for a potluck, using the same recipe but forming smaller shapes to serve as individual bites. It was a hit and saved me the hassle of slicing and serving later.
Serving & Storage Suggestions
Serve this cheese ball chilled with an array of crackers or crisp veggie sticks like celery and cucumber for a refreshing contrast. It pairs wonderfully with a crisp white wine or a sparkling lemonade for a light, festive vibe.
If you’re preparing it ahead, wrap tightly in plastic wrap and keep refrigerated for up to 3 days. The flavors actually deepen over time, so making it a day in advance is a smart move.
When reheating (though it’s best served cold), allow it to come to room temperature for about 15 minutes to soften slightly—this makes spreading easier without losing the shape.
Leftovers can be crumbled over salads or mixed into pasta dishes—something I recently tried with my high-protein pasta salad which added a rich, creamy touch.
Nutritional Information & Benefits
This cheese ball delivers a satisfying dose of protein and calcium thanks to its generous cheese content. Cream cheese provides healthy fats that keep you full and energized, while herbs like chives add antioxidants and vitamins.
Here’s an approximate breakdown per serving (based on 8 servings):
| Calories | 150 |
|---|---|
| Protein | 6g |
| Fat | 13g |
| Carbohydrates | 1g |
| Fiber | 0g |
While this recipe isn’t low-fat, it fits well into balanced eating with controlled portions. For gluten-free or low-carb diets, simply pair with veggies or gluten-free crackers. Be mindful of dairy allergies and substitute accordingly.
Conclusion
This Flavorful Bunny Shaped Cheese Ball is a delightful mix of festive fun and savory goodness that’s as easy to make as it is to eat. Its charming shape and comforting flavors bring a little joy to any table, whether it’s a holiday spread or a casual weekend snack. I love how it invites creativity without demanding perfection, making it accessible for cooks of all levels.
Feel free to tweak the herbs, cheeses, or spices to suit your taste—and don’t hesitate to get playful with the presentation. This recipe has a way of turning simple ingredients into a memorable centerpiece that guests keep asking about.
Why not try making it for your next gathering? And if you do, I’d love to hear how you put your own spin on it—drop a comment or share your photos so we can celebrate your version of this charming cheese ball together.
After all, good food—and a little whimsy—go a long way in making moments special.
Frequently Asked Questions
Can I make the bunny cheese ball ahead of time?
Absolutely! It actually tastes better after chilling overnight, which helps the flavors meld and the shape firm up.
What’s the best way to shape the bunny if I’m not confident with sculpting?
Use plastic wrap to mold the cheese ball—it keeps your hands clean and helps smooth the surface. Don’t stress about perfect symmetry; the homemade charm is part of the fun.
Can I freeze the cheese ball for later?
Freezing isn’t recommended as it can change the texture of the cream cheese and cheddar, making it crumbly when thawed.
What crackers pair best with this cheese ball?
Sturdy crackers like water crackers, buttery rounds, or multigrain varieties work well. For a healthier option, crisp veggie sticks are excellent too.
How can I make this recipe dairy-free?
Swap the cream cheese and cheddar for plant-based alternatives, such as vegan cream cheese and cashew-based cheeses. Adjust seasoning as needed for flavor balance.
Pin This Recipe!
Flavorful Bunny Shaped Cheese Ball Recipe Easy for Holiday Crackers

A playful and simple cheese ball shaped like a bunny, perfect for holiday gatherings and parties. This recipe combines cream cheese, sharp cheddar, herbs, and spices for a savory, crowd-pleasing appetizer.
- Prep Time: 10 minutes
- Cook Time: 0 minutes
- Total Time: 2 hours 10 minutes
- Yield: 8 servings 1x
- Category: Appetizer
- Cuisine: American
Ingredients
- 8 oz (225 g) cream cheese, softened
- 1 cup (110 g) sharp cheddar cheese, shredded
- 1 tsp garlic powder
- 2 tbsp fresh chives, finely chopped
- 1 tsp Worcestershire sauce
- ½ tsp salt
- ¼ tsp freshly ground black pepper
- Crackers for serving (water crackers, buttery rounds, or multigrain)
- Optional toppings: black peppercorns or whole cloves for eyes, small sliced olives or cherry tomato pieces for the nose, fresh parsley or dill sprigs for fur texture
Instructions
- Soften the cream cheese by leaving it out at room temperature for about 30 minutes.
- In a mixing bowl, beat the softened cream cheese and shredded cheddar until smooth and creamy, about 2 to 3 minutes with a hand mixer or 5 minutes by hand.
- Stir in garlic powder, Worcestershire sauce, salt, pepper, and chopped chives until evenly incorporated.
- Lay out a large piece of plastic wrap on the counter. Spoon the cheese mixture onto the center and mold it into an oval shape for the body. Pinch two smaller sections on top for ears and shape a rounded head area.
- Wrap the shaped bunny tightly with plastic wrap and refrigerate for at least 2 hours or until firm.
- Unwrap and place on a serving platter. Use black peppercorns or cloves for eyes, an olive slice or cherry tomato piece for the nose, and fresh parsley or dill sprigs to mimic fur texture. Optionally, add thin carrot sticks for whiskers.
- Arrange crackers around the bunny and serve chilled.
Notes
If the cheese mixture is too soft to shape, chill it for an additional 15-20 minutes. For best results, soften cream cheese properly before mixing to avoid lumps. The cheese ball tastes better after chilling overnight. Use plastic wrap to help mold the bunny and keep hands clean. Serve cold with sturdy crackers or veggie sticks. For dairy-free, substitute cream cheese and cheddar with plant-based alternatives.
Nutrition
- Serving Size: Approximately 1/8 of
- Calories: 150
- Fat: 13
- Carbohydrates: 1
- Protein: 6
Keywords: cheese ball, bunny shaped cheese ball, holiday appetizer, party snack, cream cheese recipe, cheddar cheese, festive appetizer


