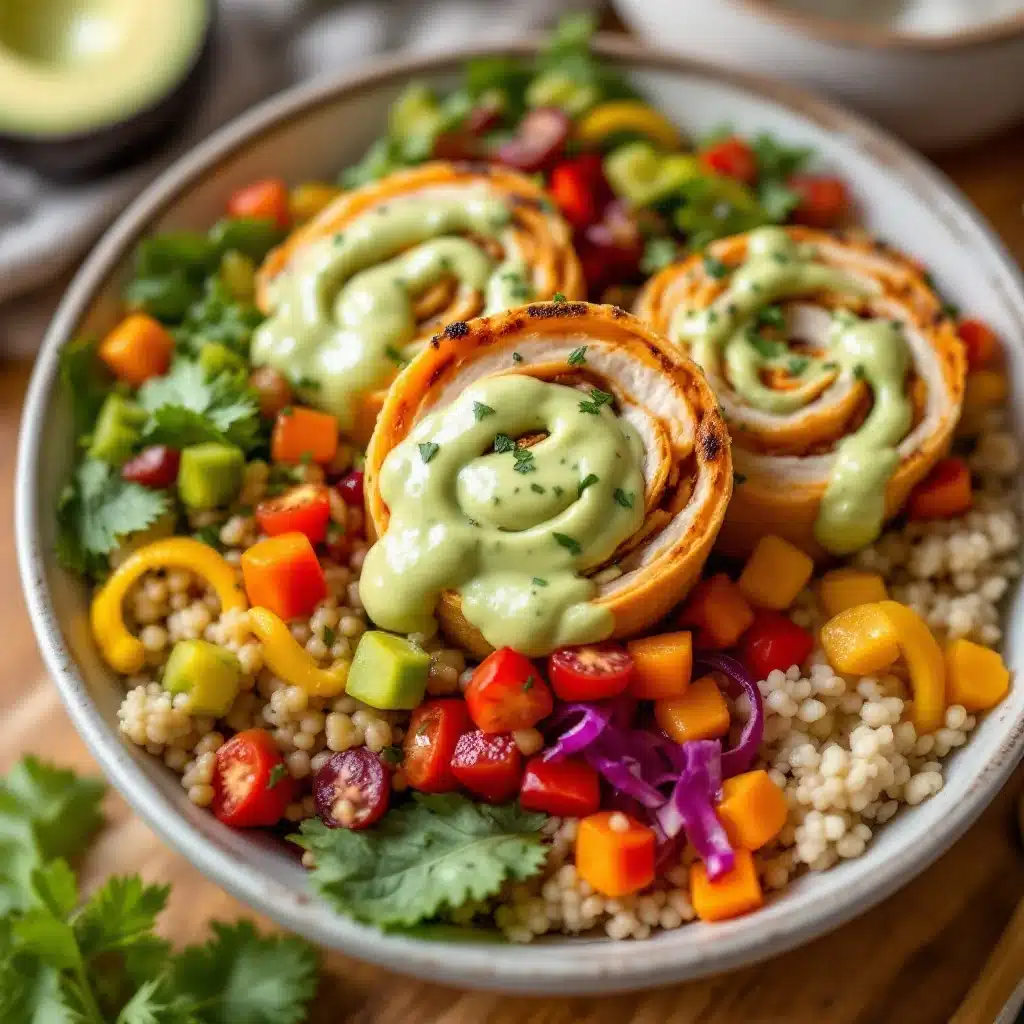
Standing in my kitchen at 6:47 AM, staring into the fridge like it might magically produce something new. The lunch boxes sat empty on the counter, and I could practically hear the clock ticking. Half a pack of turkey slices, some cheese singles, and a couple of flour tortillas that were definitely bought for taco night two weeks ago. That’s when it hit me — roll them up, slice them into little spirals, and boom. I had just invented the easiest lunch box solution of my life.
My youngest had been on a lunch strike for weeks. You know how that goes — everything I packed came back half-eaten or completely ignored. I was this close to giving up and just sending crackers and a yogurt tube every single day. But those little pinwheels? They came home empty. Not a crumb left. And honestly, I almost cried right there at the lunchbox unpacking station (which is just my kitchen counter, but let me pretend it’s official).
These Easy Turkey & Cheese Pinwheel Lunch Box Wraps are the kind of recipe that saves your sanity on busy mornings. They take about ten minutes to throw together — less time than it takes to convince a kid to put on matching socks. The best part? You can make them the night before, so morning you gets to be the hero without any of the effort. They’re cold, they’re fun to eat (because anything in spiral form is automatically more interesting), and they actually keep kids full until lunchtime.
This recipe stuck because it’s the one thing my kids actually ask for. Not beg for, not negotiate over — just quietly request, which in parenting terms is basically a standing ovation. So if you’re tired of wasted lunches and morning stress, these pinwheels might just change your life too.
Why You’ll Love This Recipe
Let me tell you why these little spirals have become a staple in our house. After testing them on multiple kids (including my neighbor’s notoriously picky eater), I can confidently say they’re a winner.
- Quick & Easy : Comes together in under 10 minutes, perfect for chaotic mornings or last-minute lunch packing. No cooking required — just assemble, roll, and slice.
- Simple Ingredients : You probably already have everything in your fridge. Turkey, cheese, tortillas, and a spread — that’s it. No fancy grocery trips needed.
- Perfect for Lunch Boxes : These hold up beautifully in a lunch bag. No sogginess, no mess, and they stay cool until lunchtime. Great for school, work, or picnics.
- Crowd-Pleaser : Kids and adults alike go crazy for these. I’ve packed them for grown-up lunches too, and they disappear just as fast.
- Unbelievably Delicious : The combination of creamy spread, savory turkey, and melty cheese wrapped in a soft tortilla is pure comfort food magic. The spiral shape makes every bite perfect.
What makes this recipe different from the dozens of other pinwheel recipes out there? It’s the cream cheese spread. I add a little ranch seasoning and a splash of milk to make it extra creamy and flavorful. That simple twist takes these from basic to absolutely irresistible. Plus, I figured out the exact rolling technique that keeps them from falling apart — no sad, unraveled pinwheels here.
This isn’t just another lunch idea. It’s the kind of recipe that makes you feel like you’ve got your life together, even when you definitely don’t. One bite and you’ll understand why these are my most-requested lunch box item.
What Ingredients You Will Need
This recipe uses simple, everyday ingredients to create something genuinely special. Nothing complicated, nothing hard to find — just good, basic components that work together beautifully.
- Large flour tortillas (10-inch size works best — burrito-sized if you want thicker pinwheels)
- 8 oz cream cheese, softened to room temperature (this is crucial for smooth spreading)
- 1 tablespoon ranch seasoning mix (I prefer Hidden Valley, but any brand works)
- 2 tablespoons milk (whole milk gives the creamiest texture, but any kind works)
- 8 slices deli turkey (I like oven-roasted turkey best, but any variety works — honey smoked is delicious too)
- 8 slices provolone cheese (or any cheese that melts at room temperature — cheddar, Swiss, or mozzarella all work great)
- Optional: lettuce leaves, washed and dried completely (adds crunch but can make pinwheels soggy if not dried well)
- Optional: thinly sliced bell peppers or cucumbers for extra veggies
Let me share a few tips I’ve learned the hard way. First, the cream cheese absolutely must be softened. I’ve tried rushing this step, and you end up with lumpy spread that tears the tortilla. Leave it on the counter for 30 minutes, or microwave it for 10 seconds if you’re in a hurry.
For the turkey, I recommend getting it sliced fresh from the deli counter rather than using pre-packaged slices. The texture is better, and they’re usually thicker, which means they don’t tear when you roll. That said, pre-packaged works in a pinch — just pat them dry with a paper towel first to remove excess moisture.
Cheese-wise, provolone is my go-to because it’s mild and melts beautifully. But honestly, any cheese you have on hand works. My kids love these with cheddar, and I’ve made them with pepper jack for a spicy kick. The key is using slices that are thin enough to roll easily but thick enough to taste.
If you’re adding vegetables, make sure they’re sliced paper-thin and patted completely dry. Wet veggies = soggy pinwheels, and nobody wants that. I usually skip the lettuce for school lunches and add it only when serving these as appetizers at home.
Equipment Needed
You don’t need much for this recipe, which is part of why I love it. Here’s what you’ll need:
- Cutting board — any size works, but a large one gives you room to work
- Sharp knife — a serrated bread knife works best for clean slices without squishing the pinwheels
- Small mixing bowl — for combining the cream cheese spread
- Spatula or butter knife — for spreading the cream cheese mixture evenly
- Plastic wrap — for wrapping the rolled tortillas tightly (this helps them hold their shape)
- Lunch box or airtight container — for storing the finished pinwheels
If you don’t have a serrated knife, a very sharp chef’s knife works too. Just use a gentle sawing motion rather than pressing down hard — that squishes the pinwheels flat. I learned this the hard way after making a batch of sad, flattened spirals.
For the plastic wrap, I’ve tried reusable beeswax wraps and they don’t work as well for this step. The plastic wrap needs to be tight to help the tortilla hold its shape while it rests. You can skip the wrapping step entirely if you’re serving them immediately, but for lunch boxes, it makes a big difference.
Budget-friendly tip: you don’t need any fancy equipment here. A butter knife, a plate, and a regular kitchen knife are totally fine. I’ve made these in a hotel room with a plastic knife and they still turned out great.
Preparation Method

Alright, let’s get rolling — literally. Here’s exactly how to make these Easy Turkey & Cheese Pinwheel Lunch Box Wraps. I’ve broken it down so even the most sleep-deprived morning person can follow along.
- Make the cream cheese spread. In a small bowl, combine the softened cream cheese, ranch seasoning mix, and milk. Stir until completely smooth and well combined. Taste it — you want it creamy and flavorful, not too salty. If it’s too thick, add another splash of milk. If it’s too thin, add a bit more cream cheese. Set aside.
- Prepare your work surface. Lay one tortilla flat on your cutting board. Spread about 2 tablespoons of the cream cheese mixture evenly over the entire surface, leaving a 1-inch border around the edges. Don’t skip the border — it helps seal the roll later.
- Layer the turkey. Place 2 slices of turkey flat on top of the cream cheese, slightly overlapping if needed. Make sure the turkey covers most of the tortilla surface. If your turkey slices are small, just tear them to fit — nobody’s judging here.
- Add the cheese. Place 2 slices of provolone cheese on top of the turkey. Again, slightly overlapping is fine. If you’re adding vegetables, now’s the time to sprinkle them on top of the cheese.
- Roll it up tight. Starting from one edge, roll the tortilla as tightly as you can without tearing it. I use my fingers to keep everything in place as I roll. Think of it like rolling a sleeping bag — firm but gentle. Once it’s rolled, press gently along the seam to seal it.
- Wrap in plastic. Tightly wrap the rolled tortilla in plastic wrap. Twist the ends to secure it. This step is non-negotiable for lunch boxes — it helps the pinwheels hold their shape and keeps them from unrolling. Pop it in the fridge for at least 30 minutes (or up to overnight).
- Slice into pinwheels. When you’re ready to serve, unwrap the tortilla roll and place it on your cutting board. Using a sharp serrated knife, slice the roll into 1-inch thick rounds. Use a gentle sawing motion — don’t press down hard or you’ll squish them. You should get about 6-8 pinwheels per tortilla.
- Pack and serve. Place the pinwheels in your lunch box or container. If packing for later, keep them refrigerated until you’re ready to go. They’re best served cold, straight from the fridge.
A few things I’ve learned: if your tortilla cracks while rolling, it’s probably too dry or cold. Let it sit at room temperature for a few minutes before spreading. Also, don’t overstuff — less is more here. Too many fillings and you’ll end up with a messy, unrollable situation.
The first time I made these, I skipped the chilling step and sliced them immediately. Total disaster. They fell apart, the filling oozed out, and I ended up with a plate of sad, messy spirals. Trust me on the 30-minute chill — it makes all the difference.
Cooking Tips & Techniques
After making these pinwheels approximately fifty-seven times (I stopped counting after the first month), I’ve picked up some tricks that make a real difference.
The tortilla temperature trick. Cold tortillas crack when you roll them. Warm tortillas are too soft and tear easily. Room temperature is the sweet spot. I take mine out of the fridge about 10 minutes before I start assembling. If you’re in a rush, pop them in the microwave for 5 seconds — just enough to take the chill off without making them hot.
The cream cheese softening hack. Forgot to take the cream cheese out of the fridge? No problem. Cut it into small cubes and microwave for 10 seconds. Check it, stir, and repeat if needed. You want it soft but not melted — melted cream cheese makes a mess. I’ve definitely microwaved it for 20 seconds and ended up with liquid cream cheese soup. Learn from my mistakes.
The even spread technique. Use the back of a spoon or an offset spatula to spread the cream cheese mixture. Work from the center outward, leaving that 1-inch border. If you spread all the way to the edges, the filling squeezes out when you roll. Trust me, I’ve cleaned up enough cream cheese from my cutting board to know.
The roll-and-rest method. This is the secret to perfect pinwheels. Roll the tortilla as tightly as you can, then wrap it in plastic and let it rest in the fridge. The resting time allows the cream cheese to firm up again, which holds everything together when you slice. I’ve made these the night before and they slice perfectly the next morning.
The slicing strategy. Use a serrated knife and a gentle sawing motion. Don’t press down — let the knife do the work. Clean the knife between slices if it gets too sticky. I keep a damp paper towel nearby to wipe the blade. This gives you clean, beautiful spirals instead of squished, messy ones.
Common mistake to avoid. Overfilling is the number one pinwheel killer. I know it’s tempting to pile on the turkey and cheese, but less really is more. You want a thin, even layer of everything. Think of it like a sushi roll — delicate and balanced, not stuffed to bursting.
Variations & Adaptations
One of the best things about this recipe is how endlessly adaptable it is. Here are some variations I’ve tried and loved:
Dietary adaptations:
– Gluten-free: Use gluten-free tortillas. They’re usually smaller and more fragile, so spread the cream cheese gently and roll carefully. Corn tortillas don’t work well — they crack too easily.
– Low-carb/Keto: Use low-carb tortillas or large lettuce leaves instead. The lettuce wraps are delicate but delicious — just skip the chilling step and serve immediately.
– Dairy-free: Use dairy-free cream cheese and dairy-free cheese slices. I’ve tried several brands and Kite Hill works best for cream cheese, while Violife melts nicely.
Flavor variations:
– Italian pinwheels: Swap the ranch seasoning for Italian seasoning, use salami instead of turkey, and add roasted red peppers. These taste like an Italian sub in pinwheel form.
– Buffalo chicken: Mix hot sauce into the cream cheese, use shredded rotisserie chicken instead of turkey, and add crumbled blue cheese. These are dangerously good.
– Veggie pinwheels: Skip the turkey and cheese, double up on the cream cheese spread, and add thinly sliced cucumbers, bell peppers, shredded carrots, and sprouts. My vegetarian friends love these.
Seasonal twists:
– Spring: Add thin slices of fresh avocado and sprouts. The creaminess pairs beautifully with the turkey.
– Summer: Use sun-dried tomato tortillas and add fresh basil leaves. Tastes like summer in every bite.
– Fall: Add a thin layer of cranberry sauce or apple butter under the turkey. The sweet-savory combo is incredible.
Different cooking methods:
– Toasted pinwheels: After slicing, place the pinwheels on a baking sheet and broil for 1-2 minutes until the cheese melts and the edges get crispy. These are amazing for parties.
– Grilled pinwheels: Roll the tortillas, don’t slice them, and toast them in a panini press until golden brown. Slice after grilling for warm, melty pinwheels.
My personal favorite variation is the everything bagel version. I mix everything bagel seasoning into the cream cheese, use smoked turkey, and add a thin layer of cream cheese on the outside before rolling in more everything seasoning. It’s ridiculous and wonderful.
Serving & Storage Suggestions
These pinwheels are versatile little things. Here’s how to serve and store them for best results.
Serving temperature: Serve these cold, straight from the fridge. They’re best chilled — the cream cheese firms up and holds everything together. If you’re serving them at room temperature for a party or picnic, keep them on ice or serve within an hour of taking them out of the fridge.
Presentation ideas: Arrange the pinwheels on a platter with the spiral sides facing up so everyone can see the pretty pattern. For lunch boxes, I pack them in a small container with a lid, sometimes with a little container of ranch dressing for dipping. My kids love dipping them — it makes lunch feel special.
What to serve with them: These pair beautifully with fresh fruit, veggie sticks, or a simple side salad. For a complete lunch, add some grapes, baby carrots, and a yogurt tube. For parties, serve them alongside other finger foods like crispy loaded potato skins or bacon-wrapped dates stuffed with creamy goat cheese for an amazing appetizer spread.
Storage instructions: Store assembled (unsliced) pinwheels in the refrigerator for up to 3 days. Keep them wrapped tightly in plastic wrap. Once sliced, store in an airtight container for up to 2 days. The sliced pinwheels can get a bit dry after that, so I recommend slicing only what you need.
Freezer instructions: You can freeze the unsliced rolls! Wrap them tightly in plastic wrap, then foil, and freeze for up to 2 months. Thaw overnight in the refrigerator before slicing. The texture is slightly softer after freezing, but still delicious. I make a double batch and keep one in the freezer for emergency lunch situations.
Reheating tips: These are meant to be served cold, so no reheating needed. If you want warm pinwheels, I recommend making the toasted version instead — just broil for a minute or two after slicing.
Flavor development: Honestly, these taste even better the next day. The flavors meld together overnight, and the cream cheese spreads evenly throughout the pinwheel. If you can plan ahead, make them the night before for the best flavor.
Nutritional Information & Benefits
Here’s the nutritional breakdown for one serving (about 4 pinwheels, made with one 10-inch tortilla):
| Nutrient | Amount |
|---|---|
| Calories | 320 |
| Protein | 18g |
| Carbohydrates | 22g |
| Fat | 18g |
| Saturated Fat | 10g |
| Fiber | 2g |
| Sugar | 3g |
| Sodium | 780mg |
These pinwheels offer a good balance of protein, carbs, and fat to keep energy levels steady through the afternoon. The turkey provides lean protein that helps with satiety — no hangry kids at pickup time. The cream cheese adds calcium and a bit of healthy fat that helps absorb fat-soluble vitamins from any veggies you add.
Health benefits of key ingredients:
- Turkey: Excellent source of lean protein, B vitamins, and selenium. It’s lower in fat than many other lunch meats.
- Cream cheese: Provides calcium and vitamin A. Using reduced-fat cream cheese cuts calories without sacrificing too much texture.
- Tortillas: Choose whole wheat or spinach tortillas for extra fiber and nutrients. The carbs provide quick energy for active kids.
Dietary considerations: This recipe contains gluten, dairy, and eggs (if using flour tortillas). For gluten-free, use corn or gluten-free tortillas. For dairy-free, use plant-based cream cheese and cheese alternatives. For lower sodium, use low-sodium turkey and reduced-sodium cheese.
From my perspective, these pinwheels are a win-win. They’re satisfying enough to keep kids full, but not so heavy that they cause an afternoon slump. Plus, you can easily customize them to fit different dietary needs without making separate meals for everyone.
Conclusion
These Easy Turkey & Cheese Pinwheel Lunch Box Wraps have honestly changed our morning routine. No more standing in front of the open fridge at 7 AM, trying to figure out what to pack. No more uneaten lunches coming home. Just happy kids and a mom who feels like she’s got at least one thing under control.
The beauty of this recipe is how forgiving it is. Use whatever tortillas you have, whatever cheese is in the drawer, whatever lunch meat needs to be used up. The cream cheese spread is the magic that holds it all together — literally and figuratively. Once you get the basic technique down, you can customize these a hundred different ways.
I’d love to hear how these turn out for you! Did you try a fun variation? Do your kids love them as much as mine do? Drop a comment below and share your pinwheel creations. And if you’re looking for more easy lunch ideas, check out our egg muffins for meal prep or these 5-ingredient pesto pasta for more quick, family-friendly recipes.
Remember, you don’t need to be a perfect parent to pack a perfect lunch. Sometimes all it takes is a tortilla, some turkey, and a little bit of cream cheese. Happy packing, friends!
Frequently Asked Questions
Can I make these pinwheels ahead of time?
Absolutely! In fact, they taste better when made the night before. Assemble and roll the tortillas, wrap tightly in plastic wrap, and refrigerate overnight. Slice them in the morning before packing. They’ll hold perfectly for up to 3 days in the fridge.
How do I keep pinwheels from getting soggy in lunch boxes?
The key is drying your ingredients thoroughly. Pat turkey slices with a paper towel to remove excess moisture. If adding vegetables like lettuce or peppers, make sure they’re completely dry before adding. The cream cheese layer also acts as a barrier that helps prevent sogginess.
Can I use different types of cheese?
Yes! Provolone is my go-to, but cheddar, Swiss, mozzarella, pepper jack, or even cream cheese slices all work great. Just avoid very soft cheeses that might squish out when rolling. Hard cheeses like cheddar should be sliced very thin.
What’s the best way to slice pinwheels without squishing them?
Use a sharp serrated knife with a gentle sawing motion. Don’t press down — let the knife do the work. Chill the rolled tortilla for at least 30 minutes before slicing. Clean the knife between cuts with a damp paper towel to prevent sticking.
Can I freeze turkey and cheese pinwheels?
Yes! Freeze the unsliced rolls wrapped tightly in plastic wrap and then foil for up to 2 months. Thaw overnight in the refrigerator before slicing. The texture will be slightly softer but still delicious. I wouldn’t freeze them already sliced — they get dry and sad.
Pin This Recipe!

Easy Turkey & Cheese Pinwheel Wraps: Best Lunch Box Idea

These Easy Turkey & Cheese Pinwheel Lunch Box Wraps are the perfect solution for busy mornings. Made with simple ingredients like turkey, cheese, and a creamy ranch spread, they come together in under 10 minutes and are a guaranteed crowd-pleaser for kids and adults alike.
- Prep Time: 10 minutes
- Cook Time: 0 minutes
- Total Time: 40 minutes (includes 30 minutes chilling)
- Yield: 4 servings 1x
- Category: Lunch
- Cuisine: American
Ingredients
- 4 large flour tortillas (10-inch size)
- 8 oz cream cheese, softened
- 1 tablespoon ranch seasoning mix
- 2 tablespoons milk
- 8 slices deli turkey
- 8 slices provolone cheese
- Optional: lettuce leaves, washed and dried completely
- Optional: thinly sliced bell peppers or cucumbers
Instructions
- Make the cream cheese spread: In a small bowl, combine the softened cream cheese, ranch seasoning mix, and milk. Stir until completely smooth and well combined. Set aside.
- Prepare your work surface: Lay one tortilla flat on your cutting board. Spread about 2 tablespoons of the cream cheese mixture evenly over the entire surface, leaving a 1-inch border around the edges.
- Layer the turkey: Place 2 slices of turkey flat on top of the cream cheese, slightly overlapping if needed.
- Add the cheese: Place 2 slices of provolone cheese on top of the turkey. If adding vegetables, sprinkle them on top of the cheese now.
- Roll it up tight: Starting from one edge, roll the tortilla as tightly as you can without tearing it. Press gently along the seam to seal it.
- Wrap in plastic: Tightly wrap the rolled tortilla in plastic wrap. Twist the ends to secure it. Refrigerate for at least 30 minutes (or up to overnight).
- Slice into pinwheels: When ready to serve, unwrap the tortilla roll and place it on your cutting board. Using a sharp serrated knife, slice the roll into 1-inch thick rounds using a gentle sawing motion.
- Pack and serve: Place the pinwheels in your lunch box or container. Keep refrigerated until ready to go. Serve cold.
Notes
Cream cheese must be softened for smooth spreading. For best results, chill the rolled tortilla for at least 30 minutes before slicing to prevent unraveling. Use a serrated knife with a gentle sawing motion for clean slices. Overfilling can cause messy pinwheels; use thin, even layers.
Nutrition
- Serving Size: 4 pinwheels (1 torti
- Calories: 320
- Sugar: 3
- Sodium: 780
- Fat: 18
- Saturated Fat: 10
- Carbohydrates: 22
- Fiber: 2
- Protein: 18
Keywords: turkey pinwheels, cheese pinwheels, lunch box ideas, easy lunch, kid-friendly lunch, no-cook lunch, make-ahead lunch