
Introduction
The first time I made air fryer garlic butter chicken breast, the aroma had my whole house smelling like a cozy little bistro. You know, that garlicky, buttery goodness that makes your mouth water before you’ve even sat down. I stumbled across this recipe idea during a frantic weeknight scramble—hungry, short on time, and determined to keep it low-carb. Honestly, my air fryer was just sitting there, begging for a bit of action, and chicken breasts are always hanging around in my fridge. That’s when the magic happened.
What I love most about this air fryer garlic butter chicken breast recipe is how it checks every box: juicy, packed with flavor, and beyond simple to throw together. No need to fuss with breading, and definitely no need for a dozen fancy ingredients. It’s a lifesaver for anyone on a keto or low-carb plan, and, let’s face it, it makes me feel like a kitchen superstar when dinner’s ready in just about 20 minutes. Plus, there’s something so comforting about classic garlic butter—like a warm hug, but for your taste buds.
After testing this recipe at least a dozen times (no kidding!), I’ve dialed in the perfect blend of seasonings and nailed the timing for that juicy, never-dry chicken. Whether you’re a keto pro or just craving something easy and delicious, this air fryer garlic butter chicken breast is sure to become a staple in your dinner rotation. It’s a go-to for busy nights, meal prepping, or whenever you want a satisfying meal without the carb crash. Let me show you how simple and rewarding this recipe can be!
Why You’ll Love This Recipe
I’m not exaggerating when I say this air fryer garlic butter chicken breast is a total game-changer for weeknight dinners. Here’s why I keep coming back to it—and why I think you will too:
- Quick & Easy: Ready in under 25 minutes, start to finish. Just season, air fry, and brush with garlic butter. Perfect for those nights when takeout is oh-so-tempting, but you want something healthier and home-cooked.
- Simple Ingredients: Nothing fancy or hard to find—most of it you probably already have in your fridge or pantry. Chicken breasts, garlic, butter, and a few spices. That’s it!
- Perfect for Any Occasion: Ideal for busy weeknights, impressing friends at a casual dinner, or meal prepping for the week. It’s also a hit at family gatherings—my kids devour it, and guests never guess it’s low-carb.
- Crowd-Pleaser: The juicy, flavorful chicken with its golden crust is always met with happy faces (even from picky eaters). It’s one of those rare recipes that fits nearly every diet and taste bud.
- Unbelievably Delicious: The combination of garlic and butter is pure comfort. The air fryer locks in moisture, so you never get dry, boring chicken. Every bite is savory, juicy, and packed with flavor.
What really sets this recipe apart is the way the butter and garlic seep into the chicken, creating layers of flavor without overwhelming the meat. I’ve tried baking, grilling, and stovetop versions, but the air fryer delivers that perfect balance—crisp on the outside, tender and juicy on the inside. The secret? Basting with garlic butter halfway through cooking. Little touches like this make all the difference. It’s the kind of meal that feels indulgent, yet fits perfectly into a keto or low-carb lifestyle. And when you bite in, you’ll see why it’s my favorite way to cook chicken breast!
What Ingredients You Will Need
This air fryer garlic butter chicken breast recipe keeps things simple, letting each ingredient shine. Every component has a role, working together for maximum flavor and the juiciest chicken you’ve ever tasted. Here’s what to gather:
- Boneless, Skinless Chicken Breasts (2 large, about 1.5 lbs/680g) – Go for evenly sized pieces for even cooking. If they’re too thick, you can lightly pound them for uniformity.
- Salt and Black Pepper – Essential for seasoning. I like using kosher salt and freshly cracked pepper for the best flavor.
- Garlic Powder (1 tsp/4g) – Gives that classic garlic flavor all the way through, even before the butter goes on.
- Paprika (1/2 tsp/2g) – Adds color and a gentle smokiness. Smoked paprika works beautifully here too.
- Dried Italian Seasoning (1 tsp/2g) – For a herby kick. You can swap with dried oregano or thyme if that’s what you have.
- Olive Oil (1 tbsp/15ml) – Helps the seasoning stick and adds a little richness. Avocado oil is a great alternative if you’re out of olive oil.
For the Garlic Butter:
- Unsalted Butter (3 tbsp/42g), melted – This forms the base of the sauce. If you’re dairy-free, try a plant-based butter substitute.
- Fresh Garlic (3 cloves, minced) – Nothing beats the punch of real garlic! If you’re in a pinch, use 1/2 tsp garlic powder, but fresh is best.
- Chopped Fresh Parsley (2 tbsp/8g) – For color and a pop of freshness. You can leave it out or use dried parsley if that’s what you have.
- Lemon Juice (1 tsp/5ml, optional) – A tiny splash brightens up the whole dish, but you can skip if you prefer a straightforward buttery flavor.
Ingredient Tips:
– For the juiciest results, I recommend using air-chilled chicken breasts if available.
– If you want a more intense garlic hit, add an extra clove to the butter.
– Make it spicy by tossing in a pinch of chili flakes or cayenne.
– Gluten-free? No worries—there’s nothing here that contains gluten. Keto? You’re all set!
Most of these ingredients are pantry staples, and the few that aren’t can be found in any grocery store. If you’re out of something, don’t stress—there’s always a simple swap (I’ve tried them all on lazy nights). This recipe is forgiving and flexible, just how weeknight cooking should be.
Equipment Needed
You don’t need a fancy kitchen setup for this air fryer garlic butter chicken breast—just a few basics that make the process smooth and easy:
- Air Fryer: Any model works, but I use a 5.8-quart basket-style air fryer (like Cosori or Ninja). If you have a smaller one, just cook in batches.
- Mixing Bowl: For tossing the chicken with oil and seasonings. A medium-sized bowl is perfect.
- Basting Brush: For brushing on the garlic butter. If you don’t have one, a spoon or even the back of a fork works in a pinch.
- Measuring Spoons: To keep your seasoning game on point.
- Tongs: For flipping the chicken halfway. I use silicone-tipped ones to avoid scratching the air fryer basket.
- Small Microwave-Safe Bowl: For melting the butter and mixing in the garlic.
- Sharp Knife and Cutting Board: For prepping the garlic and parsley.
If you’re new to air fryers, don’t worry—most models are super user-friendly. I always give my basket a light spray of oil before cooking to prevent sticking (it also helps with clean-up). If you’re looking for a budget-friendly air fryer, check out secondhand stores—mine was a $25 find and it’s still going strong. Oh, and if you ever lose your basting brush, I’ve used a wad of paper towel in a pinch (just dip and dab, works surprisingly well!).
Preparation Method
-
Prep the Chicken:
Pat 2 large boneless, skinless chicken breasts (about 1.5 lbs/680g) dry with paper towels. This helps the seasonings stick and gives a better crust. If the breasts are thick, slice them in half horizontally or pound them to about 1 inch (2.5 cm) thickness for even cooking. -
Season the Chicken:
In a medium bowl, combine 1 tsp (4g) garlic powder, 1/2 tsp (2g) paprika, 1 tsp (2g) Italian seasoning, 1 tbsp (15ml) olive oil, 1/2 tsp (3g) salt, and 1/2 tsp (2g) black pepper. Add the chicken breasts and toss until fully coated. (Tip: Use your hands to massage the seasoning in for more flavor!) -
Preheat the Air Fryer:
Set your air fryer to 375°F (190°C) for 3 minutes. Preheating helps the chicken cook evenly and get a nice golden color. -
Arrange Chicken in Basket:
Place the seasoned chicken breasts in the air fryer basket in a single layer. Don’t overcrowd—if you have a smaller air fryer, cook in two batches. -
Air Fry the Chicken:
Air fry at 375°F (190°C) for 9 minutes. Flip the chicken using tongs, then continue cooking for another 7–9 minutes, or until the internal temperature reaches 165°F (74°C). (If your air fryer runs hot, check at the 15-minute mark. Overcooked chicken dries out quickly!) -
Make the Garlic Butter:
While the chicken cooks, melt 3 tbsp (42g) unsalted butter in a small microwave-safe bowl. Stir in 3 minced garlic cloves and 2 tbsp (8g) chopped parsley. If using, add 1 tsp (5ml) lemon juice. Set aside. -
Baste with Garlic Butter:
At the halfway flip (after about 9 minutes), brush the chicken with half the garlic butter. After the chicken is done, brush on the rest immediately for maximum flavor absorption. -
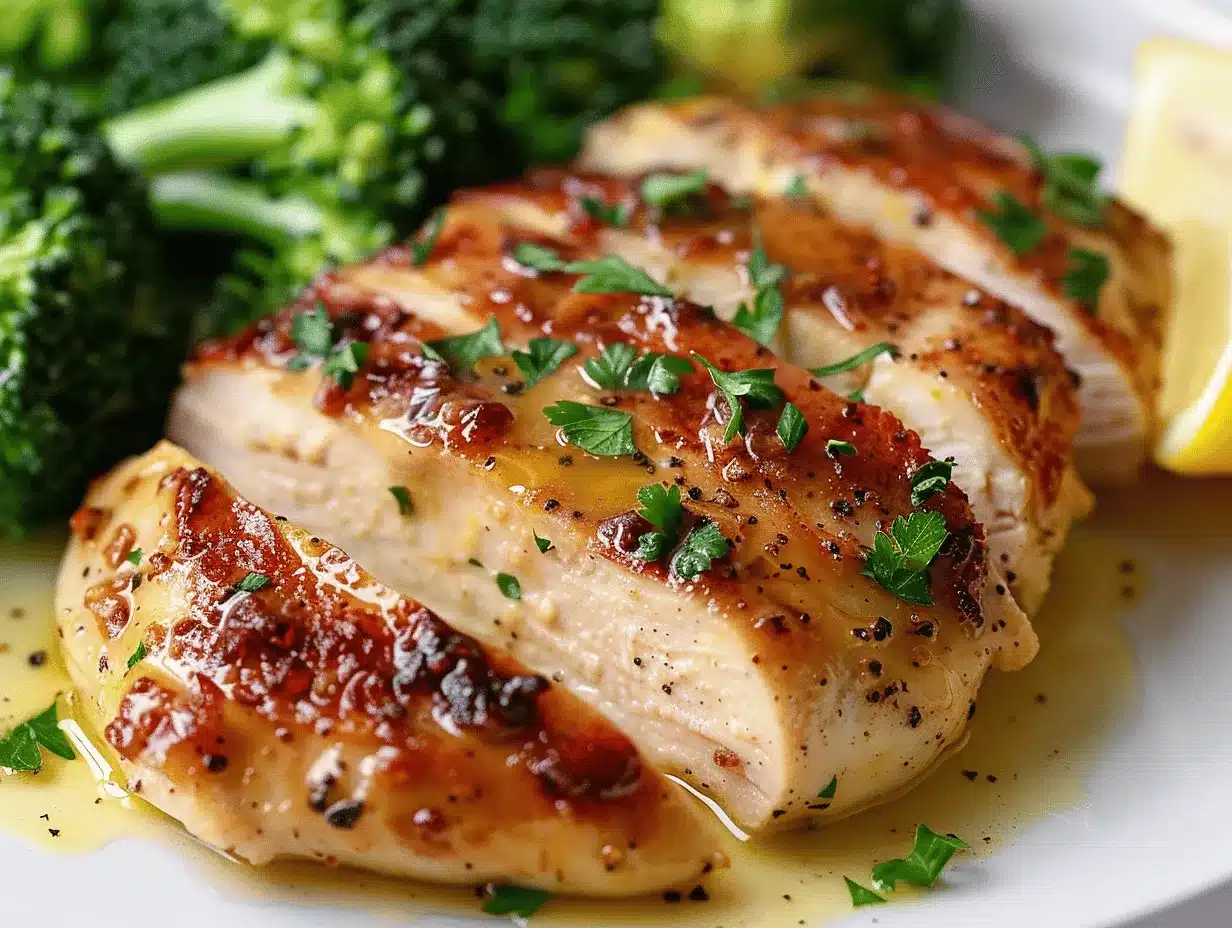
Rest and Serve:
Let the chicken rest in the basket for 3–5 minutes before slicing. This locks in the juices. Slice, garnish with extra parsley, and serve hot!
Troubleshooting Tips:
– If the chicken isn’t browning, give it a quick spritz with olive oil.
– Chicken looking dry? You may have overcooked it or started with thin pieces—reduce time by a couple of minutes next time.
– Don’t skip the resting step! It really helps keep things juicy.
– If your air fryer basket is tricky to clean, line it with parchment paper with a few holes poked in.
When I’m in a hurry, I prep the garlic butter while the chicken cooks. Multitasking for the win! And if you want extra garlicky flavor, use the basting brush to scoop up the garlicky bits from the bowl and press them right onto the chicken as it rests.
Cooking Tips & Techniques
After making this air fryer garlic butter chicken breast more times than I can count, I’ve picked up some helpful tricks and learned from a few (okay, many) kitchen mishaps along the way. Here’s what I wish I’d known sooner:
- Don’t Crowd the Basket: Air flow is key for even cooking and browning. If you pile the chicken in, it’ll steam instead of crisp. Better to cook in two batches if needed—trust me, patience pays off.
- Use a Meat Thermometer: Chicken breasts can go from juicy to dry in a matter of minutes. I always check with a digital thermometer and pull the chicken at 165°F (74°C) for perfect results. No more guesswork!
- Baste at the Right Time: Brushing on the garlic butter halfway through and again at the end gives the best flavor. If you add it too early, the garlic might burn in the air fryer.
- Rest, Rest, Rest: I used to skip resting and cut in too soon. Big mistake. Letting the chicken sit for a few minutes keeps it juicy and lets the flavors settle in.
- Preheat Always: It might seem like an extra step, but preheating the air fryer really does help get that golden, slightly crisp exterior without overcooking the inside.
I’ve had my fair share of dry, bland chicken disasters (we’ve all been there, right?). The biggest lesson? Don’t overcook, and don’t be shy with the butter. If you want to multitask, prep a quick salad or veggie side while the chicken cooks. That way, dinner is ready all at once. And don’t be afraid to experiment with seasonings—sometimes I add a pinch of cayenne for heat or swap the parsley for fresh basil if that’s what’s in the fridge. The air fryer is super forgiving, and this recipe is even better when you make it your own!
Variations & Adaptations
One of the best things about this air fryer garlic butter chicken breast is how easy it is to personalize. Here are a few of my favorite spins and swaps:
- Dairy-Free: Use plant-based butter and skip the cheese (if you add any). Olive oil can sub in for extra richness in the garlic butter. It’s just as tasty and still totally keto-friendly!
- Spicy Kick: Add 1/4 tsp cayenne pepper or a pinch of red pepper flakes to the seasoning mix. My husband loves it this way when he’s craving something with a little bite.
- Herb Swap: Instead of parsley, try chopped fresh basil, cilantro, or chives. In summer, I sometimes toss in a sprig of rosemary for a deeper herbal note.
- Cooking Method: No air fryer? No problem! Bake in a 400°F (200°C) oven on a lined baking sheet for 20–25 minutes, flipping halfway. You won’t get quite the same crispness, but the flavor is still spot on.
- Flavor Variations: Mix up the seasonings—try lemon pepper, Cajun spice blends, or add a sprinkle of grated Parmesan after basting for a cheesy crust.
- Low-Sodium: Dial back the salt and amp up the fresh herbs and lemon for brightness.
Personally, I’ve made this recipe with turkey cutlets and even thin pork chops—the timing just needs a little adjusting. For kids, I sometimes slice the chicken into strips before air frying for homemade tenders (they dip them in ranch or sugar-free ketchup). The possibilities are endless, and I’d love to hear what twists you try!
Serving & Storage Suggestions
This air fryer garlic butter chicken breast is best served hot, right after resting. Slice it and fan out the pieces on a platter, then drizzle any extra garlic butter from the bowl over the top for maximum flavor. Garnish with more fresh parsley or a squeeze of lemon for some zing.
For sides, I love pairing this with a crisp green salad, roasted veggies, or cauliflower mash to keep it low-carb. It’s also fantastic sliced over zoodles or tucked into lettuce wraps. If you’re serving guests, add a chilled glass of sauvignon blanc or sparkling water with lemon.
Leftovers store beautifully—just pop them in an airtight container in the fridge for up to 4 days. For longer storage, freeze cooked chicken breasts (wrapped tightly) for up to 2 months. To reheat, air fry for 3–4 minutes at 350°F (175°C) or microwave gently until warmed through. The flavor mellows a bit over time, but it’s still incredibly tasty. If you’re meal prepping, make a double batch and enjoy easy lunches all week!
Nutritional Information & Benefits
Each serving of air fryer garlic butter chicken breast (about 6 oz/170g cooked) packs approximately:
- Calories: 285
- Protein: 38g
- Fat: 13g
- Carbohydrates: 2g (net carbs)
- Fiber: 0g
Chicken breast is a lean, high-protein star, making it perfect for muscle-building, keto, or low-carb diets. Garlic and parsley bring immune-boosting antioxidants, while butter (in moderation) adds healthy fats that keep you full longer. There’s no gluten, and it’s naturally low in carbs, so it’s a great option for those avoiding grains or watching sugars. If you have dairy allergies, just swap the butter (see above). Personally, I feel energized and satisfied after eating this meal—no carb hangover, just pure, savory happiness!
Conclusion
If you’re searching for a truly easy, mouthwatering weeknight meal, this air fryer garlic butter chicken breast delivers every time. It’s fuss-free, family-friendly, and fits perfectly into a low-carb or keto lifestyle—without sacrificing flavor or comfort. I love how customizable it is, whether you like things spicy, herby, or classic.
Don’t be afraid to play around with the seasonings or sides to make it your own. After all, the best recipes are the ones you tweak to fit your cravings and routine. This dish has become a staple in my house, and I hope it finds a spot in your regular rotation too!
If you give this recipe a try, let me know in the comments below! I’d love to hear your favorite variations or see your delicious photos. Pin it, share it, and spread the garlic butter love—happy air frying!
Frequently Asked Questions
How long does it take to cook chicken breast in the air fryer?
For this recipe, thick chicken breasts take about 16–18 minutes at 375°F (190°C), flipping halfway. Thinner pieces may require less time, so check at the 12-minute mark.
Can I use frozen chicken breasts?
It’s best to thaw chicken before air frying for even cooking and the best texture. If cooking from frozen, add 5–8 minutes and check the internal temperature to ensure it reaches 165°F (74°C).
Is this air fryer garlic butter chicken breast recipe keto-friendly?
Yes! With only 2g net carbs per serving and plenty of healthy fat and protein, it fits perfectly into a keto or low-carb diet.
What if I don’t have an air fryer?
You can bake the chicken breasts in a preheated 400°F (200°C) oven for 20–25 minutes, flipping halfway. The texture will be slightly different, but the garlic butter flavor will still shine.
How do I keep the chicken breasts from drying out?
The key is not to overcook them. Use a meat thermometer and let the chicken rest after cooking. Basting with butter also helps lock in moisture and adds flavor.
Pin This Recipe!
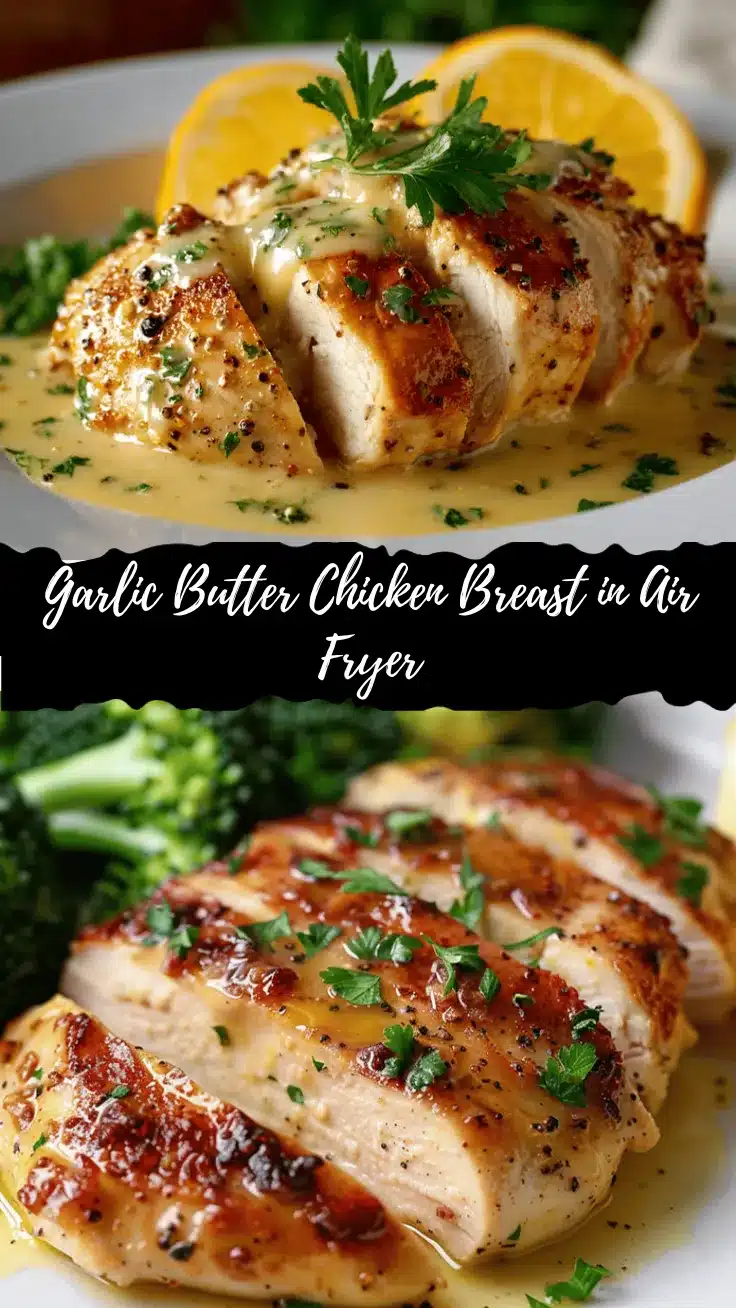
Air Fryer Garlic Butter Chicken Breast

This air fryer garlic butter chicken breast is a juicy, flavorful, and easy low-carb keto dinner that comes together in under 25 minutes. With simple ingredients and a quick cooking method, it’s perfect for busy weeknights or meal prep.
- Prep Time: 5 minutes
- Cook Time: 18 minutes
- Total Time: 23 minutes
- Yield: 2–4 servings 1x
- Category: Main Course
- Cuisine: American
Ingredients
- 2 large boneless, skinless chicken breasts (about 1.5 lbs)
- 1/2 teaspoon salt
- 1/2 teaspoon black pepper
- 1 teaspoon garlic powder
- 1/2 teaspoon paprika (smoked or regular)
- 1 teaspoon dried Italian seasoning
- 1 tablespoon olive oil
- 3 tablespoons unsalted butter, melted
- 3 cloves fresh garlic, minced
- 2 tablespoons chopped fresh parsley
- 1 teaspoon lemon juice (optional)
Instructions
- Pat chicken breasts dry with paper towels. If thick, slice in half horizontally or pound to about 1 inch thickness.
- In a medium bowl, combine garlic powder, paprika, Italian seasoning, olive oil, salt, and black pepper. Add chicken and toss until fully coated.
- Preheat air fryer to 375°F for 3 minutes.
- Place seasoned chicken breasts in the air fryer basket in a single layer. Do not overcrowd.
- Air fry at 375°F for 9 minutes. Flip chicken, then cook for another 7–9 minutes, or until internal temperature reaches 165°F.
- While chicken cooks, melt butter in a small microwave-safe bowl. Stir in minced garlic, chopped parsley, and lemon juice if using.
- At the halfway flip, brush chicken with half the garlic butter. After cooking, brush on the remaining garlic butter.
- Let chicken rest in the basket for 3–5 minutes before slicing. Garnish with extra parsley and serve hot.
Notes
For best results, use air-chilled chicken breasts and do not overcrowd the air fryer basket. Resting the chicken after cooking keeps it juicy. You can substitute parsley with other fresh herbs or add a pinch of cayenne for heat. Leftovers store well in the fridge for up to 4 days or can be frozen for up to 2 months.
Nutrition
- Serving Size: 1 chicken breast (about 6 oz cooked)
- Calories: 285
- Sodium: 500
- Fat: 13
- Saturated Fat: 6
- Carbohydrates: 2
- Protein: 38
Keywords: air fryer chicken, garlic butter chicken, keto chicken breast, low carb dinner, easy chicken recipe, gluten free, meal prep, weeknight dinner


