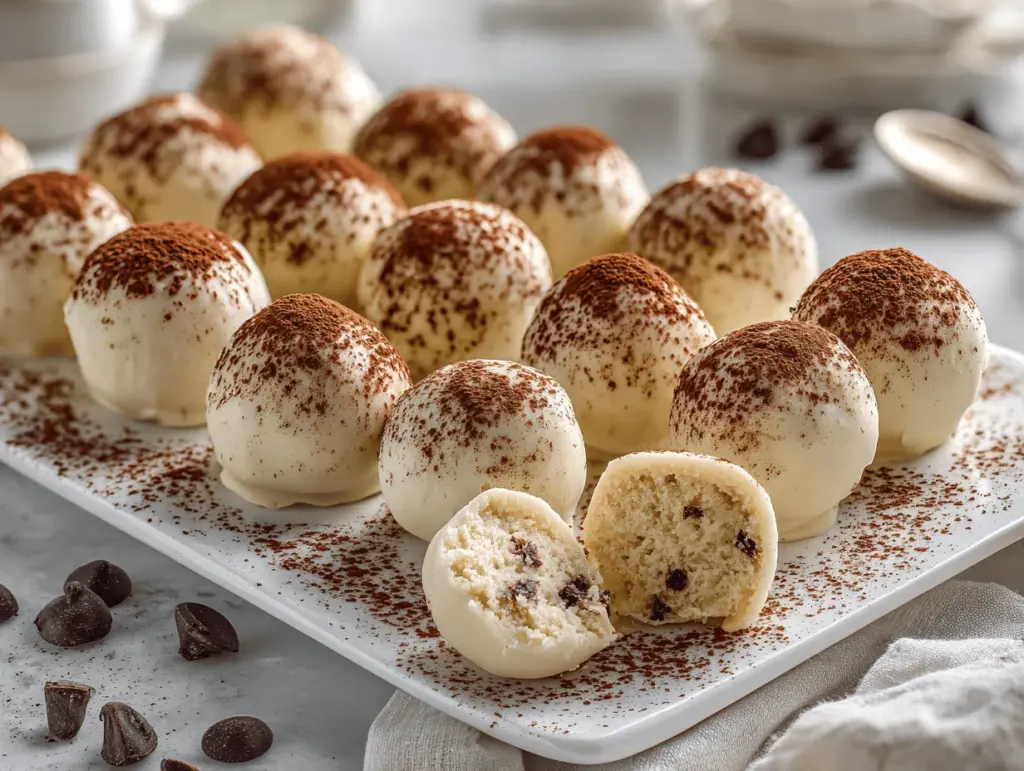
The first time I bit into a tiramisu truffle, it was like a little bite of heaven—silky, creamy, and dusted with cocoa, just like the classic Italian dessert. But honestly, these tiramisu truffles are even more fun because you can pop them in your mouth, no fork required! I started making these during the holidays years ago, and now they’re the star of every dessert table I set. You know that feeling when everyone goes quiet during dessert—that’s what these little balls of joy do to people. There’s just something about the mix of espresso, mascarpone, and chocolate that feels so luxurious (but shh, they’re easy to whip up in your own kitchen).
I’ve tested this tiramisu truffles recipe more times than I can count. My kids beg for them, my friends request them for parties, and yes, I even sneak one (or two) for myself with an afternoon coffee. What I love most? These dessert balls taste like the real deal—layers of flavor, a gentle coffee kick, and that creamy center—but you don’t need a fancy mixer or any complicated steps. If you’re searching for a fancy dessert that’s secretly simple, this is it. They’re perfect for impressing guests, gifting, or just treating yourself after a long week. Trust me, when you bring out a plate of tiramisu truffles, everyone’s eyes light up.
Whether you’re a tiramisu fan or just love a good homemade truffle, you’ll fall in love with these. Let’s get rolling—literally!
Why You’ll Love This Tiramisu Truffles Recipe
- Quick & Easy: These tiramisu truffles come together in about 30 minutes (plus a little chill time). Perfect for when you want something impressive without spending hours in the kitchen.
- Simple Ingredients: No need to hunt down rare imports—everything you need is available at most grocery stores. Honestly, you probably have most of the basics already.
- Perfect for Entertaining: Whether it’s a holiday party, birthday, or brunch, these dessert balls dress up any occasion. They’re bite-sized, portable, and look stunning on a platter.
- Crowd-Pleaser: I have yet to meet someone who doesn’t love these. Kids, adults, even the “I don’t like coffee” folks end up sneaking seconds. They literally disappear!
- Unbelievably Delicious: The creamy mascarpone center, espresso-soaked ladyfingers, and chocolatey coating hit all the right notes—rich, balanced, and just sweet enough.
What sets my tiramisu truffles apart? I blend the ladyfingers with a touch of real espresso (not just instant powder) and use mascarpone for an authentic, luxuriously creamy filling. Rolling the balls in a mix of cocoa and chocolate gives you that classic tiramisu finish, just in truffle form. These aren’t just cake balls with coffee—they taste like true tiramisu, only easier to serve and eat. Plus, you can prep them ahead (hello, stress-free entertaining).
Honestly, I think the best part is how they create those “wow” moments. People always ask for the recipe, and I love seeing their surprised faces when I tell them how easy it is. If you want a dessert that’s both impressive and foolproof, these tiramisu truffles are for you. They’re a little bit fancy, a lot of fun, and totally irresistible.
What Ingredients You Will Need
This tiramisu truffles recipe keeps things simple but delivers big on flavor. The ingredient list is short, sweet, and packed with Italian-inspired goodness. Most are pantry staples or easy finds at any supermarket:
- Ladyfingers (Savoiardi): About 7 ounces (200g), crushed. These are the backbone of tiramisu flavor and texture. If you can’t find them, use plain vanilla wafers as a backup—just don’t tell my Italian grandma!
- Mascarpone Cheese: 8 ounces (225g), softened. The creamy heart of classic tiramisu. I always go for Galbani or BelGioioso—so smooth!
- Powdered Sugar: 1/2 cup (60g), sifted. Adds sweetness and helps bind everything together. You might want to add a touch more if your mascarpone is extra tangy.
- Espresso or Strong Coffee: 1/4 cup (60ml), cooled. Real espresso makes a difference, but strong brewed coffee works too. Don’t use instant if you can avoid it—the flavor just isn’t the same.
- Dark Chocolate: 6 ounces (170g), melted. For dipping and that classic tiramisu “bittersweet” finish. I like Ghirardelli or Lindt 70% for a deep, balanced chocolate flavor.
- Unsweetened Cocoa Powder: 2 tablespoons, for dusting. Gives that iconic tiramisu look and a little edge of bitterness.
- Optional: Coffee Liqueur (Kahlua): 1 tablespoon, for extra depth. (Skip for kids or swap with a splash of vanilla extract.)
- Pinch of Salt: Trust me, it wakes up all the other flavors.
Substitution Tips:
- Gluten-Free? Use gluten-free ladyfingers or vanilla cookies. The rest of the recipe is naturally gluten-free.
- Dairy-Free? Substitute mascarpone with a dairy-free cream cheese alternative and use dairy-free dark chocolate.
- No Espresso on Hand? Use strong instant coffee, just make it nice and concentrated.
- Want it Boozy? Add a splash of rum or amaretto to the espresso for a grown-up twist.
In summer, I sometimes roll the truffles in finely chopped pistachios or even add a little orange zest for a brighter vibe. You can totally play around with the flavors once you’ve tried the classic version!
Equipment Needed
- Mixing Bowls: You’ll want at least two—one for the truffle mixture and another for the melted chocolate. Stainless steel or glass works great and cleans up easily.
- Electric Mixer or Sturdy Whisk: Makes blending mascarpone and sugar a breeze. I’ve done this by hand in a pinch, but a hand mixer saves your arm.
- Food Processor or Rolling Pin: For crushing ladyfingers. I usually toss them in a zip-top bag and bash with a rolling pin—super satisfying!
- Baking Sheet: Lined with parchment or wax paper for setting the truffles. If you don’t have a sheet, a large plate works in a pinch.
- Small Cookie Scoop or Spoon: For portioning out uniform truffle balls. A tablespoon measure works, too.
- Fork or Dipping Tool: For dunking truffles in melted chocolate. I use two forks—one to dip, one to help slide the truffle back onto the tray.
- Refrigerator: Chilling is key for setting the truffles properly.
I’ve used everything from fancy silicone mats to cheap plastic wrap—these truffles aren’t fussy! If you make a lot of truffles, investing in a small cookie scoop is life-changing (easy to clean, lasts ages). For the chocolate dipping, keep a damp towel nearby—things get messy, but that’s half the fun.
How To Make Tiramisu Truffles – Step-by-Step Preparation

- Crush the Ladyfingers: Place 7 oz (200g) ladyfingers in a large zip-top bag. Smash with a rolling pin until you have fine crumbs, or pulse in a food processor. You want a sandy, even texture—no big chunks.
- Make the Mascarpone Filling: In a mixing bowl, combine 8 oz (225g) mascarpone, 1/2 cup (60g) powdered sugar, and a pinch of salt. Beat with an electric mixer or sturdy whisk until smooth and fluffy—about 1-2 minutes. If using, add 1 tbsp coffee liqueur or 1 tsp vanilla extract for flavor.
- Add Espresso: Gradually pour in 1/4 cup (60ml) cooled espresso or strong coffee. Mix until fully incorporated. The mixture should be creamy but not runny. If it’s too loose, add a couple extra spoonfuls of ladyfinger crumbs.
- Combine and Chill: Add the ladyfinger crumbs to the mascarpone mixture. Stir gently until everything is evenly combined. The dough should be soft but able to hold its shape. Cover and refrigerate for 30-45 minutes—this makes rolling much easier.
- Roll the Truffles: Using a small cookie scoop or tablespoon, portion out the mixture and roll between your palms into 1-inch (2.5 cm) balls. Place on a parchment-lined baking sheet. If the mixture is sticky, dust your hands with cocoa powder or powdered sugar.
- Chill Again: Pop the tray in the fridge for another 15-20 minutes. This helps the truffles set and makes dipping them in chocolate much smoother.
- Dip in Chocolate: Melt 6 oz (170g) dark chocolate in a microwave-safe bowl, stirring every 30 seconds until smooth. Using a fork, dip each truffle into the chocolate, letting any excess drip off. Place back on the tray.
- Dust with Cocoa: While the chocolate is still wet, sprinkle each truffle with a little unsweetened cocoa powder (or roll them if you prefer a thicker coat).
- Final Chill: Refrigerate the finished truffles for at least 30 minutes, or until the chocolate is set. If you’re in a rush, 10 minutes in the freezer works, but watch so they don’t get icy.
Troubleshooting: If the mixture seems too wet after adding the espresso, sprinkle in extra ladyfinger crumbs until it holds together. If it’s too dry, add a spoonful more mascarpone. The key is a dough that’s soft but not sticky. Don’t worry if your truffles are a little lumpy—the cocoa dusting covers all!
Personal Tips: I always taste the filling before chilling—sometimes I add a pinch more salt or a few drops of coffee liqueur. And honestly, the messier your kitchen, the better they seem to taste. That’s just a rule of thumb around here.
Cooking Tips & Techniques
Making tiramisu truffles is pretty straightforward, but I’ve picked up a few tricks over the years to make things even smoother (and tastier):
- Use Room-Temperature Mascarpone: Cold cheese can get clumpy and hard to blend. Let it sit out while you prep the other ingredients.
- Don’t Over-Mix: Stir just until combined. Over-mixing can make the filling too loose or gummy, especially with mascarpone.
- Chill, Chill, Chill: Don’t rush the chilling steps—cold truffles roll better and dip easier. If you’re short on time, a quick blast in the freezer works, but don’t forget about them!
- Keep Hands Clean: Dust your palms with cocoa powder or powdered sugar to prevent sticking while rolling. I keep a small bowl nearby for quick touch-ups.
- Chocolate Dipping: Melt chocolate in short bursts and stir often. Overheating can cause it to seize up. If the chocolate thickens, add a teaspoon of coconut oil or butter to thin it out.
Common Mistakes & Solutions:
- Mixture Too Wet: Add ladyfinger crumbs a little at a time until it firms up.
- Chocolate Too Thick: Stir in a bit of coconut oil or vegetable shortening.
- Truffles Cracking: Let them warm up slightly before dipping in chocolate—too cold, and the chocolate shell can split.
I once tried to skip the second chill to save time—big mistake! The truffles fell apart in the chocolate. Lesson learned: a little patience goes a long way. And if your truffles aren’t perfectly round, don’t sweat it. Homemade charm is half the appeal!
Variations & Adaptations
One thing I love about tiramisu truffles is how easily you can put your own spin on them. Here are some of my favorite ways to mix things up:
- Gluten-Free Version: Use gluten-free ladyfingers or vanilla cookies. The rest of the ingredients stay the same, and you won’t notice the swap!
- Dairy-Free / Vegan: Substitute mascarpone with a plant-based cream cheese (like Kite Hill) and use dairy-free dark chocolate. Double-check that your ladyfingers are dairy-free too.
- Nutty Crunch: Roll finished truffles in finely chopped toasted hazelnuts, pistachios, or almonds for extra flavor and texture.
- Mocha Kick: Add 1 teaspoon of instant espresso powder to the chocolate before melting for a deeper coffee flavor.
- Festive Twist: Sprinkle the tops with holiday-colored sprinkles or edible gold dust for special occasions. Perfect for Christmas or New Year’s parties!
- Personal Favorite: I sometimes add orange zest to the mascarpone filling—about 1 teaspoon—for a fresh, citrusy note that pairs beautifully with the rich espresso and chocolate.
If you’re worried about allergens, these truffles are easy to adapt. For nut allergies, just skip the nut toppings and double-check your chocolate brand. If you want to try a no-caffeine version, use decaf espresso or even a caramel coffee syrup. The possibilities are endless—don’t be afraid to experiment!
Serving & Storage Suggestions
Tiramisu truffles are best served chilled—cold from the fridge, the centers are perfectly creamy, and the chocolate shell has a satisfying snap. I love arranging them on a pretty platter and dusting a bit more cocoa powder over the top for that classic tiramisu look. They also look stunning nestled in mini cupcake liners, especially for parties or gift boxes.
Pair these dessert balls with espresso, cappuccino, or a glass of dessert wine for an extra-special treat. They’re lovely on a dessert bar with fresh berries, biscotti, or chocolate-dipped strawberries.
Storage is easy: pop the truffles in an airtight container and refrigerate for up to 5 days. If you want to make them ahead, freeze them for up to a month—just let them thaw in the fridge before serving. For best flavor, let them sit at room temperature for about 10 minutes before you dig in. Honestly, the flavors get even better after a day or two as everything melds together. It’s hard to wait, but totally worth it!
Nutritional Information & Benefits
Each tiramisu truffle is about 90-110 calories, with 2g protein, 8g carbs, and 5g fat (give or take, depending on your chocolate and mascarpone brands). They’re indulgent, sure, but the portion size keeps things in check.
Mascarpone adds a bit of calcium and protein, while dark chocolate brings antioxidants. If you choose high-quality chocolate and real espresso, you get a little boost of mood-lifting compounds, too—no kidding! These truffles are naturally egg-free and can be made gluten-free or dairy-free with simple swaps.
Biggest note: they do contain dairy and gluten in the classic version, so be mindful if you’re serving folks with sensitivities. I love that you can make a batch that suits almost any dietary need with just a few tweaks!
Conclusion
If you’re looking for a dessert that’s both showstopping and secretly simple, these tiramisu truffles are the answer. They pack all the classic tiramisu flavors into a cute, easy-to-eat package—perfect for parties, gifting, or just treating yourself. I love how customizable they are, too; you can make them gluten-free, dairy-free, or even jazz them up for holidays.
Give these dessert balls a try, and don’t be afraid to make them your own! Whether you go classic or try a fun variation, they’ll disappear quickly (trust me, I’ve learned to hide a few in the back of the fridge for myself). If you try this tiramisu truffles recipe, let me know how it goes—leave a comment, share your twist, or tag me on Pinterest. Happy rolling, and happy indulging!
FAQs – Tiramisu Truffles Recipe
How long do tiramisu truffles last in the fridge?
Stored in an airtight container, tiramisu truffles stay fresh for up to 5 days. The flavors actually improve after a day or two!
Can I freeze tiramisu truffles?
Absolutely! Place them in a single layer in a freezer-safe container. They’ll keep for up to a month. Thaw in the fridge before serving.
What can I use instead of ladyfingers?
If you can’t find ladyfingers, use vanilla wafers or even plain sponge cake. Just make sure they’re dry so the texture stays right.
How can I make these truffles gluten-free?
Just swap the ladyfingers for gluten-free cookies or ladyfingers. The rest of the ingredients are already gluten-free in most cases.
Can I make tiramisu truffles without coffee?
Yes! Use decaf espresso for a caffeine-free version, or swap in caramel or chocolate syrup for a different flavor profile. They’ll still taste amazing.
Pin This Recipe!

Tiramisu Truffles

These easy tiramisu truffles pack all the classic Italian dessert flavors—espresso, mascarpone, and chocolate—into creamy, bite-sized dessert balls. Perfect for parties, gifting, or a special treat, they’re simple to make and sure to impress.
- Prep Time: 20 minutes
- Cook Time: 0 minutes
- Total Time: 1 hour 30 minutes
- Yield: 24 truffles 1x
- Category: Dessert
- Cuisine: Italian
Ingredients
- 7 ounces (200g) ladyfingers (Savoiardi), crushed (about 24 cookies)
- 8 ounces (225g) mascarpone cheese, softened
- 1/2 cup (60g) powdered sugar, sifted
- 1/4 cup (60ml) espresso or strong coffee, cooled
- 6 ounces (170g) dark chocolate, melted
- 2 tablespoons unsweetened cocoa powder, for dusting
- 1 tablespoon coffee liqueur (Kahlua), optional (or 1 teaspoon vanilla extract)
- Pinch of salt
Instructions
- Place ladyfingers in a large zip-top bag and crush with a rolling pin until fine, or pulse in a food processor.
- In a mixing bowl, beat mascarpone, powdered sugar, and a pinch of salt with an electric mixer or whisk until smooth and fluffy (1-2 minutes). Add coffee liqueur or vanilla if using.
- Gradually mix in cooled espresso or strong coffee until fully incorporated. If the mixture is too loose, add extra ladyfinger crumbs.
- Stir in the ladyfinger crumbs until evenly combined. The dough should be soft but able to hold its shape. Cover and refrigerate for 30-45 minutes.
- Using a small cookie scoop or tablespoon, portion and roll the mixture into 1-inch balls. Place on a parchment-lined baking sheet. Dust hands with cocoa powder or powdered sugar if sticky.
- Chill the tray in the fridge for 15-20 minutes to set the truffles.
- Melt dark chocolate in a microwave-safe bowl, stirring every 30 seconds until smooth.
- Dip each truffle in melted chocolate using a fork, letting excess drip off. Place back on the tray.
- While chocolate is still wet, sprinkle or roll each truffle in unsweetened cocoa powder.
- Refrigerate finished truffles for at least 30 minutes, or until chocolate is set. Serve chilled.
Notes
Use room-temperature mascarpone for best texture. If the mixture is too wet, add more ladyfinger crumbs; if too dry, add a bit more mascarpone. For gluten-free, use gluten-free ladyfingers. For dairy-free, substitute mascarpone and chocolate with dairy-free alternatives. Truffles can be made ahead and stored in the fridge for up to 5 days or frozen for up to a month.
Nutrition
- Serving Size: 1 truffle
- Calories: 100
- Sugar: 5
- Sodium: 20
- Fat: 5
- Saturated Fat: 3
- Carbohydrates: 8
- Fiber: 1
- Protein: 2
Keywords: tiramisu truffles, tiramisu balls, easy tiramisu dessert, Italian truffles, mascarpone truffles, coffee dessert, no bake dessert, party dessert, holiday truffles, chocolate truffles


