
The scent of freshly baked sugar cookies, lightly kissed with vanilla and a hint of lemon, instantly brings a smile to my face. I first stumbled upon this traditional shamrock sugar cookies recipe during a St. Patrick’s Day gathering years ago. Honestly, it felt like a little green magic on a plate—simple, sweet, and just the right touch of festive charm. These cookies have since become my go-to treat whenever I want something that’s both nostalgic and delightfully fun to bake.
What I love most about these shamrock sugar cookies is how they blend that classic sugar cookie flavor with a playful twist that’s perfect for celebrating Irish heritage or simply adding a splash of green to your cookie jar. Over the years, I’ve tested this recipe multiple times, tweaking the texture until it’s just right—soft edges with a slight crispness, and a buttery melt-in-your-mouth finish. If you’re looking for a cookie recipe that’s easy, crowd-pleasing, and perfect for decorating, you’ll adore these shamrock sugar cookies as much as I do.
Whether you’re baking for family, a festive event, or just because, these shamrock sugar cookies bring a bit of charm and sweetness to any occasion. Plus, they’re a fun way to get the kids involved in the kitchen. Trust me, once you try this recipe, it’ll be a tradition you come back to year after year.
Why You’ll Love This Recipe
- Quick & Easy: Comes together in under 30 minutes, perfect for last-minute baking urges or holiday prep.
- Simple Ingredients: Uses pantry staples you likely already have, no fancy or hard-to-find items needed.
- Perfect for Celebrations: Ideal for St. Patrick’s Day parties, classroom treats, or just a fun baking day.
- Crowd-Pleaser: Kids and adults alike love the soft texture and sweet, buttery flavor.
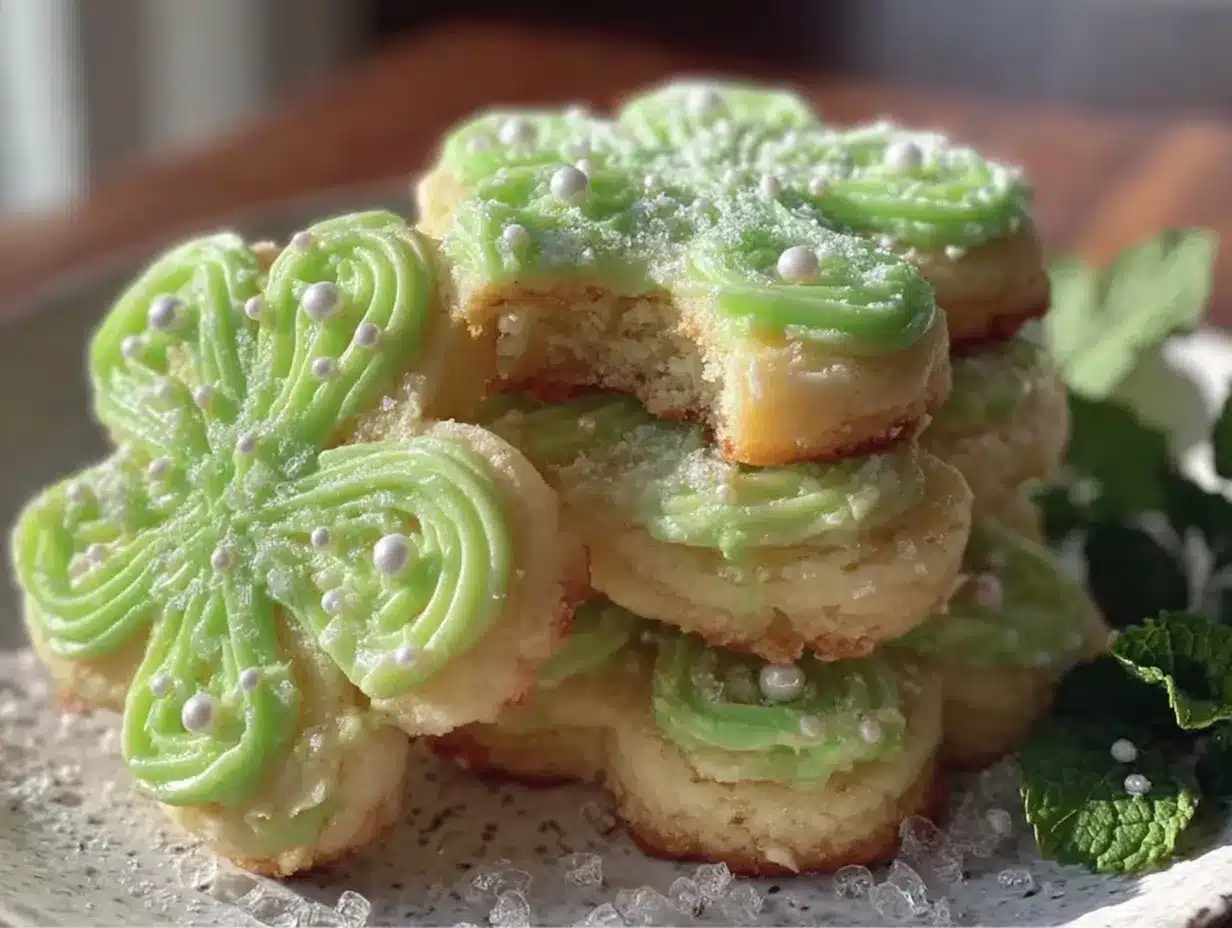
- Fun to Decorate: The shamrock shape invites creativity—frost them, sprinkle with sugar, or keep it classic.
What sets this shamrock sugar cookies recipe apart is how the dough holds its shape beautifully without spreading too much in the oven. I’ve found that chilling the dough just right, and using a touch of lemon zest, gives the cookies a fresh note that brightens the classic sugar cookie taste. It’s like comfort food with a little zing! Plus, this recipe is forgiving—whether you’re a newbie baker or a seasoned pro, you’ll get consistent, delicious results.
Honestly, biting into one of these cookies feels like a little celebration in your mouth. The texture is tender and buttery, with just enough crisp around the edges to keep things interesting. It’s the kind of recipe that makes you want to close your eyes and savor every bite.
What Ingredients You Will Need
This recipe uses simple, wholesome ingredients to deliver bold flavor and satisfying texture without the fuss. Most of these are pantry staples, so you might already have everything on hand.
- All-purpose flour (2 ¾ cups / 345 grams) – The base for our dough, providing structure.
- Baking powder (1 teaspoon) – Helps the cookies rise slightly and stay light.
- Salt (½ teaspoon) – Balances the sweetness and enhances flavor.
- Unsalted butter (1 cup / 227 grams, softened) – Adds richness and tenderness. I prefer using Land O’Lakes for best results.
- Granulated sugar (1 ½ cups / 300 grams) – Sweetness with a bit of crunch.
- Large eggs (2, room temperature) – Bind everything together and add moisture.
- Pure vanilla extract (2 teaspoons) – For that classic cookie aroma.
- Lemon zest (1 teaspoon) – A subtle fresh twist that brightens the flavor.
- Green food coloring (optional, a few drops) – To tint the dough shamrock green, but you can skip this for natural color.
- Coarse sanding sugar (for sprinkling) – Adds sparkle and texture on top.
Ingredient tips: Look for firm, high-quality butter for the best texture. If you want to make these dairy-free, swap butter for a vegan margarine and use a flax egg instead of whole eggs (1 tablespoon ground flaxseed + 3 tablespoons water per egg, chilled). For a gluten-free version, try a 1-to-1 gluten-free baking flour blend—though the texture will differ slightly.
Equipment Needed
- Mixing bowls: A large bowl for combining dry ingredients and another for wet ingredients works best.
- Electric mixer or stand mixer: Makes creaming butter and sugar a breeze, but you can also use a sturdy hand whisk if you’re up for a workout.
- Measuring cups and spoons: Accurate measurements are key for cookie success.
- Rolling pin: For evenly rolling out the dough to about ¼ inch (6 mm) thickness.
- Shamrock cookie cutter: Essential for that classic festive shape; if you don’t have one, any small cookie cutter or even a knife to cut shapes will do.
- Baking sheets: Non-stick or lined with parchment paper for easy cookie removal.
- Cooling racks: To cool cookies evenly and prevent sogginess.
If you don’t have a stand mixer, no worries! I’ve made these cookies many times with just a hand mixer or even by hand, though it takes a bit longer. A silicone baking mat is a great budget-friendly alternative to parchment paper and makes cleanup simpler. Keep your rolling pin clean by dusting lightly with flour to prevent sticking.
Detailed Preparation Method
- Mix dry ingredients: In a medium bowl, whisk together 2 ¾ cups (345 g) all-purpose flour, 1 teaspoon baking powder, and ½ teaspoon salt. Set aside. This usually takes about 3 minutes.
- Cream butter and sugar: In a large bowl, beat 1 cup (227 g) softened unsalted butter with 1 ½ cups (300 g) granulated sugar until light and fluffy—about 4 to 5 minutes using a mixer. You’ll notice the mixture turn pale and airy. This step is key for tender cookies.
- Add eggs and flavorings: Beat in 2 large room-temperature eggs, one at a time, mixing well after each addition. Then stir in 2 teaspoons vanilla extract and 1 teaspoon lemon zest. If you want green dough, add a few drops of green food coloring here to get your perfect shade.
- Combine wet and dry: Gradually add the flour mixture to the wet ingredients, mixing on low speed just until combined. Be careful not to overmix—stop as soon as you don’t see dry flour. The dough should be soft but not sticky.
- Chill the dough: Divide dough into two discs, wrap tightly in plastic wrap, and refrigerate for at least 1 hour (up to 24 hours). Chilling helps prevent spreading and makes rolling easier.
- Preheat and prepare: Preheat your oven to 350°F (175°C). Line baking sheets with parchment paper or silicone mats.
- Roll and cut: Lightly flour your surface and rolling pin. Roll out one dough disc to about ¼ inch (6 mm) thickness. Using your shamrock cookie cutter, cut shapes and transfer them carefully to the baking sheets, spacing about 2 inches apart.
- Decorate: Sprinkle cookies with coarse sanding sugar before baking for a sparkling finish.
- Bake: Bake for 10 to 12 minutes or until edges are just starting to turn golden. The centers should look set but not browned. Rotate pans halfway through for even baking.
- Cool: Let cookies cool on the baking sheet for 5 minutes before transferring to a wire rack to cool completely. This keeps bottoms from getting soggy.
Pro tip: If your dough feels too soft after chilling, pop it back in the fridge for another 20 minutes. Also, don’t skip the chilling step—it’s a game changer for cookie shape and texture.
Cooking Tips & Techniques
Here’s what I’ve learned after countless batches of shamrock sugar cookies. First, creaming the butter and sugar until light and fluffy is absolutely crucial. It traps air, giving your cookies that tender crumb. I’ve made the mistake of rushing this step before, and the cookies came out dense and flat.
Measuring flour properly matters too—too much flour makes dry, crumbly cookies. I recommend spooning the flour into your measuring cup and leveling it off with a knife instead of scooping directly from the bag.
Chilling the dough isn’t negotiable in my book. It stops the butter from melting too quickly in the oven, which keeps your cookies from spreading into sad blobs. Plus, chilled dough is easier to roll out and cut precisely.
When rolling the dough, keep it even thickness for consistent baking. If your cookies bake unevenly, you might have rolled some parts thicker than others.
Lastly, watch the baking time closely. These cookies bake fast, and a minute or two can make a big difference. I usually start checking at 9 minutes and pull them out when edges turn just golden but centers still look soft.
Variations & Adaptations
- Gluten-free version: Substitute all-purpose flour with a 1-to-1 gluten-free baking blend. The texture will be slightly different but still delicious.
- Vegan adaptation: Use dairy-free margarine and replace eggs with flax eggs (1 tablespoon ground flaxseed + 3 tablespoons water per egg). Add a bit extra vanilla for flavor boost.
- Flavor twists: Try adding ½ teaspoon almond extract along with vanilla for a nutty note. Or swap lemon zest with orange zest for a citrusy surprise.
- Decorating ideas: Instead of sanding sugar, frost with royal icing and add edible shamrock sprinkles. For a healthier twist, try a light dusting of powdered sugar and a few chopped pistachios.
- Cooking method: These cookies can also be baked on a pizza stone for a more even heat, resulting in a beautifully crisp bottom.
Personally, I once doubled the recipe and tossed in a handful of mini chocolate chips to see how it’d taste. Verdict: surprisingly good! The chocolate added a nice contrast to the bright lemon and vanilla flavors.
Serving & Storage Suggestions
Shamrock sugar cookies are best served at room temperature, allowing their buttery softness and subtle flavors to shine. They make a charming addition to any holiday platter or afternoon tea. Pair them with a cup of Irish breakfast tea or a glass of cold milk for a classic combo.
To store, keep cookies in an airtight container at room temperature for up to 5 days. If you want to keep them longer, freeze the cooled cookies in a single layer on a baking sheet, then transfer to a freezer-safe container or bag. They stay fresh for up to 3 months this way.
When reheating, pop frozen cookies in a 300°F (150°C) oven for about 5 minutes to regain that just-baked warmth. Flavors tend to mellow and meld beautifully after a day, so if you can wait, letting them rest overnight is a tasty move.
Nutritional Information & Benefits
Each shamrock sugar cookie (based on about 24 cookies per batch) contains approximately 150 calories, 7 grams of fat, 20 grams of carbohydrates, and 2 grams of protein. While these are a sweet treat, they also provide a modest serving of energy from quality ingredients like real butter and eggs.
The lemon zest adds a small dose of vitamin C and a fresh zing without added sugar. Plus, by making your own cookies, you avoid preservatives and artificial additives found in many store-bought versions.
For those mindful of dietary needs, this recipe can be adapted to be gluten-free or vegan without much fuss. Just be mindful of allergens like eggs and dairy if serving to sensitive guests.
Conclusion
These traditional shamrock sugar cookies are a simple way to bring a little joy and Irish cheer into your kitchen. With basic ingredients and just a handful of steps, you can create a batch of cookies that’s soft, buttery, and festive all at once. I love this recipe because it’s reliable, fun to make, and always delights everyone who tries it.
Feel free to customize the flavors or decorating styles to make it your own—baking is all about experimenting and enjoying the process, after all. If you give this recipe a try, I’d love to hear how your shamrock sugar cookies turned out. Drop a comment below or share your photos!
Happy baking, and may your cookie jar always be full!
Frequently Asked Questions
Can I make the dough ahead of time?
Yes! You can refrigerate the dough for up to 24 hours or freeze it for up to 3 months. Just thaw in the fridge before rolling.
Why do my cookies spread too much?
Too-soft dough or skipping the chilling step often leads to spreading. Make sure to chill the dough and measure flour accurately.
Can I use other shapes instead of shamrocks?
Absolutely! Any cookie cutter will work. Hearts, stars, or circles are great alternatives.
How do I keep the cookies soft?
Don’t overbake—take them out when edges are lightly golden but centers still look set. Store in an airtight container to retain moisture.
Can I add frosting or decoration?
Yes, royal icing or buttercream frosting works well. Decorating with sprinkles or sanding sugar adds festive charm.
Pin This Recipe!
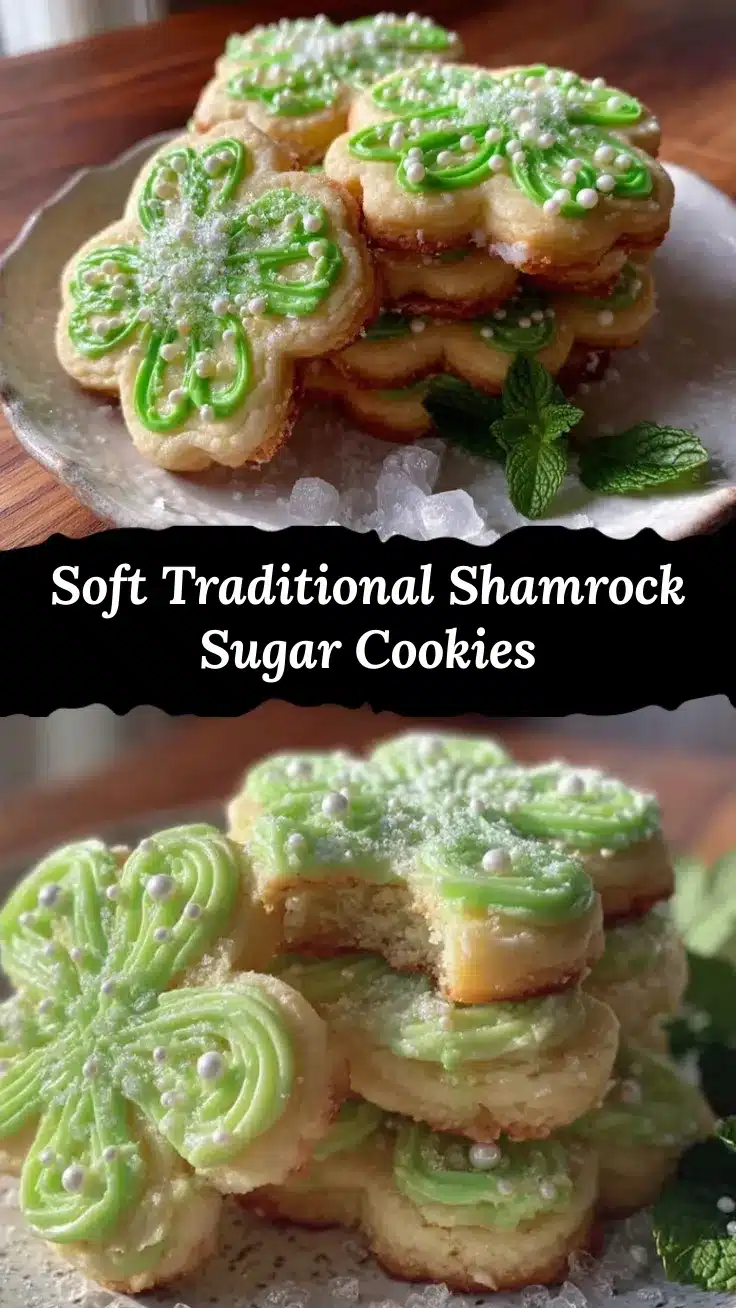
Irresistible Shamrock Sugar Cookies

These shamrock sugar cookies blend classic sugar cookie flavor with a playful twist, perfect for celebrating Irish heritage or adding a splash of green to your cookie jar. Soft edges with a slight crispness and a buttery melt-in-your-mouth finish make them a crowd-pleasing treat.
- Prep Time: 15 minutes
- Cook Time: 12 minutes
- Total Time: 1 hour 27 minutes
- Yield: 24 cookies 1x
- Category: Dessert
- Cuisine: Irish-American
Ingredients
- 2 ¾ cups (345 grams) all-purpose flour
- 1 teaspoon baking powder
- ½ teaspoon salt
- 1 cup (227 grams) unsalted butter, softened
- 1 ½ cups (300 grams) granulated sugar
- 2 large eggs, room temperature
- 2 teaspoons pure vanilla extract
- 1 teaspoon lemon zest
- Green food coloring (optional, a few drops)
- Coarse sanding sugar (for sprinkling)
Instructions
- Mix dry ingredients: In a medium bowl, whisk together 2 ¾ cups (345 g) all-purpose flour, 1 teaspoon baking powder, and ½ teaspoon salt. Set aside.
- Cream butter and sugar: In a large bowl, beat 1 cup (227 g) softened unsalted butter with 1 ½ cups (300 g) granulated sugar until light and fluffy, about 4 to 5 minutes using a mixer.
- Add eggs and flavorings: Beat in 2 large room-temperature eggs, one at a time, mixing well after each addition. Stir in 2 teaspoons vanilla extract and 1 teaspoon lemon zest. Add green food coloring if desired.
- Combine wet and dry: Gradually add the flour mixture to the wet ingredients, mixing on low speed just until combined. Do not overmix.
- Chill the dough: Divide dough into two discs, wrap tightly in plastic wrap, and refrigerate for at least 1 hour (up to 24 hours).
- Preheat oven to 350°F (175°C). Line baking sheets with parchment paper or silicone mats.
- Roll and cut: Lightly flour surface and rolling pin. Roll out one dough disc to about ¼ inch (6 mm) thickness. Cut shapes with shamrock cookie cutter and transfer to baking sheets, spacing about 2 inches apart.
- Decorate: Sprinkle cookies with coarse sanding sugar before baking.
- Bake: Bake for 10 to 12 minutes or until edges are just starting to turn golden and centers look set but not browned. Rotate pans halfway through baking.
- Cool: Let cookies cool on baking sheet for 5 minutes before transferring to a wire rack to cool completely.
Notes
Chilling the dough is essential to prevent spreading and to make rolling easier. Cream butter and sugar until light and fluffy for tender cookies. Measure flour properly by spooning and leveling to avoid dry, crumbly cookies. Watch baking time closely to keep cookies soft with lightly golden edges. Dough can be refrigerated up to 24 hours or frozen up to 3 months.
Nutrition
- Serving Size: 1 cookie
- Calories: 150
- Fat: 7
- Carbohydrates: 20
- Protein: 2
Keywords: shamrock sugar cookies, St. Patrick's Day cookies, sugar cookies, festive cookies, easy cookie recipe, buttery cookies, lemon zest cookies


