Introduction
The smell of warm mini waffles fresh off the griddle, mingling with sweet berries and rich chocolate, instantly reminds me of cozy Galentine’s mornings spent with my closest friends. Honestly, creating this Irresistible Galentine’s Mini Waffle Charcuterie Board has become my go-to for celebrating friendship with a touch of fun and indulgence. I first put this together during a chilly February weekend when I wanted something both playful and impressive but without hours in the kitchen. It’s a total crowd-pleaser that brings everyone together — you know, that perfect mix of sweet, savory, and just a bit fancy.
What’s special about this mini waffle charcuterie board is how it transforms simple brunch staples into a feast for the eyes and the palate. I’ve made it countless times, tweaking everything from the waffle batter to the topping combos, so it’s not just another brunch idea but THE one you’ll want to repeat. Whether you’re hosting your Galentine’s crew, a birthday brunch, or just craving a special treat, this board hits the sweet spot between casual and chic. Plus, it’s a creative way to skip the usual spread and bring a fresh twist to your table.
So, if you’re wondering how to wow your besties with minimal fuss but maximum flavor, this recipe is your answer. I promise, you’ll be reminiscing about that first bite long after the last waffle is gone.
Why You’ll Love This Recipe
After testing this Irresistible Galentine’s Mini Waffle Charcuterie Board multiple times (and trust me, there were a few hilarious waffle mishaps along the way), I can say with confidence it’s a winner for any brunch occasion. Here’s why you’ll want to make it ASAP:
- Quick & Easy: The mini waffles cook up in about 15 minutes, making it perfect for last-minute brunch plans or lazy weekend mornings.
- Simple Ingredients: No need for a special grocery run — you probably have everything at home already, from eggs to fresh fruit.
- Perfect for Galentine’s & Beyond: Whether it’s a festive brunch or a casual catch-up, this board fits the vibe and adds a fun, interactive element.
- Crowd-Pleaser: Kids, adults, picky eaters — everyone loves building their own mini waffle bites with all the toppings.
- Unbelievably Delicious: The combination of fluffy waffles, creamy spreads, fresh fruit, and a touch of chocolate or nuts is downright addictive.
What really sets this recipe apart is the way the mini waffle format lets you play with textures and flavors in bite-sized portions. Plus, mixing sweet and savory components on the same board means there’s something for every palate. Honestly, putting together this charcuterie board feels like an art project — but tastier! It’s that kind of recipe that makes brunch feel special without a ton of stress.
What Ingredients You Will Need
This Irresistible Galentine’s Mini Waffle Charcuterie Board uses simple, wholesome ingredients to create a feast that’s both pretty and satisfying. Most items are pantry staples or fresh picks from the market, and swapping is easy if you want to customize. Here’s what you’ll gather:
- For the Mini Waffles:
- All-purpose flour (1 ½ cups / 180 g) – I like King Arthur for consistent results
- Baking powder (2 tsp) – ensures fluffy waffles
- Granulated sugar (2 tbsp) – balances the batter’s flavor
- Salt (¼ tsp) – enhances overall taste
- Milk (1 cup / 240 ml) – whole milk works best but any milk or milk alternative is fine
- Large eggs (2, room temperature) – helps with structure and fluffiness
- Unsalted butter (4 tbsp / 56 g), melted – adds richness
- Vanilla extract (1 tsp) – gives a warm, inviting aroma
- For the Charcuterie Board Toppings:
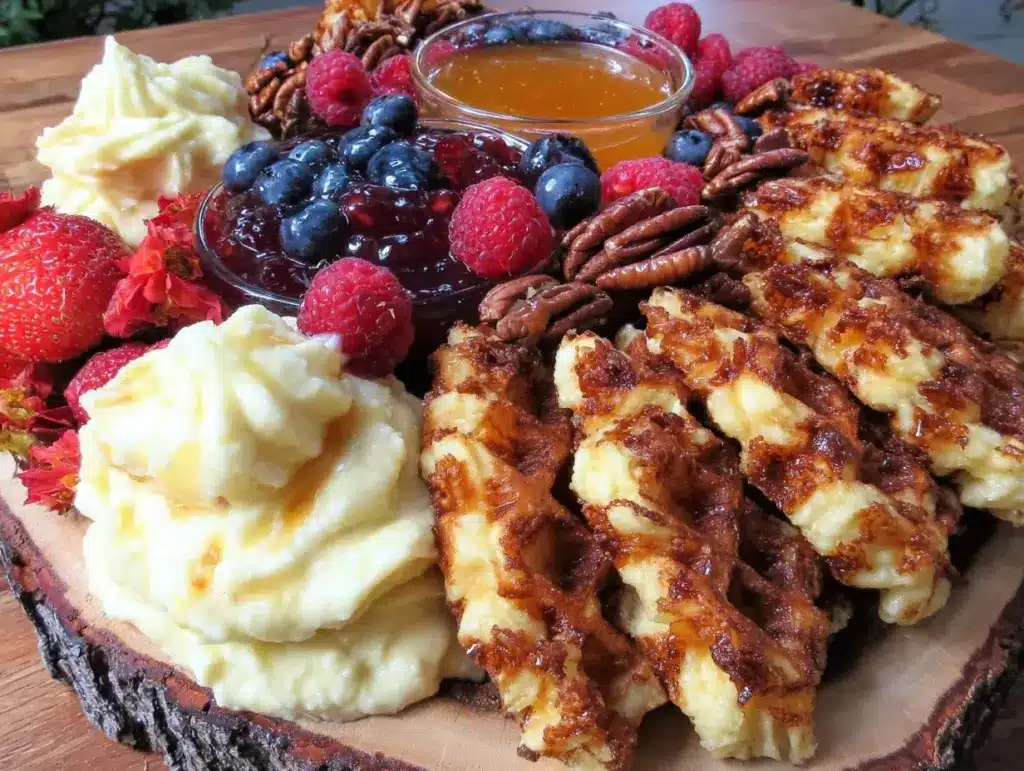
- Fresh berries (strawberries, blueberries, raspberries) – adds brightness and color
- Banana slices – creamy and sweet
- Mini chocolate chips or chunks – for that little indulgent surprise
- Mixed nuts (almonds, pecans, walnuts), roughly chopped – for crunch and nuttiness
- Greek yogurt or mascarpone cheese – creamy spread to dollop on waffles
- Honey or maple syrup – drizzle for natural sweetness
- Fresh mint leaves – optional, but pretty and refreshing
- Optional savory items: thinly sliced prosciutto or smoked salmon – adds a salty contrast
- Extras (Optional):
- Shredded coconut flakes – for tropical flair
- Cinnamon powder – sprinkle for warmth
- Edible flowers – if you want to make it fancy and festive
For gluten-free folks, swapping the all-purpose flour with a 1-to-1 gluten-free blend works great. I’ve also tried almond or oat flour versions, which bring a nice nutty flavor. If you’re dairy-free, use plant-based milk and coconut yogurt instead. The key is fresh, high-quality toppings that make the board look as good as it tastes.
Equipment Needed

The equipment list for this recipe is pretty straightforward, but a few tools make the process easier and more fun. Here’s what you’ll want:
- Mini Waffle Maker: A small, easy-to-use waffle iron designed for bite-sized waffles. If you don’t have one, a regular waffle maker works fine—just cut the waffles into smaller pieces afterward.
- Mixing Bowls: One medium bowl for dry ingredients and another for wet ingredients helps keep things organized.
- Whisk and Measuring Cups/Spoons: Essential for mixing and measuring your batter precisely.
- Spatula: A heat-resistant spatula for folding melted butter and scraping bowls.
- Serving Board or Platter: A wooden charcuterie board or a large flat platter to arrange your mini waffles and toppings beautifully.
- Small Bowls: For holding toppings like nuts, chocolate chips, and yogurt dollops separately on the board.
If you’re on a budget, a regular waffle iron and a nice plate work just as well. I’ve found that cleaning the mini waffle maker right after use keeps it non-stick and prolongs its life. Also, a small offset spatula is a great tool for spreading yogurt or mascarpone evenly. Nothing fancy required, just a little patience and love!
Detailed Preparation Method
- Preheat your mini waffle maker. Most mini waffle irons take about 5 minutes to heat up. You’ll know it’s ready when the indicator light turns on or the surface feels hot to the touch (careful, it’s hot!).
- Mix the dry ingredients: In a medium bowl, whisk together 1 ½ cups (180 g) all-purpose flour, 2 tsp baking powder, 2 tbsp granulated sugar, and ¼ tsp salt. This combo gives your waffles that perfect lift and subtle sweetness.
- Combine the wet ingredients: In a separate bowl, beat 2 large eggs at room temperature, then add 1 cup (240 ml) milk, 4 tbsp (56 g) melted unsalted butter, and 1 tsp vanilla extract. Whisk until smooth and slightly frothy.
- Make the batter: Pour the wet ingredients into the dry and gently fold together using a spatula. Don’t overmix — a few lumps are okay (trust me, overmixing leads to tough waffles!). The batter should be thick but pourable. If it feels too thick, add a splash more milk.
- Cook the mini waffles: Lightly grease the waffle maker with cooking spray or a brush of butter. Pour about 2 tablespoons of batter per mini waffle onto the iron and close the lid. Cook for 2-3 minutes or until golden and crisp. Remove carefully with a fork or tongs and place on a cooling rack. Repeat until all batter is used.
- Prepare your toppings: While waffles are cooking, wash and slice berries, bananas, and chop nuts. Portion out Greek yogurt or mascarpone into small bowls. Keep honey or maple syrup handy for drizzling.
- Assemble the charcuterie board: Arrange mini waffles in clusters on your serving board. Surround with bowls or piles of fruit, nuts, chocolate chips, and spreads. Add fresh mint leaves or edible flowers for a pop of color. Don’t forget to include small spoons or spreaders for yogurts and syrups.
- Serve immediately: Encourage guests to build their own mini waffle bites — layering a dollop of yogurt, a couple of berries, a sprinkle of nuts, and a drizzle of honey. The combination of warm waffles and fresh toppings is unbeatable.
Pro Tip: If you need to keep waffles warm before serving, place them on a baking sheet in a 200°F (95°C) oven for up to 15 minutes. Avoid stacking waffles as they’ll get soggy. Also, if you notice waffles sticking to the iron, give it a quick wipe with a paper towel between batches.
Cooking Tips & Techniques
Making this mini waffle charcuterie board shine is all about a few key tricks I’ve picked up over many brunches:
- Don’t overmix the batter. This is the biggest rookie mistake. A few lumps keep the waffles tender but fully cooked. If you stir too much, the gluten tightens and the texture suffers.
- Use room-temperature ingredients. Eggs and milk at room temp help the batter mix evenly and create fluffier waffles.
- Grease the waffle maker well. Even non-stick irons can stick if the batter has sugar. A light brush of melted butter or non-stick spray before each batch saves frustration.
- Cook waffles until golden and crisp. Patience here yields the best texture. Undercooked waffles are soggy and tough to stack on the board.
- Balance flavors and textures on the board. The sweet and creamy yogurt contrasts beautifully with crunchy nuts, fresh fruit, and the warm waffles.
- Multitask efficiently. While waffles cook, prep toppings to keep your workflow smooth. This keeps everything fresh and ready to assemble.
One time, I forgot to grease the waffle iron and ended up with a mini waffle disaster — chunks stuck and broke apart! Lesson learned: a little butter goes a long way. Also, I’ve found that using a small measuring spoon to portion batter keeps waffles uniform, which looks nicer on the board.
Variations & Adaptations
This recipe is super flexible — I’ve played around with flavors and ingredients to suit different tastes and occasions:
- Gluten-Free Version: Swap all-purpose flour for a 1:1 gluten-free baking flour. The texture is just as good, and it’s a hit with gluten-sensitive guests.
- Vegan Adaptation: Use flax eggs (1 tbsp ground flaxseed + 3 tbsp water per egg) and plant-based milk. Replace butter with coconut oil. The mini waffles still come out fluffy and delicious.
- Seasonal Toppings: In summer, add fresh peaches or nectarines; in fall, swap berries for spiced apples or pears. You can even add a dollop of pumpkin spice yogurt for a festive twist.
- Savory Board: Skip the sweet toppings and swap mascarpone for cream cheese. Add smoked salmon, capers, and dill for a brunch board with a salty kick.
- Chocolate Lover’s Delight: Mix cocoa powder into the waffle batter and add chocolate hazelnut spread alongside fresh strawberries for a dessert-inspired board.
Personally, I love the chocolate and berry combo — the contrast of slightly warm chocolate chips melting on fresh fruit is a game-changer. You could even sprinkle powdered sugar over the waffles for a pretty finish. The key is to have fun and customize based on what your friends love.
Serving & Storage Suggestions
Serve your mini waffle charcuterie board immediately for the best experience. The waffles are warm and crisp, and the fresh toppings shine brightest. If you need to wait, keep waffles warm in a low oven (200°F / 95°C) on a wire rack to prevent sogginess.
This board pairs wonderfully with hot coffee, mimosas, or a fresh fruit smoothie — perfect for a leisurely Galentine’s brunch. Presentation-wise, using a large wooden board or slate platter adds rustic charm. Arrange toppings in small bowls or neat piles for easy grabbing.
To store leftovers, keep waffles in an airtight container in the fridge for up to 2 days. Reheat in a toaster oven or regular oven to bring back their crispness — microwave tends to make them chewy. Fresh fruit and yogurt are best added fresh each time, but nuts and chocolate chips store well.
Flavors actually deepen a bit if you prep the board just before guests arrive. The hint of vanilla in the waffles and sweetness from the honey get even more inviting after a short rest.
Nutritional Information & Benefits
Each mini waffle, topped with fresh fruit and a dollop of Greek yogurt, provides a balanced mix of carbs, protein, and healthy fats. Here’s a rough estimate per serving (about 5 mini waffles with toppings):
| Nutrient | Amount |
|---|---|
| Calories | 350-400 kcal |
| Protein | 10-12 g (thanks to eggs and yogurt) |
| Carbohydrates | 45-50 g (mainly from flour and fruit) |
| Fat | 12-15 g (mostly from butter and nuts) |
| Fiber | 4-6 g (from fruit and nuts) |
The fresh fruit adds antioxidants and vitamins, while nuts contribute heart-healthy fats and crunch. Using Greek yogurt boosts protein and probiotics, which is great for digestion. The recipe can be adjusted to fit gluten-free or dairy-free diets with simple swaps, making it fairly inclusive.
From a wellness perspective, this board feels indulgent but balanced — a lovely way to treat yourself and friends without going overboard.
Conclusion
In short, this Irresistible Galentine’s Mini Waffle Charcuterie Board is the brunch recipe you didn’t know you needed. It’s easy, visually stunning, and endlessly customizable — perfect for creating memorable moments with your best friends. Whether you stick with the classic sweet toppings or venture into savory territory, the mini waffle format is a playful canvas that makes brunch feel special.
I love this recipe because it brings people together over food and fun, and honestly, it makes me smile every time I see that colorful board spread out with laughter around it. Don’t be shy to add your own twist or share your favorite combos — that’s what makes it yours!
If you try this recipe, please leave a comment or share your photos. I’d love to hear how your Galentine’s brunch turns out! Here’s to good friends and great food — happy cooking!
FAQs
Can I make the mini waffles ahead of time?
Yes! You can prepare the mini waffles a few hours in advance and keep them warm in a 200°F (95°C) oven. Just reheat in a toaster oven before serving for best texture.
What if I don’t have a mini waffle maker?
No worries! Use a regular waffle iron and cut the waffles into bite-sized pieces after cooking. They’ll still be perfect for the charcuterie board.
Can I freeze the mini waffles?
Absolutely. Freeze cooked mini waffles in a single layer on a baking sheet, then transfer to a freezer bag. Reheat in a toaster or oven straight from frozen.
What are some good dairy-free substitutions?
Swap milk for almond or oat milk, replace butter with coconut oil, and use coconut or almond-based yogurt instead of Greek yogurt. The waffles will still be tasty and fluffy.
How do I keep the toppings fresh and vibrant?
Prepare fresh fruit and yogurt just before serving. Keep nuts and chocolate chips in small bowls at room temperature. Add delicate items like mint leaves or edible flowers last for the prettiest presentation.
Pin This Recipe!

Irresistible Galentine’s Mini Waffle Charcuterie Board

A quick and easy mini waffle charcuterie board perfect for Galentine’s brunch, combining fluffy waffles with fresh fruit, creamy spreads, and sweet or savory toppings for a fun and indulgent experience.
- Prep Time: 10 minutes
- Cook Time: 15 minutes
- Total Time: 25 minutes
- Yield: 4 servings
- Category: Brunch
- Cuisine: American
Ingredients
- All-purpose flour (1 ½ cups / 180 g)
- Baking powder (2 tsp)
- Granulated sugar (2 tbsp)
- Salt (¼ tsp)
- Milk (1 cup / 240 ml) – whole milk preferred
- Large eggs (2, room temperature)
- Unsalted butter (4 tbsp / 56 g), melted
- Vanilla extract (1 tsp)
- Fresh berries (strawberries, blueberries, raspberries)
- Banana slices
- Mini chocolate chips or chunks
- Mixed nuts (almonds, pecans, walnuts), roughly chopped
- Greek yogurt or mascarpone cheese
- Honey or maple syrup
- Fresh mint leaves (optional)
- Optional savory items: thinly sliced prosciutto or smoked salmon
- Extras (optional): shredded coconut flakes, cinnamon powder, edible flowers
Instructions
- Preheat your mini waffle maker for about 5 minutes until hot.
- In a medium bowl, whisk together flour, baking powder, sugar, and salt.
- In a separate bowl, beat eggs, then add milk, melted butter, and vanilla extract; whisk until smooth.
- Pour wet ingredients into dry and gently fold together with a spatula; do not overmix.
- Lightly grease the waffle maker. Pour about 2 tablespoons of batter per mini waffle and cook for 2-3 minutes until golden and crisp.
- Remove waffles carefully and place on a cooling rack. Repeat until all batter is used.
- While waffles cook, prepare toppings: wash and slice berries and bananas, chop nuts, portion yogurt or mascarpone, and have honey or syrup ready.
- Arrange mini waffles and toppings on a serving board or platter attractively.
- Serve immediately, encouraging guests to build their own mini waffle bites with toppings.
Notes
Do not overmix the batter to keep waffles tender. Use room-temperature ingredients for fluffier waffles. Grease waffle maker well before each batch. Keep waffles warm in a 200°F (95°C) oven on a wire rack to avoid sogginess. Use a small measuring spoon to portion batter for uniform waffles. For gluten-free, swap flour with 1:1 gluten-free blend. For dairy-free, use plant-based milk and coconut yogurt. Waffles can be made ahead and reheated in toaster or oven.
Nutrition
- Serving Size: About 5 mini waffles
- Calories: 375
- Sugar: 12
- Sodium: 300
- Fat: 13.5
- Saturated Fat: 5
- Carbohydrates: 47.5
- Fiber: 5
- Protein: 11
Keywords: mini waffles, charcuterie board, brunch, Galentine’s, easy recipe, sweet and savory, quick waffles


