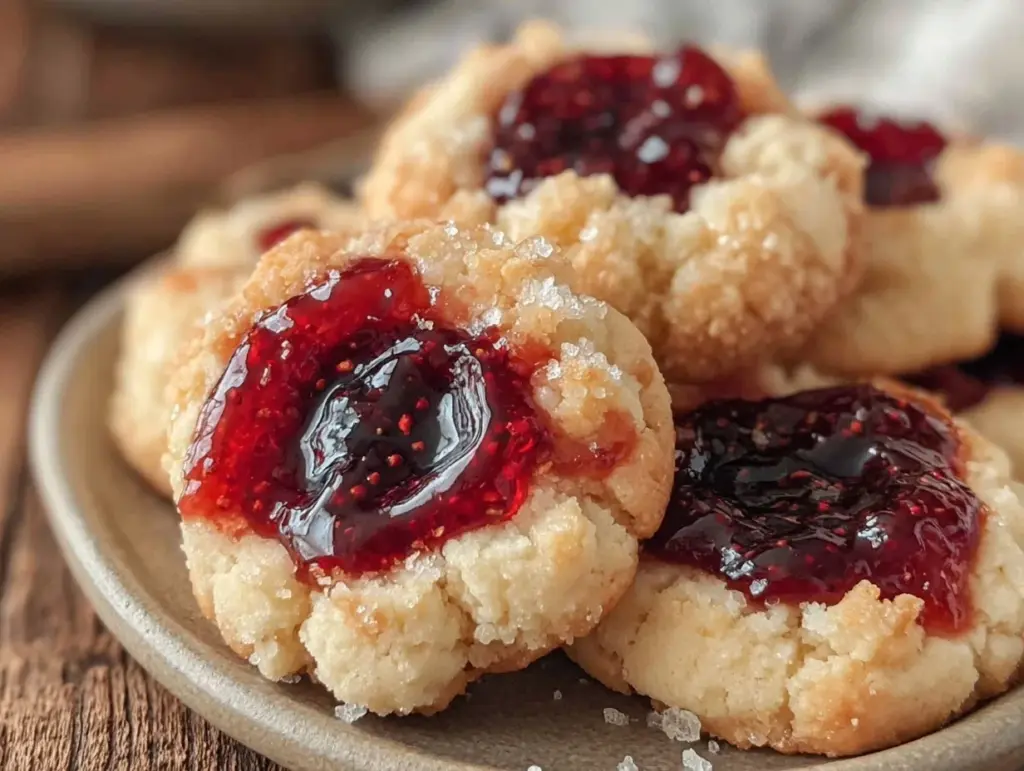
One chilly Saturday afternoon last fall, my kitchen smelled like a cozy bakery, thanks to a batch of thumbprint cookies with jam I’d been meaning to perfect for years. My kids were running around, sticky little hands eagerly waiting for the moment they could poke their fingers into the soft dough to press in the jam. I’d made jam cookies before, sure, but they were always a little too crumbly or the jam spilled over the edges. After testing this easy homemade jam cookies recipe 15 times, I finally nailed the perfect balance of buttery dough and sweet, fruity filling that holds its shape every single time.
This thumbprint cookies with jam recipe for weeknight baking (or weekend indulgence) is simple, forgiving, and uses pantry staples you probably already have. Plus, it’s the kind of recipe that makes your kitchen smell amazing and has everyone asking for seconds. And yes, I’m talking about the exact recipe that finally stopped me from buying those overpriced jam-filled cookies at the store. It’s an easy homemade jam cookies recipe you’ll want to try today, especially if you love baking but hate complicated steps or weird ingredients.
After years of tweaking, I can say this recipe is hands-down the best way to make thumbprint cookies with jam for easy homemade treats. No fancy tools, no weird jams, just that classic, nostalgic cookie everyone remembers from childhood—only way better.
Why You’ll Love This Recipe
This recipe has completely changed how I handle holiday baking and casual weekend treats. I’ve made these thumbprint cookies with jam for birthday parties, after-school snacks, and even last-minute holiday gift baskets. Everyone asks for seconds.
- Simple Ingredients, Big Flavor — You don’t need anything fancy here. Basic pantry staples like butter, sugar, and flour combine with your favorite jam to make a cookie that tastes like it took hours, not minutes.
- Perfect Texture Every Time — The dough is tender but holds together well, so the jam stays put and the cookies don’t crumble apart. I’ve tested this easy homemade jam cookies recipe with raspberry, strawberry, and apricot jams, and they all shine.
- Kid-Friendly and Fun — If you have little helpers, they’ll love pressing the indentations and dolloping jam. It’s a fun way to get them involved without the mess of rolling out dough or cutting shapes.
- Make-Ahead Friendly — These cookies store beautifully for up to four days in an airtight container, making them great for batch baking or gifting. Leftovers taste even better the next day once the jam has soaked in slightly.
- Feeds a Crowd — This recipe makes about 24 cookies, which is perfect for family gatherings, potlucks, or a cookie swap party. You can double it easily without any fuss.
This is my go-to for holiday baking and casual family treats. No complicated techniques, just reliable, delicious cookies that make everyone happy.
Ingredients
Here’s the best part: you probably have most of this already. I’m particular about a few ingredients here, and I’ll tell you why.
- Unsalted Butter (1 cup / 227g, softened) — The base of the dough. Use unsalted so you can control the salt level. I always use Land O Lakes for consistent quality.
- Sugar (2/3 cup / 135g, granulated) — Sweetens the dough just right without overpowering the jam. You can swap half for brown sugar if you want a deeper flavor.
- Vanilla Extract (1 teaspoon / 5ml) — Adds warmth and depth. Pure vanilla, never imitation, makes the flavor pop.
- All-Purpose Flour (2 cups / 240g) — The structure of the cookie. Spoon and level it for accuracy to avoid dry or dense cookies.
- Salt (1/4 teaspoon / 1.5g) — Balances sweetness and enhances flavor.
- Jam (1/2 cup / 160g) — Your choice here. Raspberry, strawberry, apricot, or even mixed berry. I prefer seedless for smooth dollops.
Equipment Needed
You don’t need anything fancy for this. Here’s what I actually use:
- Mixing Bowls — One large for the dough, and a smaller one for the wet ingredients. Glass or stainless steel works fine.
- Hand Mixer
- Baking Sheet — Standard half-sheet pans (18×13 inches) work perfectly. Line with parchment paper or a silicone mat to prevent sticking.
- Spoon or Small Cookie Scoop — For portioning dough evenly. I use a 1.5-inch scoop to get consistent cookie sizes.
- Teaspoon or Your Finger — To make the indentations for the jam. Fingers work best for the perfect thumbprint shape.
Optional but useful:
- Cooling Rack — Helps cookies cool evenly and keeps bottoms crisp.
How to Make Thumbprint Cookies with Jam for Easy Homemade Treats

Alright, let’s get into it. I’ll walk you through exactly how I make these thumbprint cookies with jam, including the small tricks that actually make a difference.
- Step 1: Cream the Butter and Sugar (5 minutes)
Use your hand mixer to beat the softened butter and granulated sugar until light and fluffy. It should look pale and smell sweet, like the promise of cookies. This step is key for that tender crumb, so don’t rush it. - Step 2: Add Vanilla
Mix in the vanilla extract until combined. The aroma will lift the whole kitchen. - Step 3: Combine Dry Ingredients
In a separate bowl, whisk together the flour and salt. This ensures even distribution and prevents salty pockets. - Step 4: Mix Dry Into Wet
Slowly add the flour mixture to the creamed butter and sugar. Use a spatula or mixer on low speed. The dough will be soft but not sticky — if it’s too crumbly, add a teaspoon of milk. - Step 5: Chill the Dough (30 minutes)
Wrap the dough in plastic wrap and pop it in the fridge. This step firms the dough, making it easier to handle and helping the cookies keep their shape during baking. - Step 6: Shape the Cookies
Scoop out tablespoon-sized balls of dough and roll them smooth. Place them on the lined baking sheet about 2 inches apart. Use your thumb or a teaspoon to make a deep indentation in the center of each ball. - Step 7: Fill With Jam
Spoon about 1/2 teaspoon of jam into each indentation. Don’t overfill or it will spill over during baking. - Step 8: Bake (12-14 minutes)
Bake in a preheated 350°F (175°C) oven until the edges are just starting to turn golden. The jam will bubble slightly but shouldn’t burn. The cookies will still be soft when you take them out — they firm up as they cool. - Step 9: Cool and Enjoy
Let the cookies cool on the baking sheet for 5 minutes before transferring to a rack. This prevents breakage and keeps the bottoms crisp.
Total time: about 50 minutes, including chilling. Active time is roughly 20 minutes, and the rest is the oven and fridge doing the work.
Expert Tips & Tricks
Here’s everything I’ve figured out from making this easy homemade jam cookies recipe dozens of times. These tips will save you from the mistakes I already made.
- Don’t Skip the Chill — I used to skip chilling the dough because impatience got the best of me. The cookies spread too much and the jam leaked. Chilling firms the dough so the cookies keep their shape and the jam stays put.
- Use Seedless Jam for Neatness — Chunky jam or preserves with seeds can cause the filling to spill or burn. Seedless raspberry or strawberry jams give a smooth, glossy finish.
- Measure Flour Correctly — Overpacked flour makes dry, crumbly cookies. Use the spoon-and-level method to avoid this. It really makes a difference in texture.
- Don’t Overfill the Jam — I’ve learned the hard way—too much jam spills and burns on the edges. Stick to about 1/2 teaspoon per cookie.
- Store Properly — Keep the cookies in an airtight container at room temperature. Refrigeration dries them out.
- Mix Up Your Jams — Raspberry is classic, but I love swapping in apricot or blackberry for variety. It’s a simple twist that keeps things interesting.
Variations & Substitutions
Once you’ve got the base version down, here’s how I mix it up. I’ve actually tried all of these.
- Nutty Thumbprints — Roll the cookie dough balls in finely chopped pecans or almonds before making the indentations. Adds crunch and a toasty flavor. Perfect for holiday cookie trays.
- Chocolate Drizzle — After the cookies cool, drizzle melted dark chocolate over the tops. It takes these easy homemade jam cookies to a whole new level of indulgence.
- Gluten-Free Option — Substitute the all-purpose flour with a 1:1 gluten-free baking flour blend. I’ve had success with Bob’s Red Mill for a chewy, tender cookie.
- Dairy-Free Version — Use a vegan butter substitute and make sure your jam is free from animal products. The texture is slightly different but still delicious.
- Holiday Spice — Add 1/2 teaspoon cinnamon and a pinch of nutmeg to the dough for a warm, festive twist perfect for Christmas cookie swaps.
Serving & Storage
I usually serve these thumbprint cookies with jam straight from the baking sheet — it looks rustic and inviting, and they stay warm just long enough to get devoured.
Great side snacks include a simple cup of tea or a glass of cold milk — nothing fancy needed.
Storage:
- Fridge: Store in an airtight container at room temperature for up to 4 days. The jam will soften the cookies slightly, which I find perfect.
- Reheating: You can warm them briefly in a 300°F (150°C) oven for 5 minutes if you want that fresh-baked feel.
- Freezing: I don’t recommend freezing these. The jam’s texture changes and the cookie can become dry.
Nutrition Information
I’m not a nutritionist, but here’s the breakdown if you’re keeping track. This is per serving based on 24 cookies.
| Calories | Protein | Carbs | Fiber | Sugar | Fat | Saturated Fat | Sodium |
|---|---|---|---|---|---|---|---|
| 120 | 1g | 18g | 0.5g | 10g | 5g | 3g | 55mg |
Look — these are classic comfort cookies made with butter and sugar. It’s not a diet recipe and I’m not gonna pretend it is. But they’re way better than store-bought, cost less, and you know exactly what’s inside. When I want something lighter, I swap half the sugar for coconut sugar and add a little lemon zest. Most days though? I stick to the original and enjoy every bite.
Final Thoughts
Remember that chilly Saturday afternoon when I started this batch? Those thumbprint cookies with jam turned my kitchen into a cozy haven and brought the family together like nothing else. That’s the magic of this recipe — simple, trustworthy, and comforting.
Make it yours. More jam, less sugar, different jams, or add-ins like nuts or chocolate. The base dough is forgiving and ready for whatever you throw at it.
If you make this, drop a comment and tell me how it went. And if something goes sideways, tell me that too — I genuinely want to help you troubleshoot. That’s what the comments are for.
Happy baking — I hope your kitchen smells amazing.
Frequently Asked Questions
Q: Can I make these thumbprint cookies with jam without eggs?
A: Yes, this recipe is naturally egg-free, which is one reason I love it. The butter and flour create a tender dough without needing eggs. If you want to swap ingredients for a vegan version, use a plant-based butter alternative and a vegan-friendly jam.
Q: Why did my jam cookies turn out too watery or the jam spilled over?
A: This usually happens if you overfill the jam cavity or use a very runny jam. I’ve learned to stick to about 1/2 teaspoon of thicker, seedless jam per cookie to keep things neat. Also, chilling the dough helps the cookies hold their shape better during baking.
Q: Can I make these thumbprint cookies with jam ahead for a holiday party?
A: Absolutely! I often bake these a day or two in advance. Store them in an airtight container at room temperature, and they’ll stay fresh and delicious. Just don’t add any chocolate drizzle or toppings until right before serving to keep everything looking perfect.
Q: Are these cookies gluten-free or can they be made gluten-free?
A: The original recipe uses all-purpose flour, but I’ve had great success swapping in a 1:1 gluten-free flour blend like Bob’s Red Mill. The texture is a bit different—slightly more crumbly—but still tasty. Just make sure your jam is gluten-free as well.
Q: Can I double or halve this recipe easily?
A: Yes! This recipe scales beautifully. I’ve doubled it for cookie swaps and halved it for smaller batches with zero issues. Just keep an eye on baking times if you change the size of the cookies.
Q: Can I substitute different jams or preserves for this recipe?
A: Definitely. Raspberry is classic, but strawberry, apricot, blackberry, or even mixed berry jams work wonderfully. Just choose jams that aren’t too runny to prevent spilling during baking.
Q: How do I prevent the cookies from spreading too much during baking?
A: The key is chilling the dough for at least 30 minutes before baking. Warm dough will spread too fast and lose their thumbprint shape. Also, avoid over-greasing your baking sheet — a liner like parchment paper or a silicone mat works best.
By the way, if you love easy homemade recipes like this, you might enjoy my brown butter banana bread with walnut streusel or my crispy garlic parmesan pull-apart bread — both are guaranteed crowd-pleasers.
Pin This Recipe!

Thumbprint Cookies with Jam

These thumbprint cookies with jam are easy to make, featuring a tender buttery dough and sweet, fruity filling that holds its shape perfectly. Ideal for family treats, holiday baking, or casual snacking.
- Prep Time: 20 minutes
- Cook Time: 14 minutes
- Total Time: 50 minutes
- Yield: 24 cookies 1x
- Category: Dessert
- Cuisine: American
Ingredients
- 1 cup (227g) unsalted butter, softened
- 2/3 cup (135g) granulated sugar
- 1 teaspoon (5ml) vanilla extract
- 2 cups (240g) all-purpose flour
- 1/4 teaspoon (1.5g) salt
- 1/2 cup (160g) seedless jam (raspberry, strawberry, apricot, or mixed berry)
Instructions
- Cream the softened butter and granulated sugar using a hand mixer until light and fluffy, about 5 minutes.
- Mix in the vanilla extract until combined.
- In a separate bowl, whisk together the flour and salt.
- Slowly add the flour mixture to the creamed butter and sugar, mixing on low speed until a soft dough forms. If too crumbly, add 1 teaspoon of milk.
- Wrap the dough in plastic wrap and chill in the refrigerator for 30 minutes.
- Preheat oven to 350°F (175°C). Line a baking sheet with parchment paper or a silicone mat.
- Scoop tablespoon-sized balls of dough and roll smooth. Place on the baking sheet about 2 inches apart.
- Use your thumb or a teaspoon to make a deep indentation in the center of each dough ball.
- Fill each indentation with about 1/2 teaspoon of jam, being careful not to overfill.
- Bake for 12-14 minutes until edges start to turn golden and jam bubbles slightly.
- Let cookies cool on the baking sheet for 5 minutes before transferring to a cooling rack.
Notes
[‘Chill the dough for at least 30 minutes to prevent spreading and jam leakage.’, ‘Use seedless jam for a smooth, neat filling.’, ‘Measure flour using the spoon-and-level method to avoid dry or crumbly cookies.’, ‘Do not overfill jam cavities to prevent spilling and burning.’, ‘Store cookies in an airtight container at room temperature for up to 4 days.’, ‘Warm cookies briefly in a 300°F oven for 5 minutes to refresh.’, ‘Optional variations include rolling dough in chopped nuts, adding chocolate drizzle, or using gluten-free or dairy-free substitutes.’]
Nutrition
- Serving Size: 1 cookie
- Calories: 120
- Sugar: 10
- Sodium: 55
- Fat: 5
- Saturated Fat: 3
- Carbohydrates: 18
- Fiber: 0.5
- Protein: 1
Keywords: thumbprint cookies, jam cookies, homemade cookies, easy baking, holiday cookies, kid-friendly cookies