
One rainy Thursday afternoon last fall, I was craving my favorite Indian street snack—vegetable samosas. But here’s the thing: I didn’t want the usual greasy deep-fried version. I’d just cleaned the kitchen and wasn’t in the mood for a splatter fest or a big cleanup. So, I decided to try baking them instead. I was skeptical at first, but after 30 minutes in the oven, out came these golden, crispy, and perfectly spiced vegetable samosas baked not fried.
After making this vegetable samosas baked not fried recipe 15 times (yes, I counted), it’s officially my go-to crispy healthy snack idea. It’s exactly what I want when I crave that flaky, crunchy exterior without the guilt of frying. Plus, it’s perfect for those evenings when you want a snack that’s easy to prep but feels a little special—whether it’s for a cozy night in or a casual get-together.
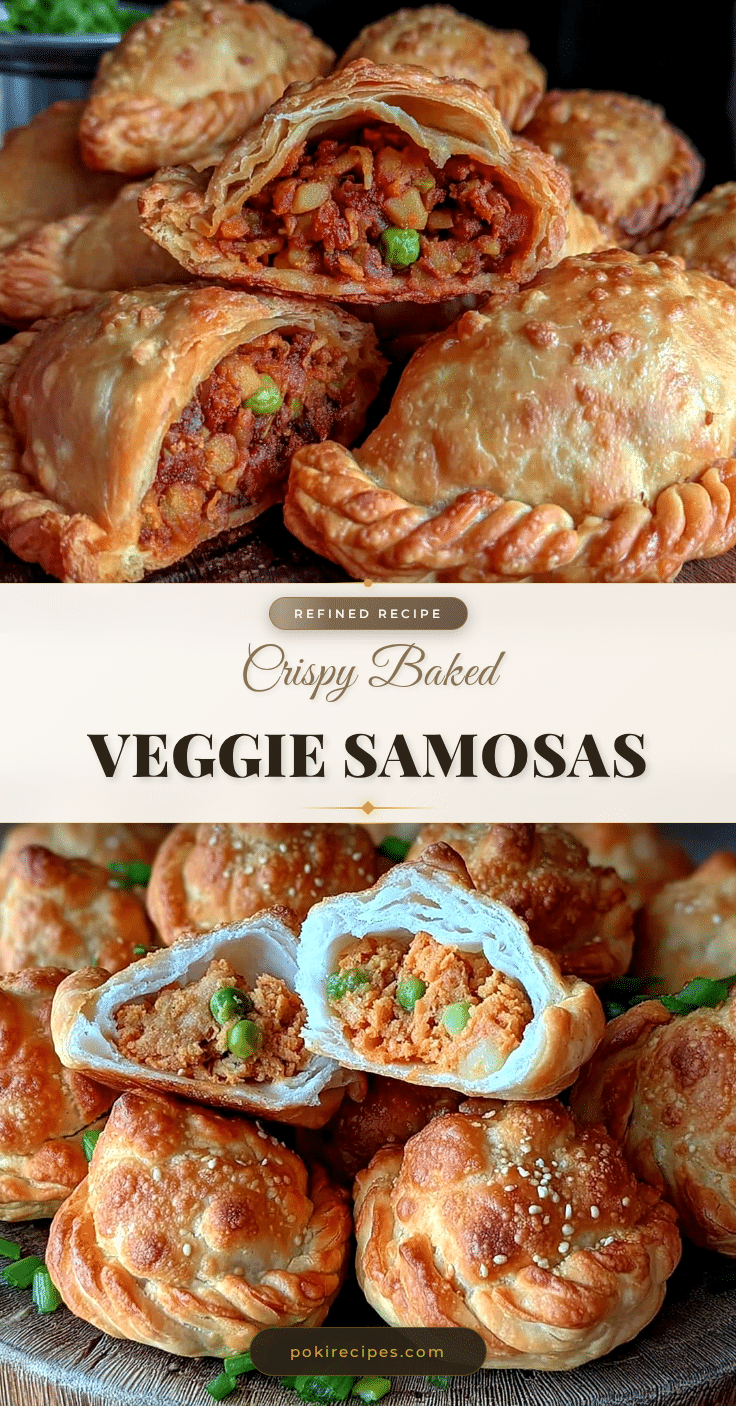
What makes these samosas really stand out? The crispy, flaky pastry that holds a warmly spiced, veggie-packed filling. And baking instead of frying means less oil, less mess, and a snack that’s surprisingly light yet satisfying. I’ll walk you through every step, and I promise it’s easier than you think.
Why You’ll Love This Recipe
This vegetable samosas baked not fried recipe has completely changed how I handle snack cravings. I’ve shared these with my family, friends, and even my picky nephew, and everyone asks for seconds.
- Crispy Without the Guilt — Baking means no deep-frying oil baths, so you get that satisfying crunch with less fat and fewer calories. My family actually prefers these baked samosas over the fried ones at this point.
- Vegetable-Packed Goodness — The filling is loaded with potatoes, peas, carrots, and spices that make each bite flavorful and wholesome. This is a great way to sneak some extra veggies into snack time.
- Make-Ahead Friendly — These samosas freeze beautifully before baking. I do a big batch on Sundays and bake them fresh whenever I want a quick crispy snack.
- Kid-Approved — My kids love the crispy texture and the mild spice blend. I’ve even seen my youngest ask for these over chips, which felt like a small parenting win.
- Perfect for Any Occasion — Whether it’s a casual weeknight snack, a holiday appetizer, or a potluck party food, they fit right in. Bonus: They’re easy to transport and reheat well.
This is my go-to for busy weeknight snacks or casual get-togethers when I want something a little different but still crowd-pleasing. No tricky frying or weird ingredients — just straightforward cooking that yields crispy, tasty results every time.
Ingredients Needed
Here’s the best part: most of these ingredients are pantry staples or easy to find at any grocery store. I’m picky about a couple of things to keep the flavor authentic and the texture spot on.
- Potatoes (2 medium / about 400g) — The base of the filling. I use Yukon Gold for their creamy texture, but russets work too.
- Frozen peas (1/2 cup / 75g) — Sweet and tender, they add color and a pop of freshness. No need to thaw before cooking.
- Carrots (1 medium, finely diced / about 70g) — Adds sweetness and crunch. I dice them small so they cook evenly.
- Onion (1 small, finely chopped / about 70g) — Adds savory depth. Yellow onions work best here.
- Fresh ginger (1 teaspoon, grated) — Brightens the whole filling with a warm, zesty note. I always grate fresh over powdered for flavor.
- Garlic (2 cloves, minced) — No shortcuts here. Fresh garlic makes a big difference.
- Ground cumin (1 teaspoon) — The signature warm spice that gives the filling its classic flavor.
- Ground coriander (1 teaspoon) — Adds a citrusy, herbal touch.
- Garam masala (1 teaspoon) — The spice blend that rounds out the flavor with warmth and a touch of heat.
- Chili powder (1/2 teaspoon, optional) — For a mild kick. Skip or reduce if you want kid-friendly.
- Fresh cilantro (1/4 cup, chopped) — Stirred in at the end for freshness.
- Phyllo dough sheets (10 sheets) — The secret to a flaky, crispy crust without deep frying. You can also use spring roll wrappers if you prefer.
- Olive oil or melted butter (1/4 cup / 60ml) — For brushing layers and sealing edges to get that golden-brown finish.
- Lemon juice (1 tablespoon) — Adds brightness and balances the spices.
- Salt (to taste) — Enhances all the flavors.
Equipment Needed
You don’t need anything fancy for this. Here’s what I actually use:
- Baking sheet — A standard rimmed baking sheet works perfectly. Line it with parchment paper for easy cleanup and to prevent sticking.
- Mixing bowls — One large for the filling and one for brushing the phyllo layers. I love using glass bowls because they’re easy to clean and don’t absorb odors.
- Sharp knife — For chopping vegetables finely. This affects the texture of the filling—small pieces cook evenly and taste better.
- Pastry brush — Optional but highly recommended for brushing oil or butter on the phyllo dough layers to get that crisp, golden finish.
- Skillet or sauté pan — For cooking the filling. A non-stick pan works well to prevent sticking and burning.
How to Make Vegetable Samosas Baked Not Fried: Step by Step

Alright, let’s get into it. I’ll walk you through exactly how I make this vegetable samosas baked not fried recipe, including the small tricks that actually make a difference in getting that perfect crispy exterior and flavorful filling.
- Prep the Vegetables (10 minutes)
Peel and dice the potatoes into small, even cubes (about ½ inch). Finely chop the onion, grate the ginger, mince the garlic, and dice the carrot small. This ensures everything cooks evenly, so your filling isn’t mushy or underdone. The smaller the dice, the better for that classic samosa texture. - Cook the Filling (12 minutes)
Heat a tablespoon of olive oil in your skillet over medium heat. Add the onions and cook until soft and translucent, about 3-4 minutes. Add the ginger and garlic, stirring constantly, and cook for 1 minute until fragrant but not browned. Then toss in the diced potatoes, carrots, and frozen peas. Stir well to combine. - Finish the Filling (2 minutes)
Remove from heat and stir in the chopped cilantro and lemon juice. Taste and adjust salt or chili if needed. Let the filling cool completely before assembling—this keeps the phyllo from getting soggy. - Prepare the Phyllo (5 minutes)
Unroll the phyllo dough and cover with a damp kitchen towel to keep it from drying out. Take one sheet at a time, brush lightly with olive oil or melted butter, then place another sheet on top and brush again. Layering two sheets gives the samosas enough strength to hold the filling and crisp up beautifully. - Assemble the Samosas (15 minutes)
Cut the layered phyllo sheets lengthwise into 3-inch wide strips. Place a heaping tablespoon of filling at one end of each strip. Fold the corner over the filling to form a triangle, then continue folding the triangle along the strip until you reach the end. Use a little oil on the last flap to seal the samosa shut. This folding technique keeps the filling secure and creates that classic samosa shape. - Bake Until Golden and Crispy (20 minutes)
Preheat your oven to 400°F (200°C). Arrange the samosas on your parchment-lined baking sheet, seam side down. Brush the tops with more oil or melted butter. Bake for 18-20 minutes until golden brown and crispy, flipping halfway through for even color. The samosas should look flaky and crunchy, not dry or burnt.
Sprinkle in the cumin, coriander, garam masala, chili powder (if using), and salt. Mix everything thoroughly so the spices coat the vegetables. Pour in a splash of water (about 2 tablespoons) to help steam the veggies and prevent sticking. Cover and cook for 6-8 minutes, stirring occasionally, until the potatoes are tender but not falling apart. The filling should be soft and fragrant, with the spices fully developed.
Total time: about 60 minutes, including prep and baking. Most of the time is hands-off, so you can prep ingredients or tidy up while the oven works its magic.
Expert Tips & Tricks
Here’s everything I’ve figured out from making this vegetable samosas baked not fried recipe dozens of times. These tips will save you from the mistakes I already made.
- Keep Phyllo Covered
Phyllo dough dries out fast. Always keep the unused sheets covered with a damp towel to prevent cracking and tearing. Dry phyllo is frustrating and hard to work with. - Don’t Overfill
It’s tempting to stuff each samosa full, but overfilling makes folding tricky and can cause them to burst open while baking. A heaping tablespoon of filling per samosa is just right. - Brush Generously with Oil or Butter
This is what creates the golden, crispy crust. Don’t skimp here, especially on the edges to help seal the samosas. - Cool Filling Before Assembling
Hot filling can make the phyllo soggy and tear easily. Let it cool completely to keep the pastry flaky and strong. - Use a Non-Stick Pan for Filling
It prevents sticking and burning, so your spices don’t turn bitter. If you don’t have one, lower the heat and stir often. - Save Extra Phyllo for Other Snacks
If you have leftovers, use them for crispy baked cream cheese rangoon wontons or crispy baked cream cheese rangoon wontons. They’re super versatile!
Variations & Substitutions
Once you’ve got the base version down, here’s how I mix it up. I’ve actually tried all of these.
- Spicy Potato & Pea
Add finely chopped green chilies and increase chili powder for a hotter version. Great for party snacks that pack a punch. - Curried Lentil Filling
Swap the potatoes for cooked red lentils and add curry powder instead of garam masala. This variation is protein-packed and perfect for a vegetarian weeknight snack. - Sweet Potato & Spinach
Use diced sweet potatoes and fresh spinach. I like this one for a nutrient boost and a hint of natural sweetness. It pairs nicely with a dollop of Greek yogurt or chutney. - Gluten-Free
Use gluten-free phyllo or spring roll wrappers. The folding technique stays the same, but watch the baking time as these may crisp faster. - Dairy-Free
Brush with olive oil instead of butter. The flavor difference is minimal, and it keeps the samosas vegan-friendly.
These variations work well whether you’re prepping snacks for a holiday party or just a casual weeknight treat with the family.
Serving & Storage
I usually serve these vegetable samosas fresh and hot from the oven. They look rustic and inviting, and the crispy exterior stays intact longer when served right away.
For dipping, I love pairing them with mint chutney, tamarind sauce, or even a simple yogurt raita. If you’re planning to serve these at a gathering, they hold up well on a platter for about an hour.
Here are a few sides I often serve alongside:
- Garlic yogurt dip — creamy and cooling against the warm spices.
- Simple cucumber salad — for a fresh crunch.
- Crispy garlic parmesan pull-apart bread — because carbs and carbs are a winning combo.
Storage:
Fridge: Store cooled samosas in an airtight container for up to 4 days. The pastry will soften slightly but still tastes great reheated.
Reheating: Best method is to reheat in a 350°F (175°C) oven for 8–10 minutes until warm and crispy again. Microwave makes them soggy — trust me, I’ve tried.
Freezing: Freeze assembled, unbaked samosas on a tray until firm, then transfer to a freezer bag. Bake frozen samosas at 400°F (200°C) for 25-30 minutes. This makes for a quick snack anytime.
Nutrition Information
I’m not a nutritionist, but here’s the breakdown if you’re keeping track.
| Nutrient | Per Serving (1 samosa) |
|---|---|
| Calories | 120 |
| Protein | 3g |
| Carbohydrates | 18g |
| Fiber | 3g |
| Sugar | 2g |
| Fat | 4g |
| Saturated Fat | 1g |
| Sodium | 220mg |
Look — this is a snack made with a flaky, buttery crust and a starchy veggie filling. It’s not a diet recipe, and I’m not pretending it is. But it’s way better than fried snacks from the store, costs less, and I know exactly what’s inside. When I want something lighter, I brush with olive oil instead of butter and add extra peas and carrots. Most days though, I make the real thing and enjoy every crispy bite.
Final Thoughts
Remember that rainy Thursday when I first tried baking vegetable samosas instead of frying? It turned out to be one of those happy kitchen accidents that I still make whenever I need a crispy, comforting snack without the mess. This recipe is forgiving, so make it yours: add more garlic, swap in different veggies, or mix up the spice blend to suit your mood.
If you make these vegetable samosas baked not fried, drop a comment and tell me how it went. And if something goes wrong, share that too — I genuinely want to help troubleshoot. That’s what the comments are for.
Happy cooking — I hope your kitchen smells amazing.
Frequently Asked Questions
Q: Can I make these vegetable samosas baked not fried for a crowd?
A: Absolutely! This recipe scales up easily and freezes well. I’ve made batches of 50+ for parties by prepping the filling and assembling samosas ahead, then baking them fresh. Just make sure to space them out on the baking sheets to keep them crispy.
Q: Why did my samosa filling turn out watery?
A: This usually happens if the filling wasn’t cooked long enough to evaporate excess moisture. Next time, cook the filling uncovered a bit longer to let the water cook off. Also, avoid adding too much water while cooking—use just enough to prevent sticking. Letting the filling cool completely before assembling also helps prevent soggy pastry.
Q: Can I make these samosas ahead for a holiday party?
A: Yes! You can assemble the samosas a day or two in advance and keep them refrigerated (covered tightly). Bake just before serving to keep the crust crisp. Alternatively, freeze them unbaked and bake straight from frozen for a fresh snack at your party.
Q: Can I make vegetable samosas baked not fried gluten-free?
A: Yes, you can use gluten-free phyllo dough or spring roll wrappers as a substitute. The folding technique is the same, but keep an eye on baking time since gluten-free dough can crisp up faster or burn if left too long.
Q: How do I double this recipe without the samosas falling apart?
A: Doubling the filling is no problem, but when assembling, work in batches to keep the phyllo from drying out. Keep unused phyllo covered, and brush oil generously on each layer to help seal and strengthen the dough. Folding carefully and sealing edges well prevents them from bursting during baking.
Q: Can I make these samosas without potatoes?
A: Yes, but potatoes give the filling the classic texture and help bind everything together. If you want to skip potatoes, try using cooked lentils or mashed sweet potatoes as a base, but expect a slightly different texture and flavor. I’ve done this when I wanted a protein boost and it worked well.
Q: What if my samosas are not crispy after baking?
A: The key to crispiness is brushing the phyllo layers with enough oil or melted butter and baking at a high enough temperature (400°F/200°C). If your oven runs cool, increase baking time slightly. Also, avoid overcrowding the baking sheet — give samosas space to crisp up evenly.
Pin This Recipe!
Vegetable Samosas Baked Not Fried Easy Crispy Healthy Snack Recipe

A healthier version of the classic Indian street snack, these vegetable samosas are baked to crispy perfection instead of fried, making them a guilt-free, flavorful snack packed with veggies and spices.
- Prep Time: 15 minutes
- Cook Time: 25 minutes
- Total Time: 60 minutes
- Yield: 10 samosas 1x
- Category: Snack
- Cuisine: Indian
Ingredients
- 2 medium potatoes (about 400g / 14 oz), peeled and diced
- 1/2 cup frozen peas (75g / 2.6 oz), no need to thaw
- 1 medium carrot (about 70g / 2.5 oz), finely diced
- 1 small onion (about 70g / 2.5 oz), finely chopped
- 1 teaspoon fresh ginger, grated
- 2 cloves garlic, minced
- 1 teaspoon ground cumin
- 1 teaspoon ground coriander
- 1 teaspoon garam masala
- 1/2 teaspoon chili powder (optional)
- 1/4 cup fresh cilantro, chopped
- 10 sheets phyllo dough (or spring roll wrappers as substitute)
- 1/4 cup olive oil or melted butter (60ml / 4 tablespoons) for brushing
- 1 tablespoon lemon juice
- Salt to taste
Instructions
- Prep the vegetables: Peel and dice potatoes into small ½ inch cubes. Finely chop onion, grate ginger, mince garlic, and dice carrot finely.
- Cook the filling: Heat 1 tablespoon olive oil in a skillet over medium heat. Cook onions until soft and translucent (3-4 minutes). Add ginger and garlic, cook 1 minute until fragrant.
- Add diced potatoes, carrots, and frozen peas. Stir well to combine.
- Sprinkle in cumin, coriander, garam masala, chili powder (if using), and salt. Mix thoroughly to coat vegetables with spices.
- Add about 2 tablespoons water, cover and cook for 6-8 minutes, stirring occasionally, until potatoes are tender but not falling apart.
- Remove from heat and stir in chopped cilantro and lemon juice. Adjust salt and chili powder to taste. Let filling cool completely.
- Prepare the phyllo: Unroll phyllo dough and keep covered with a damp towel. Take one sheet, brush lightly with oil or butter, place another sheet on top and brush again to layer two sheets.
- Cut layered phyllo sheets lengthwise into 3-inch wide strips.
- Place a heaping tablespoon of filling at one end of each strip. Fold corner over filling to form a triangle, continue folding triangle along the strip until end. Seal the last flap with a little oil.
- Preheat oven to 400°F (200°C). Arrange samosas seam side down on parchment-lined baking sheet. Brush tops with oil or butter.
- Bake for 18-20 minutes, flipping halfway through, until golden brown and crispy.
Notes
Keep phyllo dough covered with a damp towel to prevent drying and tearing. Do not overfill samosas to avoid bursting during baking. Brush phyllo layers generously with oil or butter for a golden, crispy crust. Let filling cool completely before assembling to prevent soggy pastry. Use a non-stick pan to avoid burning spices. Freeze assembled unbaked samosas on a tray before transferring to freezer bag for easy make-ahead snacks.
Nutrition
- Serving Size: 1 samosa
- Calories: 120
- Sugar: 2
- Sodium: 220
- Fat: 4
- Saturated Fat: 1
- Carbohydrates: 18
- Fiber: 3
- Protein: 3
Keywords: vegetable samosas, baked samosas, healthy snack, Indian snack, crispy samosas, vegetarian samosas, easy samosas, baked not fried


