
“Hey, you really have to try putting together a charcuterie board for our brunch tomorrow,” my friend texted me late Friday night. Honestly, I was skeptical. I mean, I always thought those boards were more fuss than fun, reserved for fancy parties or Instagram shots. But there I was, standing in my kitchen Saturday morning, surrounded by an assortment of cheeses, fruits, and those tiny pastries I’d impulsively grabbed at the bakery the day before. I had zero plan, just a vague idea from that text.
What surprised me was how effortless and satisfying it felt to arrange everything—colors popping, textures mingling—and how quickly it became the centerpiece of our casual gathering. The best part? No one felt pressured to eat in a certain order or pace. It was just good food, easy conversation, and the kind of relaxed vibe you want on a weekend morning. This perfect brunch charcuterie board with mini pastries isn’t about perfection; it’s about bringing a little charm and variety to a simple meal.
Since then, I’ve found myself coming back to this idea again and again, tweaking it with seasonal picks or swapping out cheeses based on what’s fresh. It’s become a quiet favorite for when friends drop by unexpectedly or when I want to treat myself without much hassle. If you’re a fan of mixing sweet and savory, or just love the idea of a no-fuss, yet impressive spread, this could be your new go-to brunch idea. Trust me, it’s the kind of thing that sneaks up on you—turning an ordinary morning into something just a bit more special.
Why You’ll Love This Recipe
After experimenting with countless brunch spreads, this perfect brunch charcuterie board with mini pastries has proven to be a real winner. It’s the kind of recipe that feels fancy but comes together with ease, which is honestly a rarity in my kitchen.
- Quick & Easy: You can have the whole board ready in under 30 minutes, making it ideal for those last-minute brunch invites or slow weekend mornings.
- Simple Ingredients: No need to hunt down exotic items; most of these goodies are pantry staples or easily found at your local store or bakery.
- Perfect for Any Occasion: Whether it’s a lazy Sunday with family, a casual get-together with friends, or a light holiday brunch, this board fits right in.
- Crowd-Pleaser: Kids, adults, picky eaters—you name it, this variety-packed spread wins everyone over.
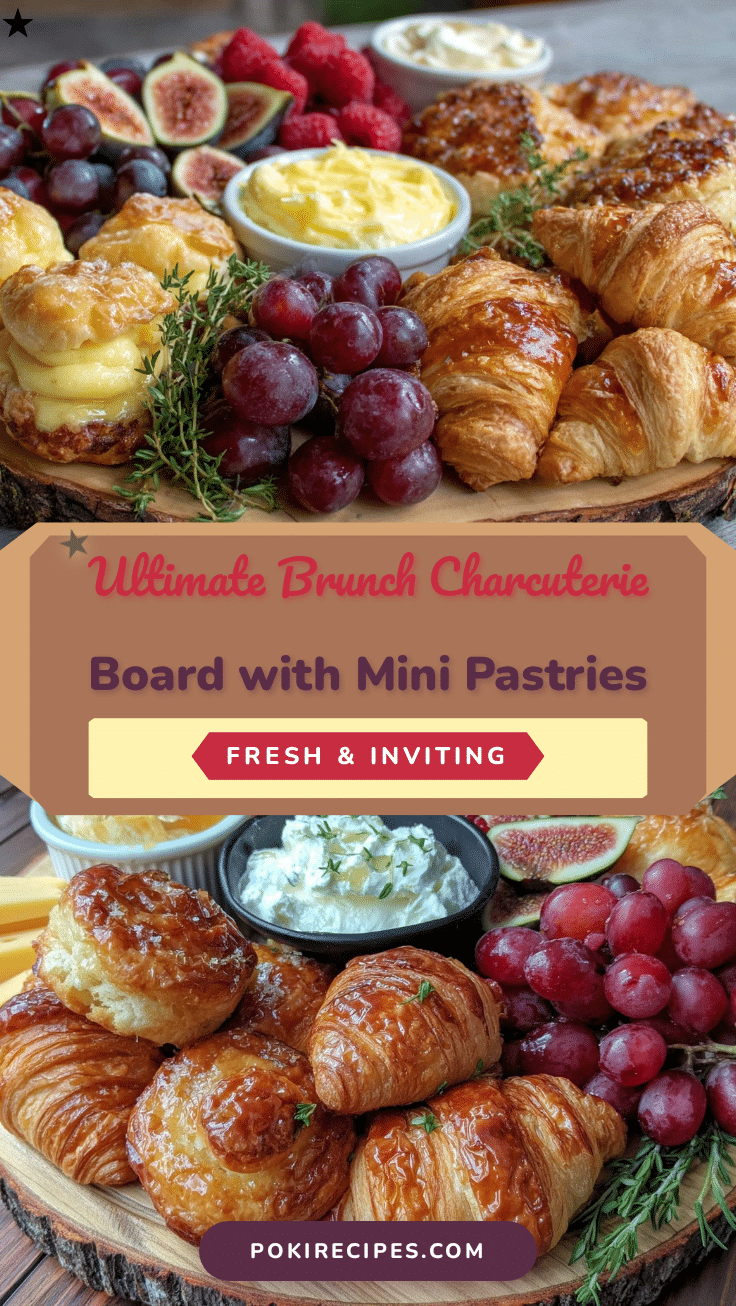
- Unbelievably Delicious: The combination of creamy cheeses, fresh fruits, savory cured meats, and flaky mini pastries offers a texture and flavor party in every bite.
What sets this apart from other charcuterie boards I’ve made is the seamless inclusion of mini pastries. Honestly, they add a touch of indulgence without feeling over the top. Whether it’s buttery croissants, fruit-filled danishes, or savory twists, these little bites bring balance and a touch of whimsy. Plus, the way the board looks—like a curated art piece—makes serving it feel like a celebration in itself, no matter the day.
If you’ve ever hesitated to try charcuterie because it feels intimidating or time-consuming, this guide will gently walk you through, so you get all the charm without the stress. It’s a little bit of culinary creativity, a lot of comfort, and a perfect way to turn brunch into the highlight of your weekend.
What Ingredients You Will Need
This perfect brunch charcuterie board with mini pastries uses simple, wholesome ingredients carefully chosen to deliver a satisfying mix of flavors and textures without fuss. Most items are pantry or deli staples, and you can swap based on what’s seasonal or preferred.
- Cheeses:
- Brie cheese, soft and creamy (a crowd favorite for spreading)
- Sharp cheddar, sliced or cubed (adds a tangy bite)
- Goat cheese log, plain or herbed (for a tangy, spreadable option)
- Cured Meats:
- Prosciutto, thinly sliced (delicate and salty)
- Soppressata or salami, sliced (for a spicier kick)
- Mini Pastries:
- Mini croissants, buttery and flaky (I love grabbing these from local bakeries)
- Mini fruit danishes, assorted flavors like raspberry or apricot (adds a sweet note)
- Mini savory puff pastries with cheese or herbs (optional, for variety)
- Fruits & Veggies:
- Fresh grapes or berries (seasonal picks work great here)
- Apple or pear slices, thinly cut (prevents browning if tossed in lemon water)
- Cucumber slices or cherry tomatoes (adds freshness and color)
- Nuts & Extras:
- Almonds or walnuts, lightly toasted (for crunch)
- Olives, mixed varieties (briny contrast)
- Honey or fig jam (perfect for drizzling or dipping)
- Whole-grain or artisan crackers (look for sturdy ones that hold cheese well)
If you want to swap for dietary reasons, almond flour crackers can replace traditional ones for a gluten-free option. For dairy-free cheese lovers, there are some excellent nut-based cheeses available nowadays. Seasonal fruits can easily be switched out—summer calls for fresh berries, while fall welcomes figs or pomegranate seeds. For a personal touch, I’ve sometimes added a small bowl of cream cheese mixed with fresh herbs as a spread, which always disappears fast.
Equipment Needed
Setting up this perfect brunch charcuterie board requires surprisingly few tools, which is part of the appeal. You don’t need fancy gadgets, just some basics you likely already own.
- Large wooden or marble serving board: A sturdy, flat surface is ideal for arranging all the goodies. I prefer a wooden board—it adds warmth and absorbs any spills nicely.
- Sharp knives: For slicing cheeses, meats, and fruits. A small paring knife and a larger chef’s knife work perfectly.
- Small bowls or ramekins: Useful for olives, nuts, and jams to keep things tidy.
- Coffee scoop or tongs: Helpful for placing mini pastries and arranging smaller items without crushing them.
- Cheese markers or small signs (optional): Handy if you’re serving guests who like to know what they’re nibbling on.
Don’t fret if you don’t have a fancy charcuterie board—you can use a large platter, cutting board, or even a clean baking sheet lined with parchment. Cleaning wooden boards is easy; just wipe with a damp cloth and let air dry. If you plan to do this often, investing in a quality wooden board is definitely worth it for the look and durability.
Preparation Method

- Gather and prep all ingredients (10 minutes): Start by slicing cheeses into bite-sized pieces or wedges. Arrange cured meats in loose folds or rolls. Wash and dry fruits and vegetables thoroughly. Slice apples or pears thinly and toss in a little lemon water to avoid browning.
- Arrange cheeses on the board (5 minutes): Place the largest cheese pieces or wedges spaced evenly around the board. This forms the foundation. Brie can be placed whole with a small spreader knife beside it.
- Add cured meats (5 minutes): Artistic folds or rolls of prosciutto and salami create visual interest. Cluster them near cheeses they pair well with.
- Place mini pastries strategically (5 minutes): Distribute mini croissants and danishes evenly. Aim for balance in colors and shapes. Use tongs or coffee scoops to avoid squishing delicate pastries.
- Fill in with fruits and veggies (5 minutes): Scatter grapes, berries, and sliced apples to fill gaps. Cherry tomatoes or cucumber slices add freshness and a pop of green or red.
- Add nuts, olives, and jams (3 minutes): Use small bowls or ramekins for olives and jams. Sprinkle nuts in open spaces for crunch.
- Finish with crackers and final touches (2 minutes): Fan crackers along edges or in small stacks. If using, add cheese markers or small garnishes like fresh herbs.
- Final check and serve: Step back and see if the board feels balanced—color, texture, and spacing matter. Adjust as needed, then bring it to the table with confidence.
Pro tip: If making ahead, keep the board components separate and assemble just before serving to keep pastries fresh and crackers crisp. Also, a quick brush of melted butter or honey on pastries before warming them slightly in the oven can make them irresistible. I’ve learned this little trick after a few attempts where pastries felt a bit dry straight from the bakery.
Cooking Tips & Techniques
Though this charcuterie board isn’t about cooking per se, there are some techniques that transform the experience from “meh” to memorable.
- Cheese prep: Let cheeses sit out at room temperature for 20-30 minutes before serving. It makes a world of difference in flavor and texture—you know that creamy spreadability that makes you close your eyes? That’s the magic.
- Meat slicing: If you buy whole cured meats, slice them thinly yourself. Thin slices fold and layer better, preventing that “too thick” chew.
- Pastry handling: Handle mini pastries gently and avoid stacking them too tightly to preserve that flaky texture. Warm them briefly just before serving for the freshest bite.
- Fruit prep: For fruits that brown fast like apples or pears, a quick soak in lemon water works wonders. And don’t forget to pat dry to avoid sogginess.
- Balance is key: When arranging, aim for a mix of colors and textures in each section of the board so guests get a bit of everything without hunting around.
- Multitasking: While prepping ingredients, put nuts in the oven to toast lightly. This step deepens flavor and crunch but only takes 5-7 minutes at 350°F (175°C). Just don’t walk away!
One lesson I’ve learned the hard way: skipping the room temperature step for cheeses results in a board that’s just okay. Temperatures matter more than you’d think. Also, avoid overloading the board; too much crowding can overwhelm and make it hard for guests to enjoy individual flavors.
Variations & Adaptations
This perfect brunch charcuterie board with mini pastries is highly customizable, so feel free to adjust based on tastes, dietary needs, or seasons.
- Dietary: For gluten-free, swap traditional crackers and pastries with gluten-free or almond flour versions. Use dairy-free cheese alternatives or add roasted veggies for more substance.
- Seasonal: Summer calls for juicy stone fruits like peaches or nectarines instead of apples. In fall, add figs, pomegranate seeds, or roasted pumpkin seeds for a festive touch.
- Flavor twists: Add a spicy element with pepper jack cheese or spicy soppressata. For sweetness, drizzle honey or use a fig or apricot jam. I once added a small bowl of spicy mustard, which surprisingly paired beautifully with the meats and cheeses.
- Cooking method: If you want warm elements, try mini quiches or egg bites alongside the board. These can be baked ahead and added fresh.
- Personal favorite: I often include a small dish of whipped ricotta mixed with lemon zest and honey. It’s creamy, fresh, and invites guests to get creative with their bites. A lovely complement to the mini pastries and savory meats.
Serving & Storage Suggestions
Serve the board at room temperature for best flavor—this means taking cheeses and meats out about 30 minutes before guests arrive. Arrange it on a large table or kitchen island where everyone can gather around and graze at will.
Pair with light beverages like sparkling water with fresh lemon, a crisp white wine, or a well-brewed coffee. For a more filling brunch, add a fresh green salad or a batch of protein-packed pasta salad to round things out.
To store leftovers, wrap cheeses tightly in parchment paper and keep in the fridge. Mini pastries are best eaten fresh but can be refrigerated and warmed slightly in the oven later. Crackers and nuts should be stored separately in airtight containers to avoid sogginess.
Flavors tend to meld nicely the next day, especially if you include jams or honey, so don’t be surprised if the board tastes even better after a few hours of sitting. Just keep fresh fruits crisp by adding them last minute or storing them separately.
Nutritional Information & Benefits
This perfect brunch charcuterie board with mini pastries offers a balanced mix of protein, healthy fats, and carbohydrates, making it a satisfying and moderately indulgent meal. Cheeses provide calcium and protein, while nuts add heart-healthy fats and fiber. Fresh fruits contribute vitamins, antioxidants, and natural sweetness without processed sugars.
Because you’re mixing multiple small portions, it’s easy to control serving sizes and tailor it to your dietary needs. Use gluten-free crackers or pastries to accommodate sensitivities, and opt for lower-fat cheeses if preferred. The inclusion of fresh vegetables like cucumbers and tomatoes adds hydration and freshness, rounding out the nutrition profile.
Personally, I find this kind of brunch nourishing and energizing without feeling heavy, especially compared to typical heavy pancakes or fried breakfasts. It’s a way to enjoy indulgence thoughtfully while still feeling good about what’s on your plate.
Conclusion
This perfect brunch charcuterie board with mini pastries has become one of my favorite ways to bring people together without the stress of a complicated meal. It’s flexible, visually stunning, and invites a casual, relaxed way of dining that’s honestly quite rare these days.
Feel free to make it your own, swapping in your favorite cheeses, fruits, or pastries. The beauty lies in the mix and match, the small bites that keep everyone exploring flavors and textures.
Why do I love it? Because it turns brunch into a leisurely event, a chance to savor and connect without rushing or fussing. If you give it a try, I’d love to hear how you customize your board or what mini pastries steal the show for you. Share your thoughts and stories—I’m always eager to swap ideas and keep the brunch magic going!
Frequently Asked Questions
What are some good mini pastries to include on a brunch charcuterie board?
Mini croissants, fruit-filled danishes, and savory puff pastries with cheese or herbs work wonderfully. You can also add mini muffins or scones depending on your taste.
Can I prepare the charcuterie board in advance?
Yes, you can prep most ingredients ahead, but assemble the board just before serving to keep pastries fresh and crackers crisp.
How do I keep fruits like apples from browning on the board?
Slice and soak them in lemon water for a few minutes, then pat dry before arranging to prevent browning.
What are good substitutes for traditional cheeses on the board?
For dairy-free options, nut-based cheeses like cashew cheese or almond cheese are great. You can also try marinated tofu or hummus for variety.
How can I make the board more filling for a heartier brunch?
Add mini quiches, boiled eggs, or a side of protein-rich salads like a high-protein pasta salad to complement the board.
Pin This Recipe!
Perfect Brunch Charcuterie Board with Mini Pastries

An effortless and satisfying brunch charcuterie board featuring a mix of creamy cheeses, fresh fruits, savory cured meats, and flaky mini pastries, perfect for casual gatherings or special weekend mornings.
- Prep Time: 10 minutes
- Cook Time: 7 minutes (toasting nuts)
- Total Time: 30 minutes
- Yield: 4 servings
- Category: Brunch
- Cuisine: American
Ingredients
- Brie cheese, soft and creamy
- Sharp cheddar, sliced or cubed
- Goat cheese log, plain or herbed
- Prosciutto, thinly sliced
- Soppressata or salami, sliced
- Mini croissants, buttery and flaky
- Mini fruit danishes, assorted flavors like raspberry or apricot
- Mini savory puff pastries with cheese or herbs (optional)
- Fresh grapes or berries (seasonal picks)
- Apple or pear slices, thinly cut
- Cucumber slices or cherry tomatoes
- Almonds or walnuts, lightly toasted
- Olives, mixed varieties
- Honey or fig jam
- Whole-grain or artisan crackers
Instructions
- Gather and prep all ingredients (10 minutes): Slice cheeses into bite-sized pieces or wedges. Arrange cured meats in loose folds or rolls. Wash and dry fruits and vegetables thoroughly. Slice apples or pears thinly and toss in a little lemon water to avoid browning.
- Arrange cheeses on the board (5 minutes): Place the largest cheese pieces or wedges spaced evenly around the board. Brie can be placed whole with a small spreader knife beside it.
- Add cured meats (5 minutes): Artistic folds or rolls of prosciutto and salami create visual interest. Cluster them near cheeses they pair well with.
- Place mini pastries strategically (5 minutes): Distribute mini croissants and danishes evenly. Aim for balance in colors and shapes. Use tongs or coffee scoops to avoid squishing delicate pastries.
- Fill in with fruits and veggies (5 minutes): Scatter grapes, berries, and sliced apples to fill gaps. Cherry tomatoes or cucumber slices add freshness and a pop of green or red.
- Add nuts, olives, and jams (3 minutes): Use small bowls or ramekins for olives and jams. Sprinkle nuts in open spaces for crunch.
- Finish with crackers and final touches (2 minutes): Fan crackers along edges or in small stacks. If using, add cheese markers or small garnishes like fresh herbs.
- Final check and serve: Step back and see if the board feels balanced—color, texture, and spacing matter. Adjust as needed, then bring it to the table with confidence.
Notes
Let cheeses sit at room temperature for 20-30 minutes before serving for best flavor and texture. Handle mini pastries gently and warm briefly before serving for freshness. Soak apple or pear slices in lemon water to prevent browning. Toast nuts lightly at 350°F (175°C) for 5-7 minutes for enhanced flavor. Assemble board just before serving to keep pastries fresh and crackers crisp.
Nutrition
- Serving Size: Approximately 1/4 of
- Calories: 0.3504
- Sugar: 8
- Sodium: 550
- Fat: 25
- Saturated Fat: 10
- Carbohydrates: 20
- Fiber: 3
- Protein: 12
Keywords: charcuterie board, brunch, mini pastries, cheeses, cured meats, easy brunch, party platter, savory and sweet


