
“You really should try these eggs,” my neighbor said while dropping off a small plate wrapped in pastel cellophane. I was skeptical at first—Easter treats always seemed a bit fussy, right? But after a bite of these easy no-bake peanut butter chocolate Easter eggs, I was hooked. Honestly, they came together so quickly, I kept making them all week. There was something oddly comforting about squishing that peanut butter mixture into those little egg molds, the smell of chocolate melting nearby, and knowing no oven fuss was involved. It’s funny how a simple recipe like this can quietly become a weekend ritual—something to look forward to after a long day.
Beyond just the taste, it was the ease that sold me—no complicated steps or fancy ingredients, just good, straightforward peanut butter and chocolate that felt like a little homemade gift. They quickly became my go-to treat when friends popped by or when I needed a quick pick-me-up. I’ve tried a handful of variations, but the classic combo still wins every time. If you’ve ever thought about making festive Easter treats that don’t require hours or a full kitchen takeover, this recipe is probably the one you’ll end up returning to, just like I did.
It’s funny how the simplest moments—a shared sweet, a warm kitchen, a quick recipe—can stick with you. These peanut butter chocolate Easter eggs aren’t just candy; they’re a little pause, a sweet reset when life’s busy. And honestly, that’s why I keep making them.
Why You’ll Love This Recipe
I’ve tested this easy no-bake peanut butter chocolate Easter eggs recipe many times, and it never fails to impress. If you’re juggling a busy schedule or just want a fuss-free dessert that feels special, this one’s a winner. Here’s why it’s become a staple in my recipe box:
- Quick & Easy: You can whip these up in about 20 minutes, making them perfect for last-minute Easter plans or spontaneous dessert cravings.
- Simple Ingredients: No need to hunt down exotic items; your pantry probably already has peanut butter, chocolate, and a few basics!
- Perfect for Easter Celebrations: These eggs fit right into holiday baskets or festive tables without any baking stress.
- Crowd-Pleaser: Kids love ’em, adults love ’em, and they vanish fast at gatherings.
- Unbelievably Delicious: The balance between the creamy peanut butter filling and rich chocolate coating hits that comfort food spot every time.
What sets this recipe apart? The no-bake method means you get soft, luscious filling with a smooth, shiny chocolate shell without the oven warming up your kitchen. Plus, I like to blend the peanut butter with just the right amount of powdered sugar and butter to get that silky, sliceable texture—not crumbly, not too sticky, just perfect. It’s a little twist that makes the difference. And honestly, this recipe is a bit of a lifesaver when I’m also juggling other dinner plans—like when I made a big batch of peanut butter blossoms cookies for a party and needed a quick Easter treat on the side.
These eggs aren’t just candy; they’re a tiny celebration in each bite, and you don’t have to be a pro baker to get them right.
What Ingredients You Will Need
This easy no-bake peanut butter chocolate Easter eggs recipe uses simple, wholesome ingredients to create a rich, satisfying treat without fuss. Most are pantry staples, and you’ll find quick swaps if needed.
- Peanut Butter: Creamy, unsalted is best for smooth texture and balanced flavor. I recommend brands like Skippy or Jif for consistent results.
- Powdered Sugar: Adds sweetness and helps firm up the filling. Make sure it’s sifted to avoid lumps.
- Unsalted Butter: Softened to room temperature, it adds richness and helps the filling hold shape.
- Vanilla Extract: Just a teaspoon for a subtle depth of flavor.
- Semi-Sweet or Dark Chocolate Chips: For coating. Choose your favorite brand—Ghirardelli or Nestlé work great here.
- Vegetable Oil or Coconut Oil: A tablespoon mixed with the chocolate helps it melt smoothly and creates a shiny finish.
Optional Ingredients (for subtle twists):
- A pinch of sea salt (sprinkled on top for contrast)
- Mini chocolate chips inside the peanut butter filling for added texture
- Use almond butter instead of peanut butter for a different nutty flair
If you want a gluten-free version, this recipe is naturally free of gluten, so no worries there. If dairy is a concern, swap butter for a vegan margarine and use dairy-free chocolate chips. For a lower sugar option, consider using powdered erythritol instead of powdered sugar, though that changes the texture slightly.
Equipment Needed
- Mixing Bowls: One medium for the peanut butter filling, another for melting chocolate.
- Electric Mixer or Hand Whisk: To beat the filling ingredients until smooth—makes life easier but a sturdy spoon works too.
- Silicone Easter Egg Mold: Essential for shaping the eggs perfectly. If you don’t have one, small candy molds or even mini cupcake liners can work.
- Microwave-Safe Bowl or Double Boiler: For melting chocolate gently without burning.
- Spatula: For folding and scraping down sides.
- Baking Sheet or Plate: To place the eggs on while they set.
If you’re on a budget, silicone molds are affordable and reusable. I’ve had mine for years, and they clean up easily (a quick rinse and they’re ready for next time). For melting chocolate, a microwave saves time, but if you prefer, a double boiler setup is great for gentle heat control, which I use when making peanut butter blossoms cookies or other chocolate-dipped treats.
Preparation Method

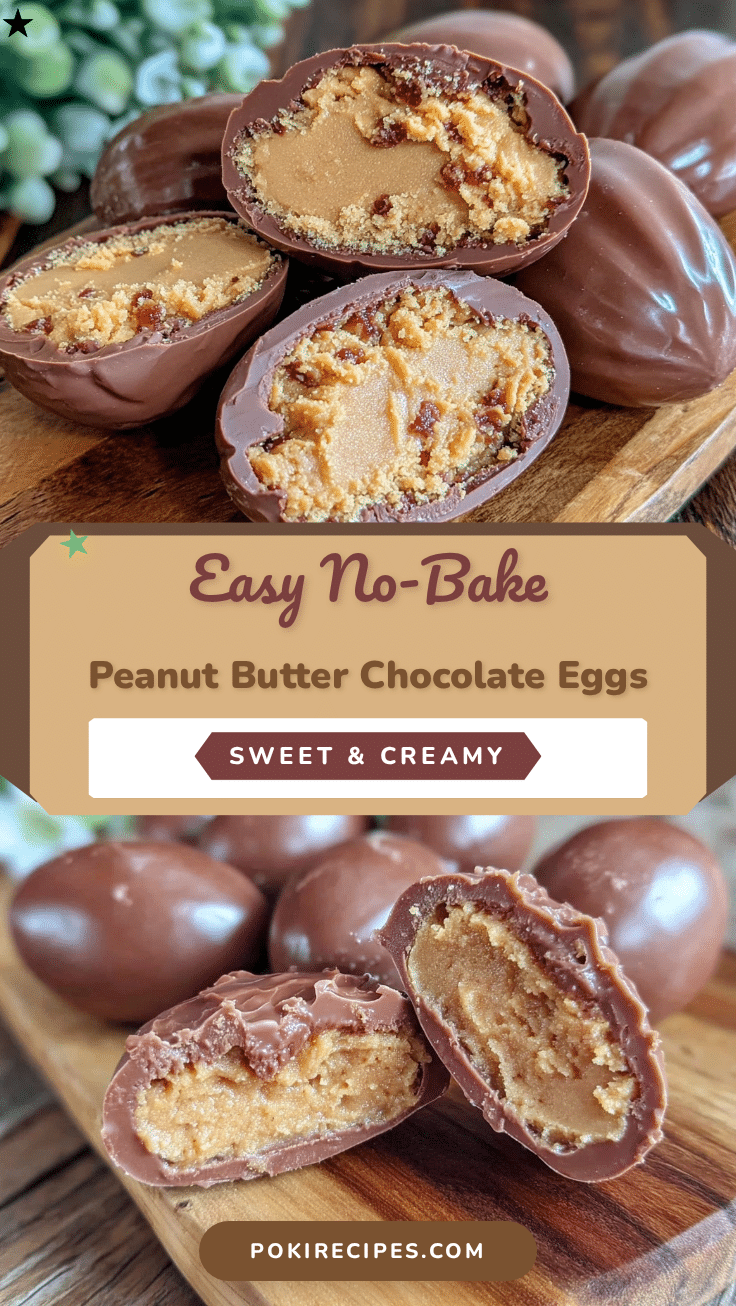
- Prepare the Peanut Butter Filling (10 minutes): In a medium bowl, combine 1 cup (250 g) creamy peanut butter, ½ cup (60 g) powdered sugar (sifted), 4 tablespoons (56 g) softened unsalted butter, and 1 teaspoon vanilla extract. Beat with an electric mixer or whisk until smooth and creamy. The texture should be firm enough to hold shape but soft enough to press easily.
- Shape the Eggs (10 minutes): Take small spoonfuls of the peanut butter mixture and press them firmly into the silicone egg molds. Fill each cavity completely, smoothing the tops. Place the mold on a baking sheet or plate and pop it into the freezer for 15 minutes to firm up.
- Melt the Chocolate (5-7 minutes): While the filling chills, melt 2 cups (340 g) of semi-sweet chocolate chips with 1 tablespoon (15 ml) vegetable or coconut oil in a microwave-safe bowl. Heat in 30-second bursts, stirring well between each, until smooth and glossy. Avoid overheating to prevent chocolate seizing.
- Coat the Eggs (10 minutes): Remove the peanut butter eggs from the freezer. Using a fork or dipping tool, carefully dip each egg into the melted chocolate, letting excess drip off. Place back on the baking sheet lined with parchment paper.
- Set the Eggs (30 minutes): Let the chocolate-coated eggs sit at room temperature or refrigerate them until the chocolate hardens completely. This usually takes about 30 minutes. If you like, sprinkle a pinch of sea salt on top for a little extra flavor contrast before the chocolate sets.
- Remove from Molds & Serve: Once set, gently pop the eggs out of the molds. They should come out easily if fully chilled and properly coated.
Pro Tips: If your chocolate starts to harden while dipping, warm it slightly again in the microwave. Also, don’t rush the freezing step—proper chilling helps the eggs keep their shape and prevents the filling from melting into the chocolate coating.
Cooking Tips & Techniques
One thing I learned early is that the chocolate coating makes or breaks this recipe. It needs to be smooth, glossy, and thin enough to bite through without overpowering the peanut butter. Mixing a bit of oil into the melted chocolate helps with that shine and keeps it from cracking too hard.
Another common hiccup is the filling texture. If it’s too dry, the eggs crack; if too wet, they don’t hold shape. So, be sure to soften the butter but not melt it, and sift your powdered sugar to avoid lumps.
Timing matters too. Freezing the peanut butter filling before dipping keeps everything neat and prevents melting. I usually prep the filling while melting the chocolate to save time—multitasking is key when making treats after a busy day.
Lastly, patience is your friend. Letting the eggs fully set in the fridge ensures a firm chocolate shell and a satisfyingly smooth bite. Rushing this step can lead to smudged chocolate or fragile eggs.
Variations & Adaptations
Want to switch things up? Here are some ideas I’ve played with that keep this recipe fresh and exciting:
- Nut-Free Version: Use sunflower seed butter instead of peanut butter for those with allergies. The taste is slightly different but still delicious.
- White Chocolate Coating: Swap the semi-sweet chips for white chocolate for a sweeter, creamier shell. Add a few drops of food coloring for pastel Easter vibes.
- Crunchy Filling: Stir in ¼ cup (30 g) crushed pretzels or crispy rice cereal into the peanut butter mixture for a surprise crunch inside.
- Vegan & Dairy-Free: Use vegan butter and dairy-free chocolate chips, and check your powdered sugar is vegan-friendly.
- Spiced Twist: Add a sprinkle of cinnamon or a drop of almond extract for a comforting flavor twist.
Personally, I once tried adding a bit of shredded coconut inside the filling, which gave it a fun texture and tropical hint. It turned into a nice contrast with the chocolate shell and felt like a little Easter vacation in every bite.
Serving & Storage Suggestions
Serve these peanut butter chocolate Easter eggs chilled or at room temperature. They’re perfect on a festive platter surrounded by pastel napkins or nestled in paper grass for an Easter basket surprise. Pair them with a cup of coffee or a cold glass of milk to balance that rich sweetness.
Store any leftovers in an airtight container in the refrigerator for up to 2 weeks. They also freeze well—just pop them in a freezer-safe bag, and thaw in the fridge for a few hours before serving. Over time, the flavors actually meld and deepen, making them taste even better the next day.
If you’re planning a brunch spread, these treats could complement savory dishes nicely. They’d fit right in alongside something like the easy make-ahead breakfast burritos or the fluffy protein pancakes for a balanced, crowd-pleasing table.
Nutritional Information & Benefits
Each peanut butter chocolate Easter egg is approximately 120 calories, with about 7 grams fat, 10 grams carbohydrates, and 3 grams protein. The peanut butter provides healthy fats and protein, while chocolate offers antioxidants, especially if you use dark chocolate.
This recipe is naturally gluten-free and can be adapted for vegan diets. Keep in mind the sugar content, which comes mainly from powdered sugar and chocolate, so enjoy these treats in moderation. They’re a sweet indulgence but also pack a bit of satisfying nourishment thanks to the peanut butter’s nutrients.
For those mindful of allergies, peanut or tree nut substitutes work well to make this recipe inclusive. I appreciate how this treat offers a homemade alternative to store-bought Easter candy, letting you control ingredients and enjoy a fresher, less processed sweet.
Conclusion
This easy no-bake peanut butter chocolate Easter eggs recipe has quietly become one of my favorite homemade treats, especially when time is tight but the craving for something special hits. It’s simple, delicious, and flexible enough to make your own with little twists here and there. Whether you’re making it for kids, guests, or just yourself, it’s one of those recipes that feels like a small celebration every time you bite in.
Feel free to experiment with different nut butters or coatings to find your perfect combo. And if you give it a try, I’d love to hear how yours turn out—maybe you’ll add a secret ingredient or two! Making treats like this reminds me that sometimes the best desserts don’t need hours or fancy gadgets, just a little patience and good ingredients.
Happy Easter, and happy snacking!
Frequently Asked Questions
Can I use crunchy peanut butter instead of creamy?
Yes, but the texture of the filling will be chunkier. If you prefer smooth eggs, creamy peanut butter works best.
Do I have to use a silicone mold?
Not necessarily. Small candy molds or mini cupcake liners can work, though shaping might be a bit messier.
How long will these peanut butter eggs keep?
Stored in an airtight container in the fridge, they last up to 2 weeks. They can also be frozen for longer storage.
Can I make these eggs ahead of time for an Easter party?
Absolutely! They keep well and can be made 2-3 days in advance, making them perfect for prepping ahead.
Is it possible to make these with almond butter?
Yes, almond butter is a great alternative and gives a slightly different but delicious nutty flavor.
Pin This Recipe!
Easy No-Bake Peanut Butter Chocolate Easter Eggs

A quick and simple no-bake recipe for creamy peanut butter filled Easter eggs coated in smooth chocolate, perfect for festive treats without oven fuss.
- Prep Time: 20 minutes
- Cook Time: 0 minutes
- Total Time: 50 minutes
- Yield: 24 eggs 1x
- Category: Dessert
- Cuisine: American
Ingredients
- 1 cup (250 g) creamy unsalted peanut butter
- ½ cup (60 g) powdered sugar, sifted
- 4 tablespoons (56 g) unsalted butter, softened to room temperature
- 1 teaspoon vanilla extract
- 2 cups (340 g) semi-sweet or dark chocolate chips
- 1 tablespoon (15 ml) vegetable oil or coconut oil
- Optional: pinch of sea salt for sprinkling
- Optional: mini chocolate chips for filling
- Optional: almond butter instead of peanut butter
Instructions
- Prepare the Peanut Butter Filling: In a medium bowl, combine peanut butter, powdered sugar, softened butter, and vanilla extract. Beat with an electric mixer or whisk until smooth and creamy, firm enough to hold shape but soft enough to press.
- Shape the Eggs: Take small spoonfuls of the peanut butter mixture and press firmly into silicone egg molds. Smooth the tops. Place the mold on a baking sheet or plate and freeze for 15 minutes to firm up.
- Melt the Chocolate: Melt chocolate chips with vegetable or coconut oil in a microwave-safe bowl in 30-second bursts, stirring until smooth and glossy. Avoid overheating.
- Coat the Eggs: Remove peanut butter eggs from freezer. Dip each egg carefully into melted chocolate, letting excess drip off. Place on baking sheet lined with parchment paper.
- Set the Eggs: Let chocolate-coated eggs sit at room temperature or refrigerate until chocolate hardens, about 30 minutes. Optionally sprinkle sea salt on top before chocolate sets.
- Remove from Molds & Serve: Once set, gently pop eggs out of molds. Serve chilled or at room temperature.
Notes
Use creamy peanut butter for smooth texture. Sift powdered sugar to avoid lumps. Proper freezing before dipping helps eggs keep shape. Mix oil into chocolate for a shiny, smooth coating. Can substitute almond butter or sunflower seed butter for allergies. Vegan and dairy-free versions possible with ingredient swaps.
Nutrition
- Serving Size: 1 egg
- Calories: 120
- Sugar: 8
- Sodium: 50
- Fat: 7
- Saturated Fat: 2
- Carbohydrates: 10
- Fiber: 1
- Protein: 3
Keywords: no-bake, peanut butter, chocolate, Easter eggs, easy dessert, homemade treats, holiday candy


