The smell of warm, crusty bread fresh out of the oven is honestly one of life’s simplest pleasures. I first stumbled upon the no-knead artisan bread recipe during a weekend when I was craving bakery-quality bread but didn’t want to wrestle with dough or fancy equipment. It’s amazing how just a handful of ingredients and a bit of patience can turn into a loaf with a perfectly crunchy crust and soft, airy crumb inside. This no-knead artisan bread has quickly become my go-to for homemade bread that feels fancy without the fuss.
What I love most about this recipe is how it fits into busy schedules—no intense kneading required, just mixing and waiting. If you’ve ever thought baking bread was intimidating or time-consuming, this will change your mind. Plus, it’s ridiculously versatile and comforting, perfect for everything from sandwiches to dipping in soups. Over the years, I’ve tested and tweaked this recipe multiple times, making it a reliable staple in my kitchen and something I happily share with friends and family. Whether you’re a beginner or a seasoned baker, this no-knead artisan bread recipe is a winner.
So, if you’re ready to enjoy homemade bread that looks and tastes like it came from a bakery, but made right in your own kitchen, this recipe is just what you need. Trust me, once you’ve tried this no-knead artisan bread, you’ll find it hard to go back to store-bought loaves.
Why You’ll Love This Recipe
- Quick & Easy: It comes together in just 3 simple steps, and you only spend a few minutes actively working on it. Perfect for those days when you want fresh bread without the sweat and elbow grease.
- Simple Ingredients: No fancy flours or additives—just basic pantry staples like flour, water, salt, and yeast. You probably already have everything on hand.
- Perfect for Any Occasion: Whether it’s a cozy family dinner, a weekend brunch, or impressing guests at a potluck, this bread fits right in.
- Crowd-Pleaser: Even my picky eaters ask for seconds. The crusty exterior and soft inside make it irresistible.
- Unbelievably Delicious: The contrast between the crunchy crust and pillowy crumb is what real artisan bread dreams are made of.
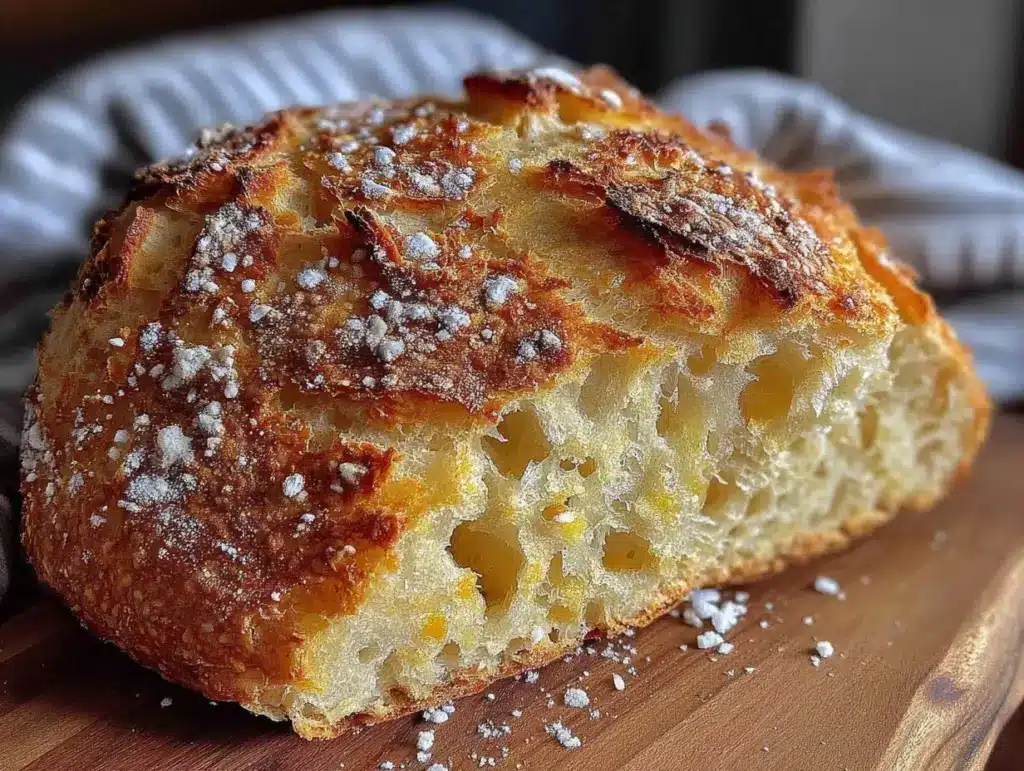
This no-knead artisan bread isn’t just another loaf. The secret lies in the long fermentation time that develops a deep flavor without complicated steps. Plus, baking it in a covered pot traps steam, giving that signature crust that makes you want to tear off a chunk immediately. Honestly, after making this bread a dozen times, I can say it’s my favorite way to achieve that bakery-quality loaf at home without any kneading or fancy machines.
What Ingredients You Will Need
This no-knead artisan bread recipe uses simple, wholesome ingredients to deliver a bold flavor and satisfying texture without any fuss. Here’s what you’ll need:
- All-purpose flour – 3 cups (360 g) (I usually go with King Arthur brand for consistent results)
- Instant yeast – 1/4 teaspoon (you can use active dry yeast but add a few extra minutes for proofing)
- Salt – 1 1/4 teaspoons (fine sea salt works best)
- Warm water – 1 1/2 cups (360 ml) (about 105°F/40°C to activate the yeast properly)
That’s all! Just four ingredients that come together to make magic. The flour provides structure, the yeast makes it rise, salt adds flavor, and water brings it all together. If you want to experiment, you can swap half of the all-purpose flour with bread flour for a slightly chewier texture, or even whole wheat for a nuttier flavor. But honestly, the classic all-purpose flour version is perfect for beginners and pros alike.
For those with dietary needs, you can substitute the all-purpose flour with a gluten-free blend designed for baking, but results may vary. If you want to add a twist, sprinkle some herbs or seeds on top before baking to change up the flavor and presentation.
Equipment Needed
- Large mixing bowl: For combining the ingredients. A glass or stainless steel bowl works great.
- Wooden spoon or spatula: To stir the dough; no mixer required here!
- Dutch oven or heavy oven-safe pot with lid: This is key to getting that perfect crust. Cast iron works best due to its heat retention, but any oven-proof pot with a tight lid will do.
- Kitchen scale (optional but recommended): It helps with accurate measuring, especially if you want consistent results every time.
- Oven mitts: For handling the hot pot safely.
If you don’t have a Dutch oven, a heavy roasting pan with a lid or even a large oven-safe ceramic dish covered tightly with foil can work as substitutes. I tried baking this bread on a baking sheet without a covered pot, but the crust just wasn’t the same—definitely worth the investment if you bake bread regularly.
Detailed Preparation Method

- Mix the dry ingredients: In your large mixing bowl, combine 3 cups (360 g) of all-purpose flour, 1/4 teaspoon instant yeast, and 1 1/4 teaspoons salt. Give it a good stir so everything is evenly distributed. This step takes about 2 minutes.
- Add warm water and stir: Pour in 1 1/2 cups (360 ml) of warm water (around 105°F/40°C). Using a wooden spoon or spatula, mix until all flour is moistened and the dough looks shaggy and sticky. Don’t worry about kneading—just stir to bring it together. This usually takes 2-3 minutes. The dough will be loose and very wet; that’s exactly how it should be.
- Cover and let it rest: Cover the bowl tightly with plastic wrap or a clean towel. Let the dough sit at room temperature (around 70°F/21°C) for 12 to 18 hours. The dough will rise and bubble, developing flavor. This long fermentation is where the magic happens, so patience pays off here.
- Prepare for baking: After the dough has risen and is bubbly, preheat your oven to 450°F (230°C) with your Dutch oven inside to get it super hot. This usually takes 30 minutes.
- Shape and transfer the dough: While the oven heats, lightly flour a clean work surface and turn the dough out onto it. With floured hands, shape it gently into a round ball by folding edges inward. No kneading needed here. Place a piece of parchment paper inside a bowl or on a peel to transfer the dough easily.
- Bake the bread: Carefully remove the hot Dutch oven from the oven. Lift the dough on the parchment paper and place it inside the pot. Cover with the lid and bake for 30 minutes.
- Finish baking uncovered: Remove the lid and bake for another 15-20 minutes until the crust is deep golden brown and crispy. The bread should sound hollow when tapped on the bottom.
- Cool and enjoy: Transfer the bread to a wire rack to cool completely before slicing. This helps the crumb set properly and keeps the crust crisp.
A couple of tips: If your dough feels too sticky to handle after rising, dust your hands and surface lightly with flour but avoid adding too much to keep the crumb light. Also, don’t rush the resting time; the flavor and texture depend on it. I’ve learned over time that the longer fermentation—within reason—creates the best artisan character.
Cooking Tips & Techniques
- Use instant yeast: It’s more convenient and doesn’t require proofing. If you only have active dry yeast, dissolve it in warm water first and wait 5-10 minutes until bubbly.
- Don’t skip the long rest: This slow fermentation develops flavor and texture, so be patient. I once tried rushing it and ended up with bland bread.
- Preheat your Dutch oven fully: This ensures the bread steams properly inside, creating a crust that’s crisp but not burnt.
- Handle dough gently: Avoid overworking once it’s risen to keep the crumb airy and open.
- Use parchment paper: It makes transferring the dough super easy and prevents sticking.
- Check internal temperature: If you want to be exact, the bread is done when it hits around 205°F (96°C) inside.
- Cool before slicing: It’s tempting to cut right away, but letting it cool lets the crumb finish setting and prevents a gummy texture.
Variations & Adaptations
- Herbed Artisan Bread: Add 1-2 tablespoons of fresh or dried herbs like rosemary, thyme, or oregano into the dry ingredients for a fragrant twist.
- Whole Wheat Version: Replace half of the all-purpose flour with whole wheat flour to add nuttiness and fiber. You may need to add a splash more water for hydration.
- Gluten-Free Option: Use a gluten-free baking flour blend and add a teaspoon of xanthan gum if your blend doesn’t include it. Be mindful that texture and rise may differ.
- Seasonal Add-ins: Fold in 1/2 cup of olives, sun-dried tomatoes, or nuts for extra flavor and texture before the long rise.
- Different Cooking Methods: If you don’t have a Dutch oven, try using a pizza stone and a metal bowl to cover the dough while baking to trap steam.
One personal favorite variation is adding caramelized onions and shredded cheese inside the dough before the final bake—talk about comfort food with a punch!
Serving & Storage Suggestions
This no-knead artisan bread is best served warm or at room temperature. I love slicing it thick and slathering with butter or dipping into olive oil and balsamic vinegar. It pairs wonderfully with soups, stews, or just a simple cheese board.
For storage, wrap the cooled loaf in a clean kitchen towel or paper bag to keep the crust crisp for up to two days. Avoid plastic wrap if you want to keep the crust from softening. If you need to store longer, slice the bread and freeze it in an airtight bag for up to 3 months.
To reheat, pop slices in a toaster or warm the whole loaf in a 350°F (175°C) oven for 10 minutes. This refreshes the crust and crumb beautifully. Interestingly, the flavors actually mellow and deepen slightly if you let the bread rest a day before eating—if you can resist!
Nutritional Information & Benefits
Per slice (approximate): 150 calories, 4g protein, 1g fat, 30g carbohydrates, 2g fiber.
This bread is a good source of energy from simple ingredients without any additives or preservatives. Using all-purpose flour provides a moderate amount of protein and carbs, making it great for a balanced diet. Plus, the long fermentation improves digestibility by breaking down some gluten and phytic acid.
If you opt for whole wheat flour or add seeds, you get extra fiber and micronutrients. Just keep in mind this recipe contains gluten and yeast, so it’s not suitable for those with celiac disease or yeast allergies.
From my perspective as someone who values wholesome, homemade meals, this no-knead artisan bread fits perfectly into a lifestyle that’s both tasty and mindful.
Conclusion
This no-knead artisan bread recipe is honestly a game-changer for anyone who loves fresh, homemade bread without the stress. It’s simple, reliable, and delivers that bakery-worthy loaf that makes you feel like a pro baker, even if it’s your first try. I encourage you to play around with the variations and find your favorite version—maybe with herbs, nuts, or whole grains.
I still remember the first time I pulled this bread out of the oven—the crust crackled as I sliced, and the warm, yeasty aroma filled my whole kitchen. It’s a small moment of joy that’s easy to recreate anytime you want. If you try this recipe, please drop a comment and share how it turned out or any personal twists you made. Baking bread is better when we share the love!
Happy baking, and may your kitchen always smell like fresh artisan bread!
FAQs
Can I use active dry yeast instead of instant yeast?
Yes, you can. Just dissolve the active dry yeast in warm water and let it sit for 5-10 minutes until bubbly before mixing it with the dry ingredients.
What if I don’t have a Dutch oven?
You can use any heavy oven-safe pot with a lid or cover a baking sheet with a large metal bowl or foil to trap steam. The crust might be less crisp but still delicious.
How long can I keep the bread fresh?
Stored properly at room temperature in a paper bag or wrapped in a towel, it stays fresh for up to 2 days. For longer storage, slice and freeze.
Can I add flavors like herbs or cheese?
Absolutely! Adding herbs, cheese, olives, or nuts before the long rise adds wonderful flavor and texture.
Why is the dough so sticky?
The dough is meant to be wet and sticky—that’s what helps create the open crumb and artisan texture. Use floured hands to shape it gently without adding too much extra flour.
Pin This Recipe!

No-Knead Artisan Bread

A simple no-knead artisan bread recipe that yields a crusty, bakery-quality loaf with minimal effort and just four basic ingredients.
- Prep Time: 5 minutes
- Cook Time: 45 minutes
- Total Time: 12 hours 50 minutes
- Yield: 1 loaf (about 8 servings) 1x
- Category: Bread
- Cuisine: American
Ingredients
- 3 cups (360 g) all-purpose flour
- 1/4 teaspoon instant yeast
- 1 1/4 teaspoons salt
- 1 1/2 cups (360 ml) warm water (about 105°F/40°C)
Instructions
- In a large mixing bowl, combine 3 cups (360 g) all-purpose flour, 1/4 teaspoon instant yeast, and 1 1/4 teaspoons salt. Stir to evenly distribute the ingredients (about 2 minutes).
- Pour in 1 1/2 cups (360 ml) warm water (around 105°F/40°C). Mix with a wooden spoon or spatula until all flour is moistened and the dough looks shaggy and sticky (2-3 minutes).
- Cover the bowl tightly with plastic wrap or a clean towel and let the dough rest at room temperature (around 70°F/21°C) for 12 to 18 hours until risen and bubbly.
- Preheat the oven to 450°F (230°C) with a Dutch oven inside for 30 minutes.
- Lightly flour a work surface and turn the dough out onto it. Shape gently into a round ball by folding edges inward. Place the dough on parchment paper for easy transfer.
- Carefully remove the hot Dutch oven from the oven. Lift the dough with the parchment paper and place it inside the pot. Cover with the lid and bake for 30 minutes.
- Remove the lid and bake uncovered for another 15-20 minutes until the crust is deep golden brown and crispy. The bread should sound hollow when tapped on the bottom.
- Transfer the bread to a wire rack and cool completely before slicing.
Notes
Use instant yeast for convenience; if using active dry yeast, proof it in warm water for 5-10 minutes first. Do not rush the long fermentation time for best flavor and texture. Preheat the Dutch oven fully to trap steam and create a crispy crust. Handle the dough gently to maintain an airy crumb. Cool bread completely before slicing to avoid gummy texture.
Nutrition
- Serving Size: 1 slice
- Calories: 150
- Sodium: 300
- Fat: 1
- Carbohydrates: 30
- Fiber: 2
- Protein: 4
Keywords: no-knead bread, artisan bread, homemade bread, easy bread recipe, crusty bread, simple bread


