The moment you bite into these Decadent St. Patrick’s Lucky Mint Brownie Bites, you’ll be hit with a wave of rich chocolate and refreshing mint that just feels like a little celebration in your mouth. Honestly, I first whipped up these minty brownie treats on a whim during a chilly March evening when I craved something festive yet comforting. The smell of melted chocolate mingling with cool mint instantly took me to cozy Irish pubs and lively St. Patrick’s Day gatherings, even though I was just in my kitchen.
This recipe has quickly become a favorite for anyone who loves a fudgy brownie with a twist. The “lucky” part isn’t just about the green sprinkles or festive vibes—it’s the way the mint cuts through the dense chocolate, making every bite feel light yet indulgent. Plus, these brownie bites are perfect little crowd-pleasers that you can whip up without breaking a sweat.
After testing this recipe more times than I can count (no complaints here!), I can confidently say it’s a must-try for anyone who wants a homemade treat that’s both festive and unforgettable. Whether you’re planning a St. Patrick’s Day party or just craving something special, these Decadent St. Patrick’s Lucky Mint Brownie Bites have got you covered.
Why You’ll Love This Recipe
Having baked these brownie bites over and over, here’s why they stand out and why I think you’ll fall for them too:
- Quick & Easy: You can have these delicious bites ready in under 40 minutes, perfect for last-minute celebrations or sweet cravings.
- Simple Ingredients: No complicated or hard-to-find items—just pantry staples with a refreshing mint twist.
- Perfect for St. Patrick’s Day: The green mint element and festive sprinkles make them ideal for holiday parties or just channeling some Irish cheer.
- Crowd-Pleaser: Kids, adults, mint lovers, and chocolate fans alike rave about the fudgy texture and cool flavor combo.
- Unbelievably Delicious: The dense, gooey brownie paired with a minty freshness isn’t your everyday brownie—it’s a delightful surprise every time.
What sets this recipe apart is the balance. Instead of just dumping mint extract in and hoping for the best, I blend in real peppermint oil and a touch of cream cheese frosting that brings a luscious creaminess. Also, I toss in some crushed mint candies for a little crunch and sparkle. This isn’t just another brownie recipe—it’s your new St. Patrick’s Day staple.
I can honestly say after multiple batches and tweaks, these bites make you pause and savor the moment. They’re like comfort food wearing a party hat—perfect if you want to impress guests without stressing over complicated desserts.
What Ingredients You Will Need
This recipe brings together straightforward ingredients that pack a punch in flavor and texture. Most of these are probably hanging out in your pantry or fridge right now.
- Unsweetened cocoa powder (natural or Dutch-processed, about ½ cup / 50g) – gives the brownies that deep chocolate intensity.
- All-purpose flour (¾ cup / 95g) – the base that holds everything together.
- Granulated sugar (1 cup / 200g) – sweet enough but not overpowering.
- Unsalted butter (½ cup / 115g, melted) – adds richness and fudginess.
- Large eggs (2, room temperature) – for structure and moisture.
- Peppermint extract (1 tsp) – the star of the mint flavor, be careful not to overdo it!
- Salt (¼ tsp) – balances the sweetness and enhances flavors.
- Baking powder (½ tsp) – just enough lift for soft bites without cake-like texture.
- Cream cheese (2 oz / 60g, softened) – for that creamy, minty frosting swirl.
- Powdered sugar (½ cup / 60g) – to sweeten the cream cheese frosting.
- Green food coloring (a few drops, optional) – for a festive minty green touch.
- Crushed mint candies or Andes mints (2 tbsp) – adds texture and a pop of extra minty goodness.
- Vanilla extract (½ tsp) – rounds out the flavors.
For best results, I like using a trusted brand of cocoa powder like Ghirardelli or Valrhona. The peppermint extract should be pure and strong—avoid imitation ones that can taste artificial. If you want to make this gluten-free, swapping the flour for a 1-to-1 gluten-free blend works nicely, but be sure to test the baking time.
In case you want a dairy-free version, use coconut oil instead of butter and a vegan cream cheese substitute for the frosting. Trust me, it still hits the spot!
Equipment Needed
- Mixing bowls: At least two – one for the dry ingredients, one for the wet. I prefer glass or stainless steel for easy cleanup.
- Electric mixer or hand whisk: To get that cream cheese frosting smooth and fluffy. A stand mixer is great if you have one, but a sturdy whisk works too.
- Measuring cups and spoons: Accuracy matters here, especially with baking powder and peppermint extract.
- 8×8-inch baking pan: Or a similar-sized square pan. If you don’t have one, a 9-inch round pan can work—just adjust baking time slightly.
- Parchment paper: For lining the pan, makes removing brownie bites a breeze and keeps cleanup easy.
- Spatula: For folding ingredients and spreading batter evenly.
- Knife or small cookie cutter: To cut the brownie bites neatly once baked.
I once tried baking these in a silicone mold for mini bites, and while it worked, I found the traditional pan gave better edges and fudgy centers. Also, a good quality non-stick pan makes life easier, but if you don’t have one, just be sure to grease and line well.
Keeping your cream cheese softened at room temp is key for smooth frosting, so plan ahead for that little step!
Detailed Preparation Method
- Preheat your oven to 350°F (175°C). Line your 8×8-inch baking pan with parchment paper, leaving some overhang for easy removal later. This step saves you from sticky fingers after baking.
- Mix dry ingredients. In a medium bowl, sift together ½ cup (50g) cocoa powder, ¾ cup (95g) all-purpose flour, ½ tsp baking powder, and ¼ tsp salt. Sifting helps avoid lumps and ensures even distribution of rising agents.
- Combine wet ingredients. In a large bowl, whisk together 1 cup (200g) granulated sugar and ½ cup (115g) melted unsalted butter until well blended. Add 2 large eggs, one at a time, beating after each addition until smooth.
- Add flavorings. Stir in 1 tsp peppermint extract and ½ tsp vanilla extract into the wet mixture. Be careful with the peppermint—too much can overpower the chocolate.
- Combine wet and dry. Gradually fold the dry ingredients into the wet mixture using a spatula. Mix until just combined—overmixing can make the brownies tough. The batter should be thick and fudgy.
- Prepare cream cheese frosting. In a small bowl, beat 2 oz (60g) softened cream cheese with ½ cup (60g) powdered sugar and a few drops of green food coloring if using. Beat until smooth and creamy. This frosting adds a lovely minty swirl and creaminess.
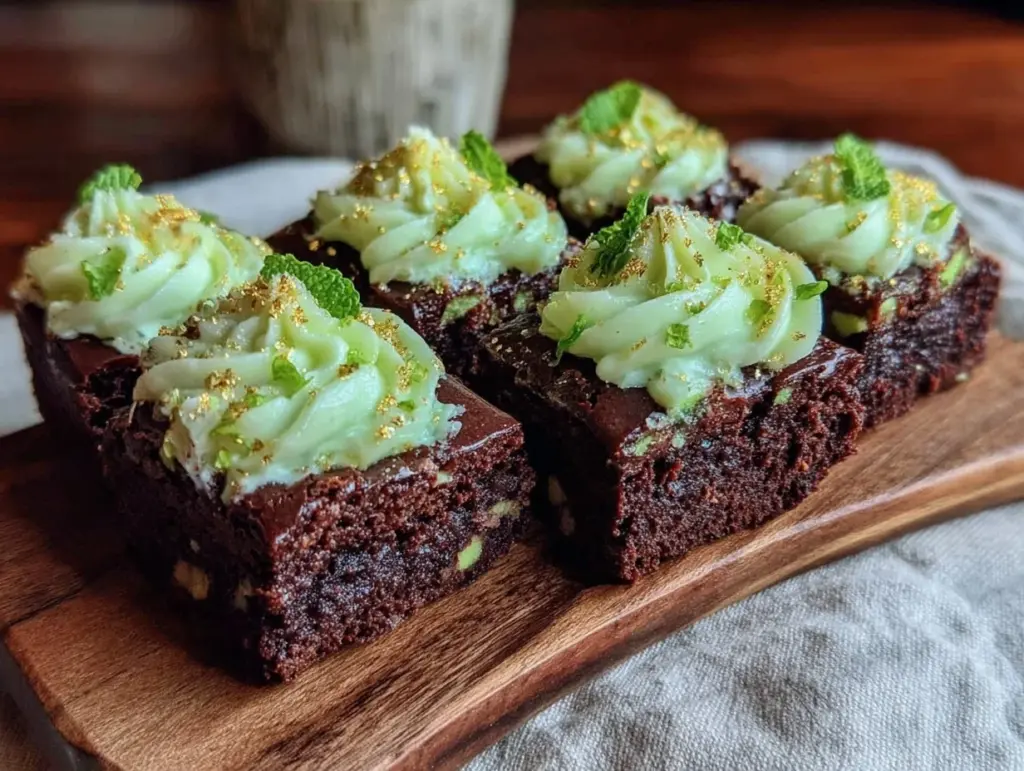
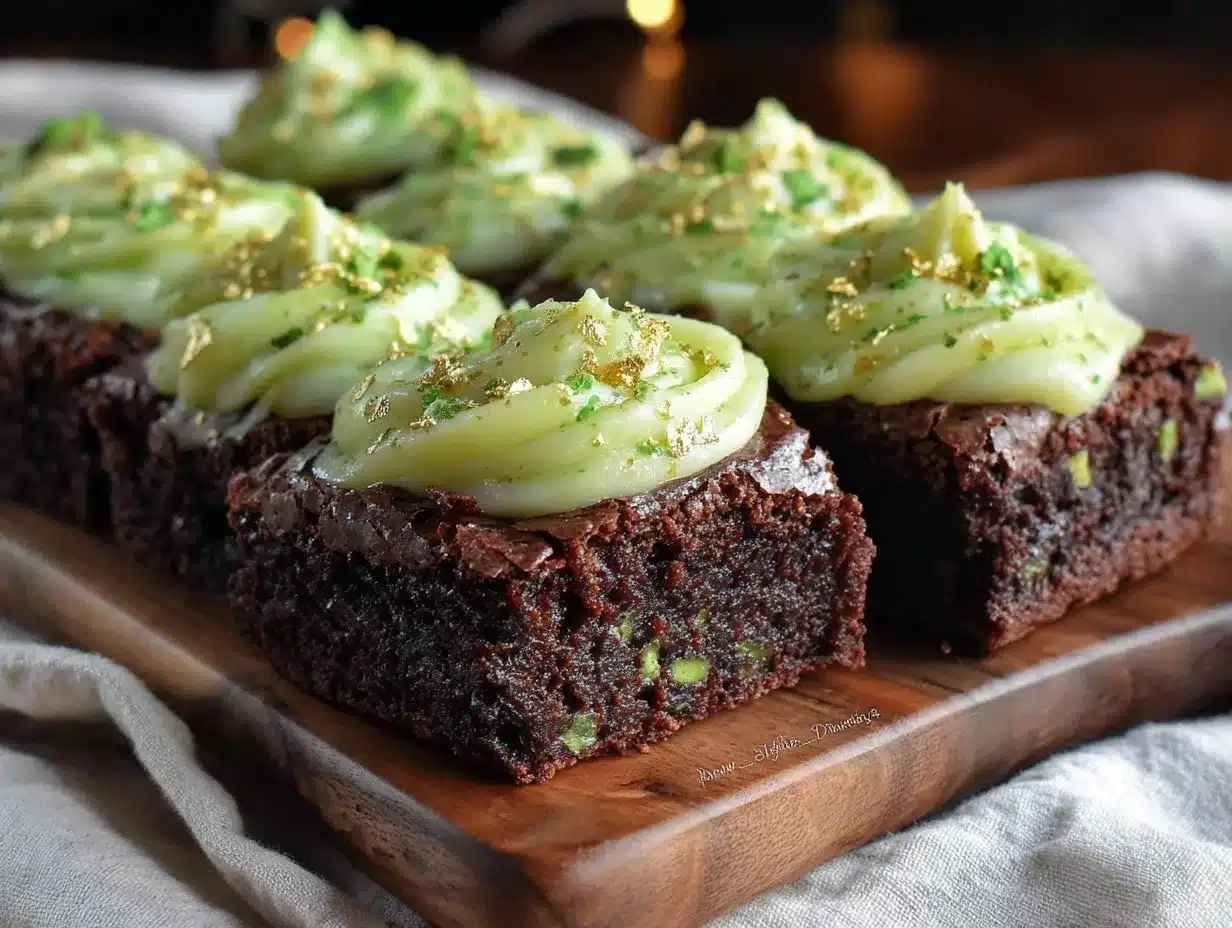
- Layer the batter and frosting. Pour half of the brownie batter into the prepared pan and spread evenly. Dollop half the cream cheese frosting over the batter in random spots. Use a knife or skewer to gently swirl the frosting into the batter. Repeat with the remaining batter and frosting, swirling again. This creates a marbled, beautiful effect.
- Add crushed mint candies. Sprinkle 2 tbsp crushed mint candies or Andes mints evenly over the top for texture and color.
- Bake. Place the pan in the preheated oven and bake for 25-30 minutes. Start checking at 25 minutes by inserting a toothpick near the center; it should come out with a few moist crumbs but not wet batter.
- Cool and cut. Let the brownies cool completely in the pan on a wire rack. Once cooled, use the parchment overhang to lift the slab out, then cut into 1.5-inch (4cm) square bites for perfect portioning.
Pro tip: If you want fudgier bites, bake closer to 25 minutes. For slightly cakier edges, go nearer 30 minutes. Keep an eye on the oven as every stove acts a bit differently.
Cooking Tips & Techniques
Making these mint brownie bites has taught me a few things that can help you get perfect results every time:
- Don’t overmix the batter. Once you add flour, mix just until combined. Overworking the batter makes brownies dense and less tender.
- Use room temperature eggs. Cold eggs can cause the butter to seize or batter to clump. Letting eggs sit out for 15 minutes before mixing really helps.
- Softened cream cheese is key. If it’s cold or lumpy, your frosting swirl won’t be smooth and pretty. I sometimes microwave cream cheese for 10 seconds if I’m in a rush.
- Watch the oven closely. Ovens vary. Start checking your brownies at 25 minutes to avoid overbaking, which dries them out.
- Crushing mint candies. Use a rolling pin in a ziplock bag for even-sized pieces—not too powdered, so you get a nice crunch.
- Swirling technique. Don’t overdo the swirl; gentle movements keep the layers distinct and pretty.
One time, I accidentally doubled the peppermint extract (yikes!). The brownies tasted like toothpaste! Lesson learned—mint is powerful, a little goes a long way.
Variations & Adaptations
Feel free to play with this recipe to suit your tastes or dietary needs. Here are some ideas I’ve tried or recommend:
- Vegan option: Swap butter for coconut oil and use flax eggs (1 tbsp flaxseed + 3 tbsp water per egg). Use vegan cream cheese for the frosting.
- Gluten-free: Replace all-purpose flour with a 1:1 gluten-free baking flour. The texture stays fudgy and delicious.
- Mint chocolate chips: Add ¼ cup mint-flavored chocolate chips into the batter for extra bursts of minty chocolate.
- Spicy twist: Add a pinch of cayenne pepper to the batter for a surprising kick that pairs well with mint.
- White chocolate swirl: Swap cream cheese frosting for white chocolate ganache mixed with a touch of peppermint extract.
Personally, I enjoy adding crushed pistachios on top sometimes for a salty crunch that cuts through the sweetness. Also, if you want mini bite-sized treats, bake the batter in a mini muffin tin for about 18 minutes.
Serving & Storage Suggestions
These brownie bites are best served at room temperature or slightly chilled. I like to plate them with a few fresh mint leaves or a dusting of powdered sugar for a simple yet elegant presentation.
They pair wonderfully with a cup of hot Irish coffee or a glass of cold milk, especially if you want to balance the minty richness with a creamy drink.
For storage, keep the brownie bites in an airtight container. They stay fresh at room temperature for up to 3 days, but I usually pop them in the fridge for up to a week. Just bring them back to room temp before serving for the best texture.
They also freeze beautifully. Wrap bites individually in plastic wrap and place in a freezer-safe container for up to 2 months. Thaw overnight in the fridge and warm slightly before enjoying.
Fun fact: The mint flavor actually deepens a bit after a day or two, so if you can wait, let them rest—that’s when they taste truly magical.
Nutritional Information & Benefits
Each Decadent St. Patrick’s Lucky Mint Brownie Bite contains approximately 120 calories, 7g fat, 15g carbohydrates, and 1.5g protein. These values can vary slightly based on ingredient brands and portion sizes.
The use of real cocoa powder delivers antioxidants and minerals like magnesium. Peppermint extract not only adds flavor but can aid digestion and provide a refreshing sensory boost.
While these are treats (let’s be honest, brownies are indulgent), choosing quality ingredients like unsalted butter and pure peppermint extract gives you a dessert that feels a bit more wholesome.
If you opt for the gluten-free or vegan versions, you can tailor the recipe to fit various dietary preferences without losing that signature fudgy texture.
Just a heads-up for anyone with dairy or egg allergies: this traditional recipe contains both, but the variations can help accommodate those needs.
Conclusion
These Decadent St. Patrick’s Lucky Mint Brownie Bites are the kind of recipe you’ll come back to year after year—not just for St. Patrick’s Day, but whenever you want a little chocolate-mint magic in your life. They’re quick, simple, and full of personality, with just the right balance of fudgy richness and refreshing mint.
Don’t hesitate to customize these bites to your own taste buds—whether that’s dialing up the mint, adding crunchy bits, or making them allergy-friendly. I love how this recipe brings a little joy and celebration to my kitchen, and I hope it does the same for you.
If you give this recipe a try, please leave a comment or share how you made it your own—I’d love to hear your twists and tips! Happy baking and may your kitchen be filled with sweet, lucky moments.
FAQs
Can I make these brownie bites ahead of time?
Yes! They taste great made a day or two in advance and stored in an airtight container. The mint flavor often improves after resting.
What if I don’t have peppermint extract?
You can substitute with spearmint extract or even a few drops of mint-flavored liqueur. Just adjust the quantity to avoid overpowering the brownies.
How do I know when the brownies are done?
Insert a toothpick in the center; it should come out with a few moist crumbs but no wet batter. Avoid overbaking to keep them fudgy.
Can I double this recipe?
Absolutely! Just use a larger baking pan or two pans and adjust the baking time slightly, checking for doneness earlier.
What’s the best way to crush mint candies for the topping?
Place candies in a ziplock bag and gently tap with a rolling pin or the bottom of a heavy pan until you get small, uneven pieces for texture.
Pin This Recipe!

Decadent St. Patrick’s Lucky Mint Brownie Bites

These brownie bites combine rich chocolate with refreshing mint for a festive and indulgent treat perfect for St. Patrick’s Day or any celebration.
- Prep Time: 15 minutes
- Cook Time: 25-30 minutes
- Total Time: 40-45 minutes
- Yield: 16 servings 1x
- Category: Dessert
- Cuisine: American
Ingredients
- ½ cup (50g) unsweetened cocoa powder (natural or Dutch-processed)
- ¾ cup (95g) all-purpose flour
- 1 cup (200g) granulated sugar
- ½ cup (115g) unsalted butter, melted
- 2 large eggs, room temperature
- 1 tsp peppermint extract
- ¼ tsp salt
- ½ tsp baking powder
- 2 oz (60g) cream cheese, softened
- ½ cup (60g) powdered sugar
- A few drops green food coloring (optional)
- 2 tbsp crushed mint candies or Andes mints
- ½ tsp vanilla extract
Instructions
- Preheat your oven to 350°F (175°C). Line an 8×8-inch baking pan with parchment paper, leaving some overhang for easy removal.
- In a medium bowl, sift together cocoa powder, all-purpose flour, baking powder, and salt.
- In a large bowl, whisk together granulated sugar and melted unsalted butter until well blended. Add eggs one at a time, beating after each addition until smooth.
- Stir in peppermint extract and vanilla extract into the wet mixture.
- Gradually fold the dry ingredients into the wet mixture using a spatula until just combined. The batter should be thick and fudgy.
- In a small bowl, beat softened cream cheese with powdered sugar and green food coloring (if using) until smooth and creamy.
- Pour half of the brownie batter into the prepared pan and spread evenly. Dollop half the cream cheese frosting over the batter in random spots and gently swirl with a knife or skewer.
- Repeat with the remaining batter and frosting, swirling again to create a marbled effect.
- Sprinkle crushed mint candies evenly over the top.
- Bake for 25-30 minutes, checking at 25 minutes with a toothpick; it should come out with a few moist crumbs but no wet batter.
- Cool completely in the pan on a wire rack. Use parchment overhang to lift out and cut into 1.5-inch square bites.
Notes
Do not overmix the batter to keep brownies tender. Use room temperature eggs for better texture. Softened cream cheese is key for smooth frosting. Start checking brownies at 25 minutes to avoid overbaking. Crushing mint candies evenly adds nice texture. Swirl frosting gently to keep layers distinct.
Nutrition
- Serving Size: 1.5-inch square brow
- Calories: 120
- Sugar: 12
- Sodium: 80
- Fat: 7
- Saturated Fat: 4
- Carbohydrates: 15
- Fiber: 1
- Protein: 1.5
Keywords: brownie bites, mint brownies, St. Patrick’s Day dessert, chocolate mint dessert, fudgy brownies, homemade brownie bites