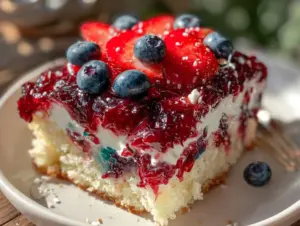
The moment I took my first bite of these Irresistible St. Patrick’s Green Velvet Fudge Bars, I knew I had stumbled upon something special. The rich, creamy fudge paired with that vibrant green velvet color just screams celebration — perfect for St. Patrick’s Day or any time you want a festive treat. Honestly, the smell of these bars baking fills the kitchen with a warm, sweet aroma that’s hard to resist. I first whipped up this recipe during a last-minute holiday get-together, and it quickly became a crowd favorite. Since then, I’ve made it countless times, tweaking the texture and sweetness until it hit just the right note.
These fudge bars aren’t your average dessert; they offer a fun twist on the classic velvet flavor by infusing a luscious green hue and silky fudge texture. What I love most is how versatile and approachable this recipe is — no fancy ingredients or complicated steps, just pure indulgence made easy. Whether you’re baking for a family gathering, a friend’s party, or just craving a sweet pick-me-up, these bars deliver a satisfying bite every time. Plus, their festive green shade adds a splash of joy to any dessert table, making them a delightful treat for kids and adults alike.
As someone who’s tested a lot of fudge and velvet dessert recipes, I can tell you this one stands out for its balance of richness and softness. So if you’re ready for a homemade treat that’s both eye-catching and downright delicious, you’re in the right place. Let’s get into making these irresistible green velvet fudge bars!
Why You’ll Love This Recipe
- Quick & Easy: You can have these bars ready in under an hour, perfect when you want a festive dessert without fuss.
- Simple Ingredients: No need to hunt down rare items — everything is likely in your pantry or easy to find at any store.
- Perfect for St. Patrick’s Day: The vibrant green color and smooth texture make these bars a showstopper for holiday celebrations.
- Crowd-Pleaser: Kids and adults alike rave about the creamy fudge flavor combined with that classic velvet crumb.
- Unbelievably Delicious: The blend of white chocolate, cream cheese, and a hint of vanilla creates a melt-in-your-mouth experience that’s hard to beat.
This recipe is not just another fudge bar — it’s a little celebration in every bite. What sets it apart is my secret touch of cream cheese folded into the batter, giving the bars a velvety softness that balances the rich fudge perfectly. Plus, I use a natural green food coloring that keeps the bars bright without any bitterness or weird aftertaste. After testing over a dozen batches, I can confidently say this recipe nails that perfect texture: moist but firm, creamy but not heavy.
It’s the kind of dessert that makes you close your eyes and smile after the first bite. Whether you’re looking to impress guests or just want a cozy treat with an Irish twist, these green velvet fudge bars won’t disappoint. Trust me — once you try them, they’ll become your go-to festive sweet for years to come.
What Ingredients You Will Need
This recipe uses simple, wholesome ingredients to deliver bold flavor and a satisfying texture without any fuss. Most are pantry staples, with a few fresh touches that make all the difference.
- For the Green Velvet Fudge Bars Batter:
- 1 cup (225g) unsalted butter, softened (adds richness and moisture)
- 2 cups (400g) granulated sugar
- 3 large eggs, room temperature (helps bind and create structure)
- 1 tablespoon vanilla extract (for warm, inviting flavor)
- 2 cups (250g) all-purpose flour (for that classic velvet crumb)
- ½ cup (45g) unsweetened cocoa powder (to deepen the velvet flavor)
- 1 teaspoon baking powder (for gentle lift)
- ½ teaspoon salt (balances sweetness)
- 4 ounces (115g) cream cheese, softened (the secret to velvety softness)
- ½ teaspoon green food coloring gel (choose natural if preferred for a clean taste)
- For the Fudge Topping:
- 8 ounces (225g) white chocolate chips or chopped white chocolate (for smooth, creamy fudge)
- ⅓ cup (80ml) heavy cream (adds luscious richness)
- 1 tablespoon unsalted butter (for shine and silkiness)
Pro tip: I recommend using a trusted brand like Ghirardelli for the chocolate — it melts beautifully and tastes divine. For the cream cheese, Philadelphia cream cheese always gives me the best texture. If you need a dairy-free option, swap cream cheese for a plant-based alternative and use coconut cream instead of heavy cream in the topping.
Equipment Needed
- 9×13-inch (23×33 cm) baking pan – lined with parchment paper for easy removal
- Mixing bowls – one large for batter, one small for fudge topping
- Electric mixer or stand mixer – to cream butter and sugar smoothly
- Measuring cups and spoons – for precise ingredient measurement
- Rubber spatula – great for folding cream cheese into the batter gently
- Whisk – helps to combine dry ingredients evenly
- Double boiler or microwave-safe bowl – for melting white chocolate without burning
- Cooling rack – essential to cool bars evenly after baking
If you don’t have an electric mixer, a sturdy whisk and some elbow grease will work fine, just takes a bit longer. For melting chocolate, I personally prefer a double boiler because it gives me better control and prevents scorching, but the microwave method works well if you heat in short bursts and stir often.
Detailed Preparation Method

- Preheat and prep: Set your oven to 350°F (175°C). Line the 9×13-inch baking pan with parchment paper, leaving some overhang on the sides for easy lifting later. This step saves you a lot of hassle when cutting bars.
- Cream butter and sugar: In a large bowl, beat 1 cup softened unsalted butter with 2 cups granulated sugar until light and fluffy — about 3-4 minutes using an electric mixer. The mixture should look pale and airy, which helps create the perfect crumb.
- Add eggs and vanilla: Crack in 3 large room-temperature eggs one at a time, beating well after each addition. Then stir in 1 tablespoon vanilla extract. The batter will look glossy and smooth now.
- Mix dry ingredients: In a separate bowl, whisk together 2 cups all-purpose flour, ½ cup unsweetened cocoa powder, 1 teaspoon baking powder, and ½ teaspoon salt. This ensures even distribution and avoids any bitter cocoa clumps.
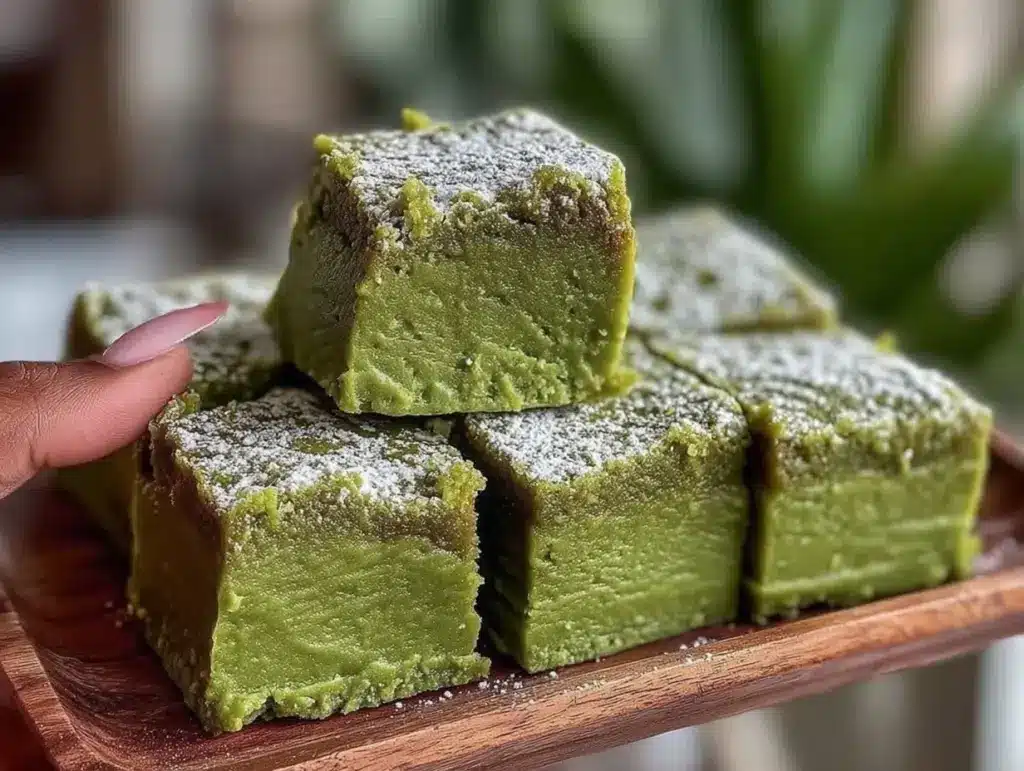
- Incorporate cream cheese and green color: Soften 4 ounces cream cheese and gently fold it into the wet butter-sugar mixture using a rubber spatula. Add ½ teaspoon green food coloring gel and mix until the batter turns an even, festive green shade.
- Combine wet and dry: Gradually add the dry ingredients to the wet, mixing on low speed or folding gently until just combined. Don’t overmix! The batter will be thick but smooth.
- Spread batter in pan: Transfer the batter to the prepared pan and smooth the top with a spatula. Aim for an even layer for consistent baking.
- Bake the bars: Place in the oven and bake for 30-35 minutes. You’ll know they’re done when a toothpick inserted in the center comes out with a few moist crumbs but no wet batter. The edges should look set and slightly pulled away from the pan.
- Prepare fudge topping: While the bars bake, combine 8 ounces white chocolate and ⅓ cup heavy cream in a heatproof bowl. Melt gently over a double boiler or microwave in 20-second bursts, stirring frequently until smooth. Stir in 1 tablespoon unsalted butter until glossy.
- Cool and spread fudge: Let baked bars cool in the pan for 10 minutes, then pour the warm fudge topping evenly over the surface. Use a spatula to smooth it out.
- Chill to set: Place the pan in the refrigerator for at least 2 hours to allow the fudge to firm up fully. This step is key for easy slicing and that perfect chewy texture.
- Slice and serve: Use the parchment overhang to lift bars from the pan. Cut into 12-16 squares with a sharp knife, wiping it clean between cuts for neat edges.
Tip: If your bars seem too soft after cooling, pop them in the fridge a bit longer. Cutting them too early can cause crumbling, so patience pays off here.
Cooking Tips & Techniques
One thing I’ve learned by trial and error is not to rush the cooling process. The fudge topping needs time to set properly, or else it slides right off your knife during slicing. Also, be sure to use room temperature eggs and softened butter — it makes mixing easier and ensures a smooth batter.
When incorporating the cream cheese, fold gently to keep the batter fluffy. Overmixing can deflate the air you’ve whipped in and lead to dense bars. Also, using gel food coloring instead of liquid prevents thinning your batter, keeping that perfect velvet texture intact.
When melting white chocolate, patience is your friend. Heat slowly and stir frequently to avoid burning or grainy texture. I usually melt it in 20-second intervals in the microwave, stirring in between until silky smooth.
To cut the bars cleanly, chill well and use a sharp chef’s knife warmed under hot water, then dried. This technique prevents cracking or messy edges.
Finally, don’t skip the parchment paper lining. It’s a small step that makes removing the bars a breeze and keeps your pan clean.
Variations & Adaptations
- Mint Chocolate Twist: Add ½ teaspoon peppermint extract to the batter and sprinkle crushed peppermint candies on top of the fudge before chilling for a refreshing flavor.
- Gluten-Free Version: Substitute the all-purpose flour with a 1:1 gluten-free baking blend. The texture stays delightfully soft and just as rich.
- Vegan Adaptation: Use vegan butter and cream cheese alternatives, swap eggs for flax eggs (1 tablespoon ground flaxseed + 3 tablespoons water per egg), and replace heavy cream with full-fat coconut milk for the fudge topping.
- Seasonal Berry Addition: Gently fold in ½ cup fresh or frozen raspberries into the batter for a tangy surprise that pairs wonderfully with the fudge layer.
I personally tried the mint chocolate twist last year for a holiday party, and it was an absolute hit — the cool mint cuts through the sweetness beautifully. Experimenting with different toppings or extracts keeps this recipe fresh and exciting.
Serving & Storage Suggestions
Serve these bars chilled or at room temperature — both work well. I like to plate them with a dusting of powdered sugar or a drizzle of extra melted white chocolate for added flair. They pair nicely with a cup of strong coffee or a creamy Irish cream liqueur for an adult twist.
To store, keep the bars in an airtight container in the refrigerator for up to 5 days. You can also freeze them for up to 3 months; just thaw in the fridge overnight before serving. Reheat slightly in the microwave (about 10 seconds) to soften if desired.
Flavors actually deepen after a day or two, so these bars taste even better the next day. Just make sure to keep them covered to prevent drying out.
Nutritional Information & Benefits
Each serving (assuming 12 bars) contains approximately 350 calories, 20g fat, 40g carbohydrates, and 4g protein. While these bars are a treat, the cream cheese adds a bit of protein and calcium, and the white chocolate provides antioxidants from cocoa butter.
This recipe is naturally gluten-containing but can be adapted easily for gluten-free diets. It contains dairy and eggs, so not suitable for those with allergies unless substitutions are made. It’s a festive indulgence best enjoyed in moderation but definitely worth the occasional celebration.
From my perspective, these bars strike a nice balance between indulgent and homemade goodness — perfect for when you want to treat yourself without the fuss of complicated baking.
Conclusion
If you’re after a homemade dessert that’s both festive and downright delicious, these Irresistible St. Patrick’s Green Velvet Fudge Bars have you covered. The creamy fudge topping paired with a soft, green velvet base creates a dessert that’s as fun to make as it is to eat. I love how easy this recipe is to customize and how it instantly brightens up holiday gatherings.
Give it a try, tweak it to your liking, and share your own spin — I’d love to hear how you make it yours! Don’t forget to leave a comment below or tag me if you post your creations. Here’s to many happy bites of this festive treat!
FAQs
Can I use regular green food coloring instead of gel?
You can, but gel food coloring is better because it won’t thin out your batter or affect the texture. Regular liquid coloring may make the batter too runny.
How do I store these fudge bars to keep them fresh?
Store bars in an airtight container in the fridge for up to 5 days. For longer storage, freeze them and thaw in the fridge before serving.
Can I make these bars ahead of time?
Absolutely! They actually taste better after chilling overnight, as the fudge topping firms up and flavors meld.
Is there a way to make these bars less sweet?
You can reduce the sugar slightly or use semi-sweet white chocolate instead of sweetened white chocolate to tone down sweetness.
What’s the best way to cut these fudge bars cleanly?
Chill the bars fully, then use a sharp knife warmed under hot water and dried before slicing. Wipe the knife clean between cuts for neat edges.
Pin This Recipe!

Irresistible St. Patrick’s Green Velvet Fudge Bars

These rich, creamy fudge bars feature a vibrant green velvet base perfect for St. Patrick’s Day or any festive occasion. The combination of white chocolate fudge topping and a velvety cream cheese-infused batter creates a melt-in-your-mouth treat.
- Prep Time: 15 minutes
- Cook Time: 35 minutes
- Total Time: 2 hours 50 minutes
- Yield: 12-16 bars 1x
- Category: Dessert
- Cuisine: American
Ingredients
- 1 cup (225g) unsalted butter, softened
- 2 cups (400g) granulated sugar
- 3 large eggs, room temperature
- 1 tablespoon vanilla extract
- 2 cups (250g) all-purpose flour
- ½ cup (45g) unsweetened cocoa powder
- 1 teaspoon baking powder
- ½ teaspoon salt
- 4 ounces (115g) cream cheese, softened
- ½ teaspoon green food coloring gel
- 8 ounces (225g) white chocolate chips or chopped white chocolate
- ⅓ cup (80ml) heavy cream
- 1 tablespoon unsalted butter
Instructions
- Preheat oven to 350°F (175°C). Line a 9×13-inch baking pan with parchment paper, leaving overhang for easy removal.
- In a large bowl, beat 1 cup softened unsalted butter with 2 cups granulated sugar until light and fluffy, about 3-4 minutes.
- Add 3 large room-temperature eggs one at a time, beating well after each addition. Stir in 1 tablespoon vanilla extract.
- In a separate bowl, whisk together 2 cups all-purpose flour, ½ cup unsweetened cocoa powder, 1 teaspoon baking powder, and ½ teaspoon salt.
- Soften 4 ounces cream cheese and gently fold into the wet butter-sugar mixture using a rubber spatula. Add ½ teaspoon green food coloring gel and mix until batter is evenly green.
- Gradually add dry ingredients to wet mixture, mixing on low speed or folding gently until just combined. Do not overmix.
- Spread batter evenly in prepared pan and smooth the top.
- Bake for 30-35 minutes until a toothpick inserted in the center comes out with a few moist crumbs but no wet batter. Edges should look set and slightly pulled away from pan.
- While bars bake, combine 8 ounces white chocolate and ⅓ cup heavy cream in a heatproof bowl. Melt gently over double boiler or microwave in 20-second bursts, stirring frequently until smooth. Stir in 1 tablespoon unsalted butter until glossy.
- Let baked bars cool in pan for 10 minutes, then pour warm fudge topping evenly over surface and smooth with spatula.
- Place pan in refrigerator for at least 2 hours to allow fudge to set fully.
- Use parchment overhang to lift bars from pan. Cut into 12-16 squares with a sharp knife, wiping clean between cuts for neat edges.
Notes
Use gel food coloring to avoid thinning the batter. Chill bars fully before cutting to prevent crumbling. Melt white chocolate slowly to avoid burning. Use parchment paper for easy removal. For dairy-free or vegan options, substitute cream cheese and butter with plant-based alternatives and use coconut cream instead of heavy cream.
Nutrition
- Serving Size: 1 bar (assuming 12 b
- Calories: 350
- Fat: 20
- Carbohydrates: 40
- Protein: 4
Keywords: St. Patrick’s Day, fudge bars, green velvet, cream cheese, white chocolate, festive dessert, easy fudge recipe