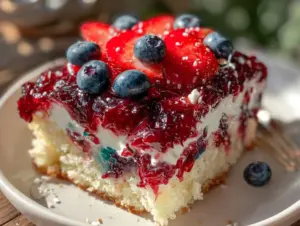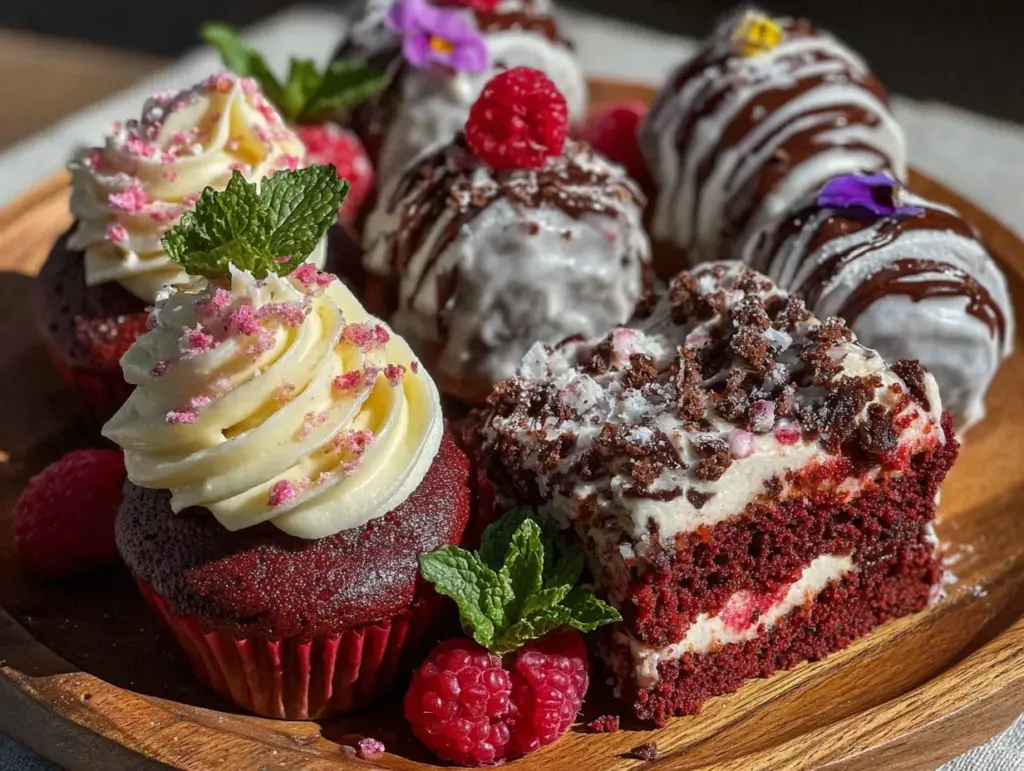
The moment you catch a whiff of rich cocoa mingling with sweet cream cheese and vibrant red velvet hues, you know something special is happening. I first put together this Irresistible Galentine’s Red Velvet Dessert Board during a casual girls’ night, and honestly, it stole the show—everyone kept reaching back for more. It’s not just a dessert; it’s a celebration on a board, packed with colors, textures, and flavors that scream love and friendship.
Over time, I’ve tweaked and tested this dessert board recipe enough to feel confident sharing it with you as my go-to Galentine’s Day treat. Whether you’re hosting a cozy gathering or looking for an eye-catching centerpiece that tastes as good as it looks, this red velvet dessert board checks all the boxes. The balance between the classic red velvet components and the playful, shareable setup makes it perfect for all kinds of sweet lovers.
What’s great about this recipe is how versatile it is—you can easily customize it for your guests or swap ingredients based on what you have on hand. Plus, it’s a fantastic way to impress without fuss, making you look like a dessert pro (even if you’re whipping it up last minute!). So, let’s get talking about why you’ll absolutely fall for this red velvet dessert board and how to bring it to life with ease.
Why You’ll Love This Recipe
After assembling this board more times than I can count, I’ve learned what makes it truly shine. Here’s why this Galentine’s Red Velvet Dessert Board will be your new favorite dessert idea:
- Quick & Easy: You’ll have the whole board ready in under an hour, which is perfect when time’s tight but you want a wow factor.
- Simple Ingredients: No need for exotic items—just classic red velvet cake, cream cheese frosting, fresh berries, and a few sweet extras you likely already have.
- Perfect for Parties: This board is the ultimate crowd-pleaser at Galentine’s gatherings, bridal showers, or any festive occasion that calls for a little indulgence.
- Crowd-Pleaser: Kids, adults, picky eaters—everyone loves the familiar flavors with a fancy twist. It’s a guaranteed hit.
- Visually Stunning: The vibrant reds and creamy whites make the board look like a work of art, so you’ll score big on presentation without breaking a sweat.
- Creative Twist: I blend classic red velvet cake bites with mini cream cheese frosting dollops and fresh strawberries to keep textures exciting and the flavors balanced.
Honestly, this isn’t just any dessert board; it’s the kind that makes you close your eyes and savor every bite. It’s comfort food with a playful, girly touch that’s as fun to make as it is to eat. Trust me, once you try it, you’ll want to bring this board out for every celebration.
What Ingredients You Will Need
This red velvet dessert board relies on straightforward ingredients that play well together, creating a festive and indulgent spread. Most are pantry staples or easy to find at your local store.
- Red Velvet Cake: Store-bought or homemade, cut into bite-sized cubes (about 8 oz / 225 g). I prefer a moist, tender crumb for best results.
- Cream Cheese Frosting: Approximately 1 cup (240 ml). You can whip up a quick batch with cream cheese, butter, powdered sugar, and a splash of vanilla extract.
- Fresh Strawberries: About 1 pint (450 g), hulled and halved—adds freshness and a natural sweetness contrast.
- White Chocolate Chips or Chunks: ½ cup (90 g) for a creamy, sweet bite.
- Mini Marshmallows: ½ cup (50 g), perfect for a playful texture and extra sweetness.
- Red Velvet Cake Crumbs: Optional, sprinkle for decoration and added color pop.
- Fresh Mint Leaves: A few sprigs for garnish and a hint of freshness.
- Optional Extras: Dark chocolate drizzle, crushed pecans, or edible flowers for added flair.
Tip: If you want to keep things dairy-free, swap the cream cheese frosting with a coconut cream-based frosting. For gluten-free options, a gluten-free red velvet cake mix works wonders without compromising flavor.
When selecting strawberries, look for firm, bright red ones—they’ll stay fresh longer and look more inviting on the board. I usually grab organic when I can, but any fresh, ripe berries do the trick.
Equipment Needed
- Large Serving Board or Platter: A wooden or marble board around 16×12 inches (40×30 cm) works beautifully. If you don’t have one, a large plate or tray will do.
- Mixing Bowls: For prepping frosting and organizing ingredients.
- Spatula or Butter Knife: To spread cream cheese frosting into small dollops.
- Sharp Knife: For cutting cake into neat cubes.
- Measuring Cups and Spoons: For ingredient accuracy and consistency.
- Piping Bag (Optional): If you want to pipe frosting dollops instead of spooning them—it adds a polished look.
Honestly, you don’t need fancy tools to make this board look incredible. I’ve made it plenty of times with just a simple plate and a butter knife, and it still wowed my guests. If you plan to host often, investing in a sturdy wooden board is worth it—it cleans easily and looks timeless.
Detailed Preparation Method

- Prepare the Red Velvet Cake: If baking from scratch, use your favorite red velvet cake recipe and let it cool completely before cutting. If using store-bought, unwrap and cut into 1-inch (2.5 cm) cubes. Aim for about 2 cups (300 g) of cubes. (Time: 10 minutes)
- Make the Cream Cheese Frosting: In a medium bowl, beat 4 oz (115 g) softened cream cheese with 2 tablespoons (28 g) unsalted butter until smooth. Gradually add 1 cup (120 g) powdered sugar and ½ teaspoon vanilla extract. Whip until fluffy. (Time: 5 minutes)
- Prep the Strawberries: Rinse and hull 1 pint (450 g) of fresh strawberries. Slice them in half lengthwise for easy picking. (Time: 5 minutes)
- Arrange the Board Base: Start with the red velvet cake cubes, placing them in a loose cluster off-center on the board. Leave space around for other elements. (Time: 5 minutes)
- Add Cream Cheese Frosting Dollops: Use a spoon or piping bag to create small dollops of frosting around the cake cubes. Keep them about 1 inch (2.5 cm) in size for easy serving. (Time: 5 minutes)
- Place Strawberries: Arrange the halved strawberries around the cake and frosting, alternating colors and shapes for visual appeal. (Time: 5 minutes)
- Scatter Mini Marshmallows and White Chocolate Chips: Fill in empty spaces with mini marshmallows and white chocolate chips, adding texture and sweet surprises. (Time: 3 minutes)
- Garnish: Sprinkle red velvet cake crumbs over the board for a pop of color. Add fresh mint leaves for aroma and contrast. If desired, drizzle melted dark chocolate in thin ribbons across the board for a touch of elegance. (Time: 5 minutes)
- Final Touches: Step back and fill in any gaps with extra berries or marshmallows. Make sure everything looks balanced but not too uniform—natural charm wins every time. (Time: 5 minutes)
Troubleshooting tip: If your cream cheese frosting feels too thick, add a teaspoon of milk to loosen it slightly. If too runny, add a bit more powdered sugar. The goal is a creamy but stable texture that holds shape on the board.
Cooking Tips & Techniques
Putting together a dessert board might sound straightforward, but there are a few tricks that make all the difference:
- Use Room Temperature Ingredients: For the cream cheese frosting, softening the cream cheese and butter beforehand results in a smoother, fluffier spread.
- Cut Cake Neatly: Chill your cake slightly before cutting to get clean edges and avoid crumbling.
- Balance Flavors and Textures: The sweetness of cake and frosting pairs perfectly with the tartness of fresh strawberries and the chewiness of marshmallows, so don’t skimp on variety.
- Layer Thoughtfully: Start with bigger chunks (cake, berries) and fill gaps with smaller items (chips, marshmallows) to avoid overcrowding.
- Keep It Fresh: Assemble the board close to serving time, especially if strawberries are involved, to prevent sogginess.
- Practice Piping: If you decide to pipe frosting, practice on parchment paper first to get even dollops—this little step saves embarrassment later!
I learned the hard way that rushing assembly leads to messy boards, so take your time and enjoy the process. Also, don’t be afraid to make it your own—adding a few unexpected touches can take this board from good to unforgettable.
Variations & Adaptations
This red velvet dessert board is super flexible, and I love trying new spins depending on seasons or dietary needs:
- Vegan Version: Use dairy-free cream cheese and frosting, swap the cake for a vegan red velvet loaf or cupcakes.
- Nutty Addition: Sprinkle chopped toasted pecans or walnuts for crunch and a nutty flavor contrast.
- Berry Swap: Substitute strawberries with raspberries or cherries for a different fruity punch.
- Chocolate Lover’s Twist: Add dark chocolate truffles or brownie bites alongside the cake cubes for an extra chocolate hit.
- Mini Dessert Boards: Create individual boards or plates for a more personal touch—perfect for intimate gatherings.
One fun variation I tried was adding a drizzle of salted caramel sauce over the cream cheese dollops. It brought a salty-sweet complexity that stunned my friends! Feel free to experiment with flavors and textures—you can’t really go wrong here.
Serving & Storage Suggestions
Serve this dessert board at room temperature for the best flavor and texture. The cream cheese frosting tastes richer when not cold, and the cake is at its softest.
Pair it with a lightly sweetened sparkling rosé, hot cocoa, or a fruity iced tea to complement the board’s flavors beautifully. For a cozy night in, a cup of coffee or chai tea also works wonders.
If you have leftovers (and sometimes there are!), cover the board tightly with plastic wrap and refrigerate for up to 2 days. The cake and frosting may firm up, so bring the board back to room temperature about 30 minutes before serving again.
For longer storage, remove fresh berries and store them separately. The cake cubes and frosting can be frozen in airtight containers for up to 1 month. Thaw overnight in the fridge and assemble your board fresh.
Remember, the flavors tend to meld and deepen when the board sits for a bit, so if you’re prepping ahead, a little patience pays off in taste!
Nutritional Information & Benefits
While this dessert board is a treat, it does offer some nutritional perks thanks to the fresh strawberries and mint:
| Nutrient | Approximate Amount Per Serving (1/6 Board) |
|---|---|
| Calories | 320 kcal |
| Fat | 15 g |
| Sugar | 30 g |
| Protein | 3 g |
| Fiber | 2 g |
Strawberries bring antioxidants and vitamin C, supporting immune health, while the cream cheese offers a bit of calcium and protein. If you swap in dairy-free or gluten-free options, this board can fit a variety of dietary needs—just keep an eye on ingredient labels for allergens like nuts or soy.
I like to think of this dessert board as a “sometimes” indulgence balanced with fresh fruit and love, keeping celebrations joyful and guilt-free.
Conclusion
If you’re looking for a dessert that’s fun to assemble, stunning to look at, and absolutely delicious, this Irresistible Galentine’s Red Velvet Dessert Board is your answer. It strikes the perfect balance between classic flavors and playful presentation, making it ideal for sharing with your favorite people.
Make it your own by customizing ingredients or adding personal touches—you’ll be surprised how easy it is to impress without stress. I love this recipe because it turns a simple cake into a centerpiece full of joy, conversation, and sweet memories.
Give this recipe a try at your next get-together, and please drop a comment below with your tweaks or stories. Sharing is caring, especially when it comes to dessert boards! Now, gather your friends, grab your favorite treats, and celebrate friendship in the sweetest way possible.
FAQs About the Galentine’s Red Velvet Dessert Board
Can I make the red velvet cake from scratch for this dessert board?
Absolutely! Homemade red velvet cake works beautifully and lets you control sweetness and texture. Just make sure the cake is fully cooled before cutting to keep cubes intact.
How far in advance can I assemble the dessert board?
It’s best to assemble the board within a few hours of serving to keep berries fresh and frosting creamy. You can prep cake cubes and frosting a day ahead and assemble just before guests arrive.
Can I use other berries instead of strawberries?
Yes! Raspberries, blueberries, or cherries make great substitutes and add different flavors and colors to the board.
What’s the best way to store leftovers?
Cover leftovers tightly and refrigerate up to 2 days. Bring to room temperature before serving again for the best taste. For longer storage, freeze cake and frosting separately and add fresh berries when ready to serve.
Is this dessert board suitable for dietary restrictions?
With a few swaps, yes! Use gluten-free cake mixes, dairy-free cream cheese frosting, and vegan marshmallows to accommodate gluten intolerance or vegan diets.
Pin This Recipe!
Irresistible Galentine’s Red Velvet Dessert Board

A visually stunning and crowd-pleasing dessert board featuring classic red velvet cake bites, cream cheese frosting dollops, fresh strawberries, and sweet extras, perfect for parties and celebrations.
- Prep Time: 15 minutes
- Cook Time: 10 minutes
- Total Time: 50 minutes
- Yield: 6 servings 1x
- Category: Dessert
- Cuisine: American
Ingredients
- 8 oz (225 g) Red Velvet Cake, cut into bite-sized cubes
- 1 cup (240 ml) Cream Cheese Frosting (cream cheese, butter, powdered sugar, vanilla extract)
- 1 pint (450 g) Fresh Strawberries, hulled and halved
- ½ cup (90 g) White Chocolate Chips or Chunks
- ½ cup (50 g) Mini Marshmallows
- Red Velvet Cake Crumbs (optional, for decoration)
- Fresh Mint Leaves (a few sprigs for garnish)
- Optional Extras: Dark chocolate drizzle, crushed pecans, or edible flowers
Instructions
- Prepare the Red Velvet Cake: If baking from scratch, bake and cool completely. If store-bought, unwrap and cut into 1-inch cubes (about 2 cups or 300 g). (10 minutes)
- Make the Cream Cheese Frosting: Beat 4 oz (115 g) softened cream cheese with 2 tablespoons (28 g) unsalted butter until smooth. Gradually add 1 cup (120 g) powdered sugar and ½ teaspoon vanilla extract. Whip until fluffy. (5 minutes)
- Prep the Strawberries: Rinse, hull, and slice 1 pint (450 g) fresh strawberries in half lengthwise. (5 minutes)
- Arrange the Board Base: Place red velvet cake cubes in a loose cluster off-center on the serving board. (5 minutes)
- Add Cream Cheese Frosting Dollops: Use a spoon or piping bag to create small dollops about 1 inch in size around the cake cubes. (5 minutes)
- Place Strawberries: Arrange halved strawberries around the cake and frosting, alternating colors and shapes for visual appeal. (5 minutes)
- Scatter Mini Marshmallows and White Chocolate Chips: Fill empty spaces with mini marshmallows and white chocolate chips for texture and sweetness. (3 minutes)
- Garnish: Sprinkle red velvet cake crumbs over the board, add fresh mint leaves, and optionally drizzle melted dark chocolate in thin ribbons. (5 minutes)
- Final Touches: Fill any gaps with extra berries or marshmallows, ensuring a balanced but natural look. (5 minutes)
Notes
Use room temperature ingredients for smoother frosting. Chill cake slightly before cutting for clean edges. Assemble close to serving time to keep berries fresh. For dairy-free, swap cream cheese frosting with coconut cream-based frosting. For gluten-free, use gluten-free red velvet cake mix. Practice piping frosting dollops on parchment paper for even shapes.
Nutrition
- Serving Size: 1/6 of the dessert b
- Calories: 320
- Sugar: 30
- Fat: 15
- Fiber: 2
- Protein: 3
Keywords: red velvet dessert board, Galentine’s Day dessert, party dessert, cream cheese frosting, strawberry dessert, easy dessert board, festive dessert