
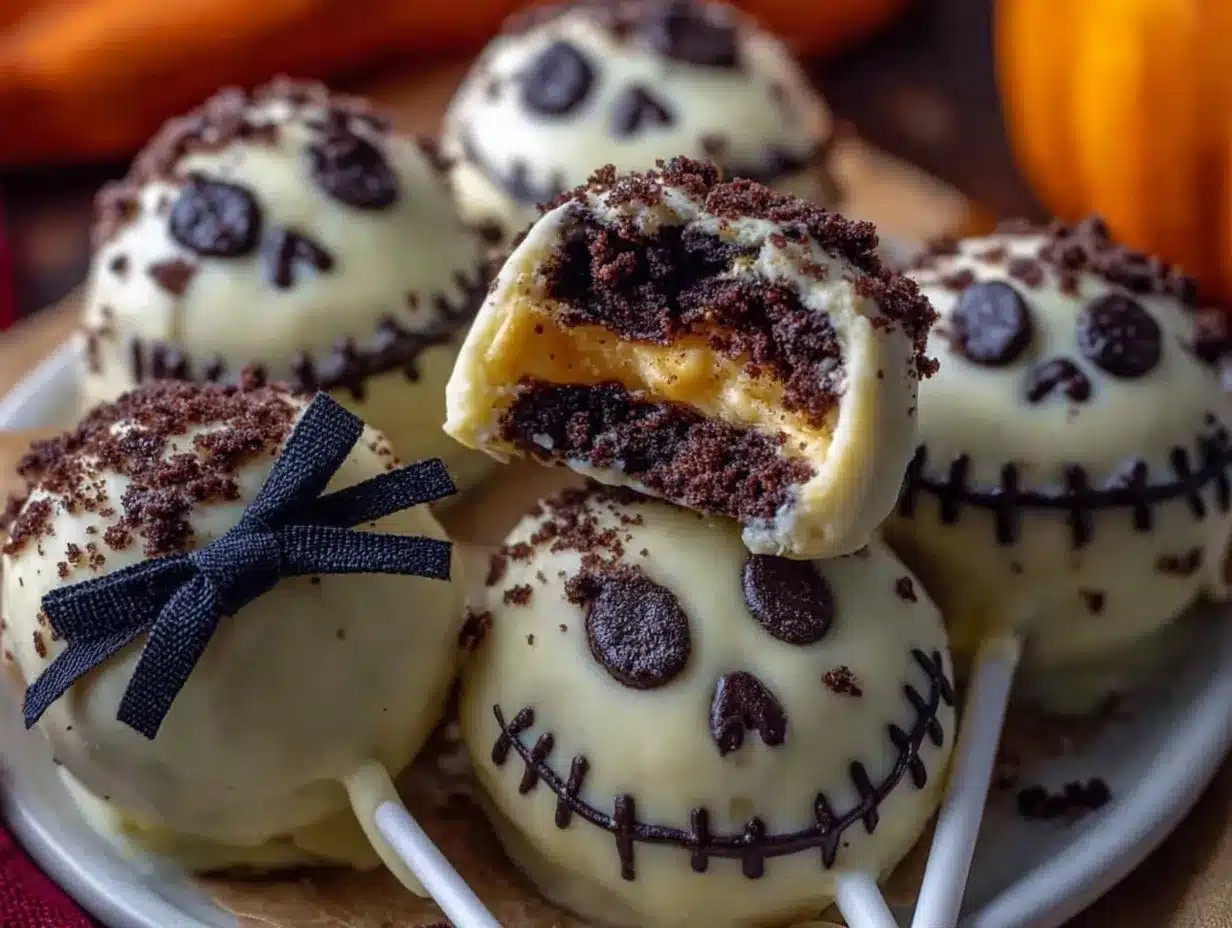
The chills are in the air, the leaves are crunching underfoot, and Halloween is just around the corner! If you’re looking for a treat that’s equal parts spooky and sweet, these Spooky Jack Skellington Oreo Pops are here to steal the show. Inspired by “The Nightmare Before Christmas,” these adorable pops are perfect for Halloween parties, movie nights, or even as an edible craft for kids. Plus, they’re super easy to make and require minimal baking skills. Trust me, once you try this recipe, it’ll become a Halloween tradition in your home.
I first came up with these Oreo pops when my niece was obsessed with Jack Skellington. We wanted to create something fun and festive that tied into the movie, but also something we could enjoy making together. Honestly, they turned out better than I expected, and now I look forward to making them every Halloween. The combination of creamy white chocolate, crunchy Oreos, and the playful design makes them a hit with kids and adults alike.
Whether you’re hosting a spooky bash or just want to surprise your family with a themed snack, these Oreo pops are the perfect treat. Let’s jump into the details and start creating some Halloween magic!
Why You’ll Love This Recipe
- Fun and Festive: These Oreo pops bring the spooky vibes of Jack Skellington to life, making them perfect for Halloween.
- Kid-Friendly: Not only are they great for kids to eat, but they’re also a fun activity to make together. Decorating Jack’s face is like an edible art project!
- No Baking Required: You don’t need to turn on your oven for this recipe, which is perfect for busy holiday prep.
- Simple Ingredients: Made with just a few basic items you can find at any grocery store, these treats are easy and budget-friendly.
- Customizable: You can use different colors, sprinkles, or even a variety of Oreos to make them uniquely yours.
- Showstopper Presentation: These pops are Instagram-worthy and are bound to be the star of any Halloween dessert table.
What sets these Oreo pops apart is how effortless they are to make yet how impressive they look. You don’t need fancy decorating skills to pull off Jack’s iconic face—all it takes is a little creativity and some simple tools. Plus, they’re so delicious that everyone will be asking for seconds!
What Ingredients You Will Need
This recipe uses simple ingredients that come together for a spooky yet sweet treat. Here’s what you’ll need:
- Oreos: Classic Oreos work best, but you can also use double-stuffed for extra decadence.
- White Chocolate Chips: Melt these down to create Jack’s signature pale face. You can also use white candy melts.
- Black Food Coloring Gel: You’ll need this to draw Jack’s iconic facial features. Avoid liquid food coloring as it can affect the consistency of the chocolate.
- Vegetable Oil: A small amount helps the chocolate melt smoothly and gives it a shiny finish.
- Lollipop Sticks: These turn your Oreos into pops! You can find them at most craft stores or online.
- Optional Sprinkles: Add a little Halloween flair by sprinkling black and orange sprinkles on the back of the pops.
Each ingredient plays a key role in creating these spooky treats. If you’re looking for substitutions, you can use dark chocolate for a twist or opt for gluten-free cookies to accommodate dietary needs. Don’t forget, the better the quality of your white chocolate, the smoother and tastier your pops will be!
Equipment Needed
- Microwave-Safe Bowl: For melting the white chocolate or candy melts.
- Fork or Skewer: To dip the Oreos into the melted chocolate without making a mess.
- Wax Paper or Parchment Paper: Essential for letting the pops dry without sticking.
- Piping Bag or Toothpick: For drawing Jack’s face with precision. A zip-top bag with a small corner cut works too!
- Decorating Stand (Optional): If you have one, it’s great for holding the pops upright while the chocolate sets.
- Baking Tray: To arrange the pops while they chill in the fridge.
If you don’t have lollipop sticks, you can use wooden skewers or even small popsicle sticks. And for the chocolate, a double boiler works beautifully if you prefer not to use a microwave.
Preparation Method
- Prepare the Oreos: Carefully twist open each Oreo cookie. Add a small dab of melted white chocolate in the center of one side to help the lollipop stick adhere. Place the stick in the chocolate and gently press the other half of the Oreo back on top. Let the chocolate set for about 5 minutes.
- Melt the White Chocolate: In a microwave-safe bowl, heat the white chocolate chips in 30-second intervals, stirring in between until fully melted and smooth. Add 1 teaspoon of vegetable oil for a shiny finish and stir well.
- Dip the Pops: Hold each Oreo pop by the stick and carefully dip it into the melted white chocolate until fully coated. Tap gently against the edge of the bowl to remove excess chocolate.
- Set the Pops: Place the dipped Oreo pops on a baking tray lined with wax paper. If you want to add sprinkles, now’s the time! Refrigerate for 15 minutes or until the chocolate has hardened.
- Draw Jack’s Face: Use black food coloring gel to draw Jack Skellington’s iconic grin, nostrils, and eye sockets on each pop. You can use a piping bag for precision or a toothpick for more control. Let the gel set for 10 minutes.
- Serve and Enjoy: Once the decorations are dry, your spooky Jack Skellington Oreo Pops are ready to serve. Arrange them on a platter, and watch the smiles light up the room!
Cooking Tips & Techniques
- Keep Your Chocolate Smooth: If the melted chocolate starts to harden, reheat it in the microwave in short bursts, stirring in between.
- Work Quickly: White chocolate can set fast, so have your Oreos and sticks prepped and ready before you start dipping.
- Prevent Breakage: Handle the Oreos gently when inserting the lollipop sticks to avoid cracking the cookies.
- Practice Makes Perfect: If you’re nervous about drawing Jack’s face, practice on a piece of wax paper first. It’s easier than you think!
- Use Good Quality Tools: A piping bag with a small tip can make drawing Jack’s features much easier and cleaner.
Variations & Adaptations
- Gluten-Free Version: Use gluten-free sandwich cookies and ensure your white chocolate is certified gluten-free.
- Colorful Twist: Use colored candy melts instead of white chocolate to give Jack a funky Halloween makeover.
- Flavor Swap: Try mint or peanut butter-filled Oreos for a unique flavor profile.
- No Lollipop Sticks? Skip them and make Jack Skellington Oreo “sandwiches” instead. Just dip the whole cookie in white chocolate and decorate both sides!
- Vegan Version: Use dairy-free chocolate and cookies for a plant-based treat.
I’ve also tried making these pops with dark chocolate as the base instead of white chocolate—it gives Jack a spooky shadowy vibe that looks super cool!
Serving & Storage Suggestions
Serve these Oreo pops chilled or at room temperature for a satisfying crunch. They look amazing displayed on a Halloween-themed dessert table or tucked into treat bags for party favors. Pair them with hot cocoa, apple cider, or a spooky punch to complete the Halloween vibe.
To store, place the Oreo pops in an airtight container with layers of parchment paper between them to prevent sticking. They’ll keep well in the refrigerator for up to 5 days. If you want to make them ahead of time, you can freeze the undecorated pops and add Jack’s face closer to serving day for the freshest look.
Nutritional Information & Benefits
These Spooky Jack Skellington Oreo Pops are a festive treat, so they’re best enjoyed in moderation. Each pop has approximately:
- Calories: 150
- Fat: 8g
- Sugar: 12g
- Protein: 2g
While not a health food, the Oreo pops do use white chocolate, which contains calcium and can be a mood booster—perfect for Halloween fun! If you opt for dark chocolate, you’ll get an extra dose of antioxidants.
Conclusion
These Spooky Jack Skellington Oreo Pops are more than just a treat—they’re a fun, creative way to celebrate Halloween with your loved ones. Whether you’re an expert in the kitchen or a beginner, this recipe is simple enough for anyone to create. Plus, it’s customizable, so you can make it your own.
For me, these pops are a reminder of how much fun it is to embrace the whimsical spirit of Halloween. I hope they bring some spooky joy to your celebration this year! If you try this recipe, let me know how it turns out in the comments below—or share your creations on social media and tag me. I can’t wait to see your Jack Skellington Oreo Pops!
FAQs
Can I use other types of cookies instead of Oreos?
Absolutely! Any sandwich-style cookie will work. Just make sure it has a creamy center to hold the lollipop stick securely.
What if I don’t have black food coloring gel?
You can use melted dark chocolate or black edible markers to draw Jack’s face. It might take a little longer to set, but the results will be just as cute!
Can I make these pops ahead of time?
Yes! You can prepare the pops a few days in advance and store them in the refrigerator. Just make sure to keep them in an airtight container to preserve freshness.
How do I prevent the Oreo cookies from breaking?
Insert the lollipop sticks gently and add a small dollop of melted chocolate to hold the halves together before dipping.
What’s the best way to melt the white chocolate?
The microwave is quick and easy—just heat the chocolate in short intervals and stir frequently. Alternatively, you can use a double boiler for even melting.
Pin This Recipe!
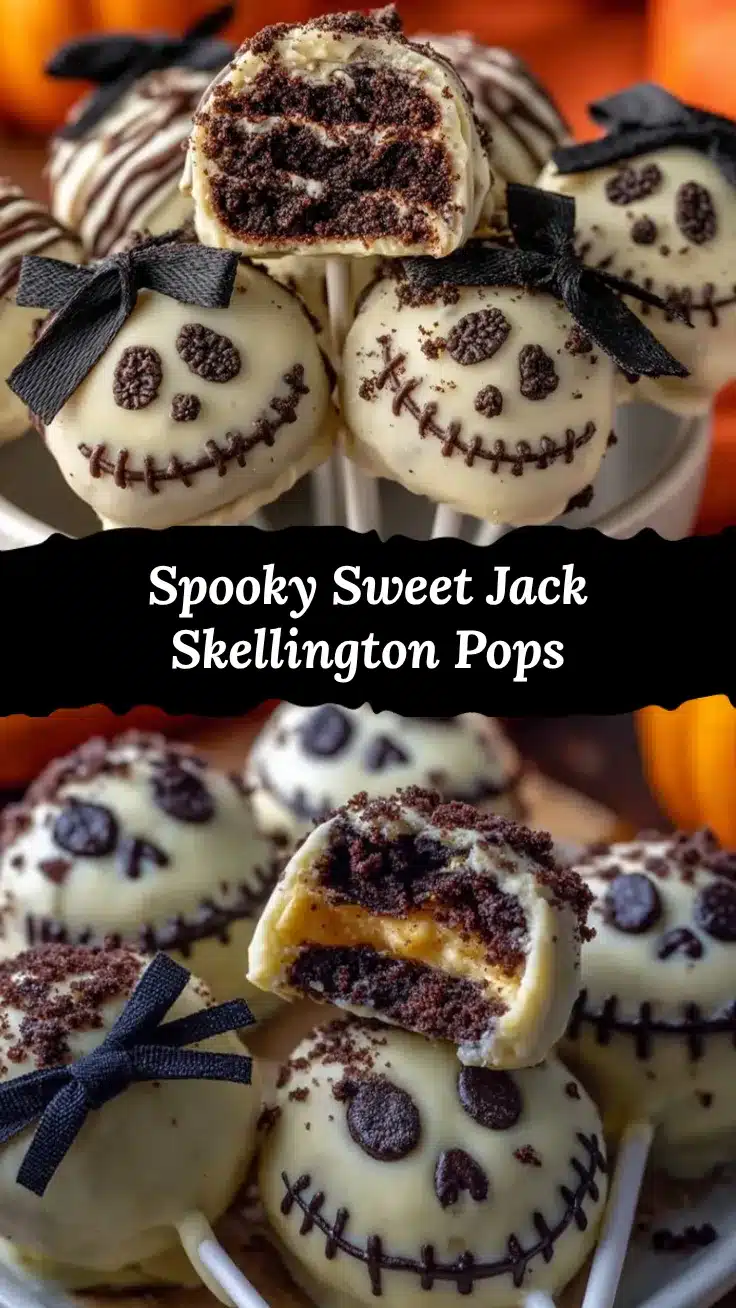
Spooky Jack Skellington Oreo Pops Recipe for Halloween Fun

These spooky and sweet Jack Skellington Oreo Pops are inspired by ‘The Nightmare Before Christmas’ and are perfect for Halloween parties, movie nights, or edible crafts for kids.
- Prep Time: 15 minutes
- Cook Time: 15 minutes
- Total Time: 30 minutes
- Yield: 12 pops
- Category: Dessert
- Cuisine: American
Ingredients
- Oreos (classic or double-stuffed)
- White chocolate chips or white candy melts
- Black food coloring gel
- Vegetable oil
- Lollipop sticks
- Optional: Black and orange sprinkles
Instructions
- Carefully twist open each Oreo cookie. Add a small dab of melted white chocolate in the center of one side to help the lollipop stick adhere. Place the stick in the chocolate and gently press the other half of the Oreo back on top. Let the chocolate set for about 5 minutes.
- In a microwave-safe bowl, heat the white chocolate chips in 30-second intervals, stirring in between until fully melted and smooth. Add 1 teaspoon of vegetable oil for a shiny finish and stir well.
- Hold each Oreo pop by the stick and carefully dip it into the melted white chocolate until fully coated. Tap gently against the edge of the bowl to remove excess chocolate.
- Place the dipped Oreo pops on a baking tray lined with wax paper. If you want to add sprinkles, now’s the time! Refrigerate for 15 minutes or until the chocolate has hardened.
- Use black food coloring gel to draw Jack Skellington’s iconic grin, nostrils, and eye sockets on each pop. You can use a piping bag for precision or a toothpick for more control. Let the gel set for 10 minutes.
- Once the decorations are dry, your spooky Jack Skellington Oreo Pops are ready to serve. Arrange them on a platter, and enjoy!
Notes
[‘Reheat the chocolate in short bursts if it starts to harden.’, ‘Handle the Oreos gently to prevent breakage.’, ‘Practice drawing Jack’s face on wax paper before decorating the pops.’, ‘Use good quality white chocolate for smoother results.’]
Nutrition
- Serving Size: 1 pop
- Calories: 150
- Sugar: 12
- Fat: 8
- Protein: 2
Keywords: Halloween, Jack Skellington, Oreo Pops, No Bake, Spooky Treats, Edible Crafts


