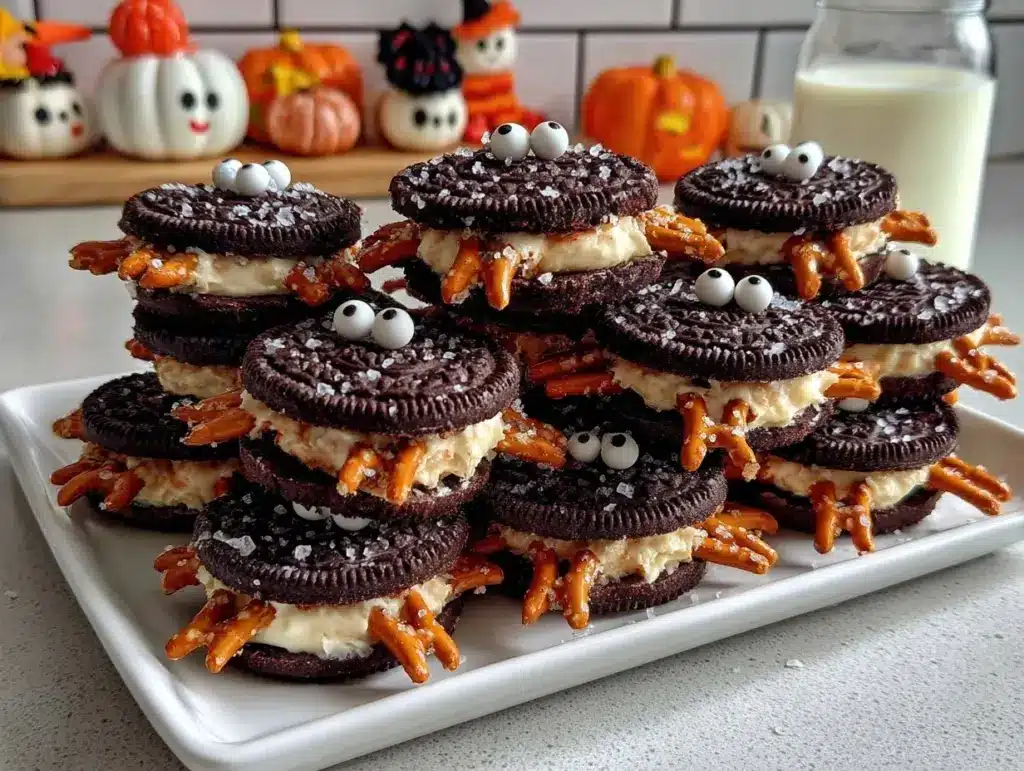
The crunch of chocolate cookies, the creamy sweetness of frosting, and the spooky charm of edible candy eyes—these Oreo spiders are the ultimate Halloween treat that’s both adorable and delicious! I remember the first time I made these for a Halloween party; the kids couldn’t get enough of them, and even the adults were sneaking them off the dessert table. If you’re looking for a creative, no-bake recipe that’s as fun to make as it is to eat, this Oreo spiders recipe is exactly what you need.
Perfect for those last-minute party preparations or a festive baking session with the family, these creepy-crawly treats are simple, budget-friendly, and a guaranteed crowd-pleaser. Plus, they’re easy to customize with different candies and colors to match your Halloween theme. Whether you’re hosting a party, attending a potluck, or just want to surprise your kids with some spooky fun, you’ll absolutely love making (and eating) these Oreo spiders!
Why You’ll Love This Recipe
There are so many reasons to fall head over heels for these Oreo spiders. Here’s why they’re the perfect addition to your spooky season:
- Quick & Easy: No baking required! You can whip these up in under 30 minutes, leaving you more time for party prep or enjoying Halloween festivities.
- Fun for All Ages: Trust me, kids and adults alike will love these cute and creepy treats. They’re perfect for family bonding or classroom parties.
- Simple Ingredients: No need for fancy supplies—just grab a pack of Oreos, pretzels, and candy decorations, and you’re ready to go.
- Customizable: Get creative with colors, candy types, and even flavored Oreos to match your party theme.
- Perfect for Halloween: These spiders are spooky without being too scary, making them ideal for little ones or anyone who prefers their Halloween treats with a side of cute.
- Irresistibly Delicious: The combination of chocolate, creamy filling, and crunchy pretzels makes these spiders as tasty as they are fun.
Whether you’re a seasoned baker or just looking for a simple, festive activity to enjoy, this Oreo spiders recipe will bring a smile to everyone’s face.
What Ingredients You Will Need
This recipe uses only a handful of ingredients, making it super easy to shop for and prepare. Here’s what you’ll need:
- Oreos: The star of the show! Classic Oreos work perfectly, but you can also try double-stuffed or flavored varieties for a fun twist.
- Mini Pretzel Sticks: These will serve as the spider legs. Look for thin, crunchy pretzel sticks for the best results.
- Candy Eyes: The cutest (and spookiest) detail of these spiders! You can find these at most craft or baking stores, or online.
- Chocolate Frosting: Acts as the glue to hold everything together. You can use store-bought frosting or make your own from scratch.
- Optional Decorations: Colored sprinkles, mini chocolate chips, or candy pieces for extra flair.
If you’re feeling adventurous, you can experiment with different types of cookies, like chocolate-covered sandwich cookies or even homemade ones. And if you’re catering to specific dietary needs, there are gluten-free Oreos and dairy-free frosting options available!
Equipment Needed
You don’t need fancy tools to make these fun Halloween treats. Here’s what you’ll need:
- Butter knife or spatula: For spreading the frosting onto the cookies.
- Small bowls: To organize the pretzel sticks, candy eyes, and other decorations.
- Clean work surface: A cutting board or baking sheet lined with parchment paper works well.
- Toothpicks: Optional, for precise application of frosting to attach the candy eyes.
If you don’t have candy eyes, you can substitute them with white chocolate chips and a dot of melted dark chocolate for pupils. These spiders are all about creativity, so use what you have on hand!
How to Make Oreo Spiders

- Prepare the workspace: Start by clearing a clean surface and laying down parchment paper. This will make cleanup a breeze and prevent sticking.
- Separate the Oreos: Gently twist apart each Oreo cookie to separate the top and bottom halves. Try to keep the cream filling intact on one side.
- Attach the pretzel legs: Break the pretzel sticks in half to create eight legs for each spider. Press four pretzel halves into the cream filling on each side of the cookie to form the spider’s legs. Be gentle to avoid breaking the cookie.
- Reassemble the cookie: Carefully place the cookie top back over the cream and pretzel legs, pressing down gently to secure them.
Use a small dab of chocolate frosting to “glue” the candy eyes onto the top of the Oreo. You can use a toothpick for more precise application. - Decorate: If desired, add extra decorations like sprinkles or mini chocolate chips to give your spiders a personalized look.
- Let them set: Allow the frosting to set for about 10 minutes before serving. This helps keep everything in place.
And there you have it—spooky Oreo spiders ready to wow your guests and gobble up! They’re so fun and easy to make, you might find yourself whipping up several batches.
Cooking Tips & Techniques
Here are some tips and tricks to ensure your Oreo spiders come out perfectly creepy every time:
- Be gentle: When separating the Oreo cookies, twist them carefully to avoid breaking the cookie halves.
- Use fresh pretzels: Stale pretzels may break more easily, so opt for a fresh bag for sturdy spider legs.
- Keep it cool: If your frosting is too runny, pop it in the fridge for a few minutes to firm up before using it as glue.
- Make it ahead: You can prepare these spiders the night before your party. Just store them in an airtight container in the fridge to keep them fresh.
- Customize the look: Use different sizes of candy eyes or mix up the colors for unique spider personalities.
Want to save time? If you’re in a rush, use pre-filled Oreos and skip the frosting step altogether. The pretzel legs will still stick into the cream filling!
Variations & Adaptations
One of the best things about this Oreo spiders recipe is how versatile it is. Here are some fun ways to switch things up:
- Gluten-Free Version: Use gluten-free Oreo-style cookies and gluten-free pretzels for a safe option.
- Colorful Spiders: Add food coloring to your frosting or use colored candy eyes to match your Halloween party theme.
- Flavored Oreos: Swap classic Oreos for pumpkin spice, mint, or peanut butter-flavored varieties for a tasty twist.
- Healthier Option: Use dark chocolate-covered rice cakes instead of Oreos and almond butter as the glue for a lighter version.
- DIY Candy Eyes: Make your own by piping dots of white icing and adding chocolate chips or sprinkles for pupils.
Feel free to get creative and make this recipe your own—it’s practically impossible to go wrong!
Serving & Storage Suggestions
These Oreo spiders are best served fresh, but here’s how to make the most of them:
- Serving Temperature: Serve them at room temperature for the best taste and texture.
- Presentation Ideas: Arrange the spiders on a spooky Halloween-themed platter or scatter them across faux cobwebs for a creepy-cute vibe.
- Complementary Treats: Pair these spiders with candy apples, pumpkin cupcakes, or a steaming mug of apple cider.
- Storage: Store the Oreo spiders in an airtight container in the fridge for up to 3 days. Avoid stacking them to keep the decorations intact.
- Reheating Tips: If chilled, let the spiders sit at room temperature for about 15 minutes before serving.
Remember, the candy eyes and frosting will hold up best in a cool environment, so avoid leaving them in a warm room for too long.
Nutritional Information & Benefits
Here’s a quick look at the nutritional breakdown for these Oreo spiders:
- Calories: Approximately 120 per spider.
- Fat: About 5g per serving.
- Sugar: Roughly 12g per spider.
- Dietary Considerations: Vegetarian-friendly, with gluten-free and dairy-free options available.
While these are an indulgent treat, they’re small and portion-controlled, making them a perfect way to satisfy your sweet tooth without going overboard.
Conclusion
These Oreo spiders are the perfect addition to your Halloween festivities. They’re adorable, easy to make, and a guaranteed hit with kids and adults alike. I love how simple yet creative this recipe is—it’s always a joy to see the smiles they bring to everyone’s faces.
Feel free to put your own twist on these spooky treats, and don’t forget to share your creations with me! Leave a comment below and let me know how your Oreo spiders turned out. I’d love to hear about your Halloween party plans and ideas!
Wishing you a spook-tacular Halloween filled with fun, laughter, and lots of yummy treats!
FAQs About Oreo Spiders Recipe
Can I use a different type of cookie?
Absolutely! Chocolate sandwich cookies work best, but you can experiment with other types like vanilla-filled cookies or homemade ones.
Where can I find candy eyes?
Most craft stores, baking supply shops, and online retailers carry candy eyes during the Halloween season. Check the baking aisle or order them online!
How do I make this recipe gluten-free?
Simply swap out the regular Oreos and pretzels for gluten-free alternatives. Many brands offer great gluten-free options.
Can I prepare these in advance?
Yes! You can make these Oreo spiders a day or two ahead of time. Store them in an airtight container in the fridge to keep them fresh.
What if I can’t find pretzel sticks?
If pretzel sticks aren’t available, you can use licorice strings or thin candy sticks as an alternative for the spider legs.
Pin This Recipe!

Oreo Spiders Recipe for Easy and Fun Halloween Treats

These Oreo spiders are the ultimate Halloween treat—adorable, delicious, and easy to make with no baking required. Perfect for parties or festive family fun!
- Prep Time: 15 minutes
- Cook Time: None
- Total Time: 15 minutes
- Yield: 12 spiders
- Category: Dessert
- Cuisine: American
Ingredients
- Oreos (classic, double-stuffed, or flavored varieties)
- Mini pretzel sticks
- Candy eyes
- Chocolate frosting
- Optional decorations: colored sprinkles, mini chocolate chips, or candy pieces
Instructions
- Prepare the workspace: Clear a clean surface and lay down parchment paper.
- Separate the Oreos: Gently twist apart each Oreo cookie to separate the top and bottom halves, keeping the cream filling intact on one side.
- Attach the pretzel legs: Break pretzel sticks in half to create eight legs for each spider. Press four pretzel halves into the cream filling on each side of the cookie.
- Reassemble the cookie: Carefully place the cookie top back over the cream and pretzel legs, pressing down gently to secure them.
- Add the candy eyes: Use a small dab of chocolate frosting to glue the candy eyes onto the top of the Oreo.
- Decorate: Add extra decorations like sprinkles or mini chocolate chips if desired.
- Let them set: Allow the frosting to set for about 10 minutes before serving.
Notes
[‘Be gentle when separating the Oreo cookies to avoid breaking them.’, ‘Use fresh pretzels for sturdy spider legs.’, ‘If frosting is too runny, chill it in the fridge for a few minutes.’, ‘Store prepared spiders in an airtight container in the fridge for up to 3 days.’, ‘Customize the look with different candy eyes or decorations.’]
Nutrition
- Serving Size: 1 spider
- Calories: 120
- Sugar: 12
- Fat: 5
Keywords: Halloween treats, Oreo spiders, no-bake dessert, spooky snacks, kids party food


