
Introduction
There’s just something magical about that first bite of a s’more—the gooey, toasted marshmallow, melty chocolate, and crisp graham cracker all coming together in one perfect, sticky mess. Now, imagine all that campfire nostalgia wrapped up in a delicate, bakery-worthy shell. That’s exactly what you get with these irresistible s’mores macarons with toasted marshmallow filling. I still remember the first time I recreated my favorite fireside treat in macaron form—it was a rainy Saturday, and my craving for summer was off the charts. My kitchen smelled like melted chocolate and toasted sugar, and honestly, I’ve never looked back.
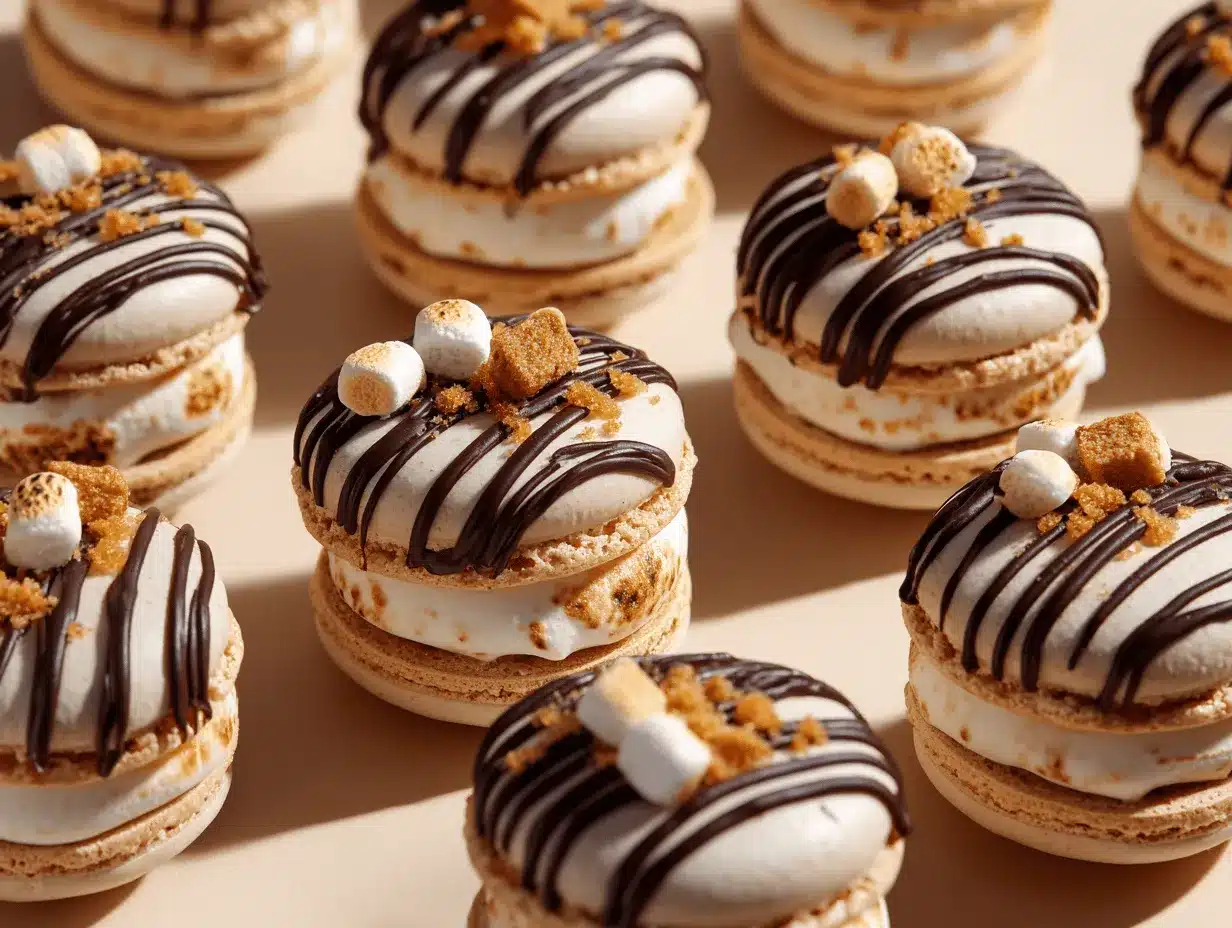
I’ve baked (and probably eaten) more macarons than I’d care to admit, but this smores macarons recipe is a level above the rest. It’s a fun twist on the classic French cookie, but with all the familiar flavors of a campfire treat. With crisp chocolate almond shells, a gooey toasted marshmallow buttercream, and a sprinkle of crushed graham crackers, these cookies are pure nostalgia with a sophisticated edge. They’re perfect for sharing at parties, gifting to friends, or just treating yourself when you’re missing those summer nights.
If you’re new to macarons, don’t worry—I’ve tested this recipe more times than I can count (and survived all the classic macaron mishaps so you don’t have to). Whether you’re baking for a special event or just want to bring a little campfire magic to your kitchen, these smores macarons with toasted marshmallow filling will absolutely hit the spot. Plus, they’re a guaranteed hit with both kids and grownups. Let’s get baking!
Why You’ll Love This Recipe
After countless rounds of macaron testing (and a few sticky disasters along the way), I can tell you this smores macarons recipe is the one you’ll want to make again and again. Here’s exactly why these cookies deserve a spot in your baking rotation:
- Quick & Easy: Don’t let the fancy look fool you—these come together in about 90 minutes, so you can satisfy your sweet tooth without an all-day kitchen marathon.
- Simple Ingredients: No need to hunt down obscure stuff. You’ll find most of these basics in your pantry already, especially if you’re a s’mores fan.
- Perfect for Any Occasion: Great for birthday parties, summer BBQs, or cozy movie nights. They make for seriously impressive gifts, too.
- Crowd-Pleaser: I’ve served these at family gatherings, bake sales, and even as wedding favors—the rave reviews never stop.
- Unbelievably Delicious: The cocoa macaron shell is crisp yet chewy, the marshmallow filling is fluffy and smoky, and the graham cracker dust ties it all together.
What truly sets this smores macarons recipe apart is the toasted marshmallow filling. Instead of a basic buttercream, you’ll whip up a marshmallow fluff that gets a little torch action for that classic “toasted” s’mores vibe. It’s a detail that takes these cookies from good to “where have these been all my life?” If you’ve ever worried macarons are too fussy or not worth the effort, trust me—these are the ones that’ll change your mind. There’s just something about the flavors and textures that feels both fancy and familiar, all at once.
Honestly, every time I make these, I think of long summer nights and sticky fingers around a campfire. If you want a recipe that’s as fun to make as it is to eat, these smores macarons are it.
What Ingredients You Will Need
This smores macarons recipe uses a handful of classic ingredients to capture that signature s’mores flavor—think cocoa, almonds, marshmallow, and graham crackers. Don’t worry if you’re missing something; I’ll share some easy swaps, too!
-
For the Macaron Shells:
- Almond flour (super-fine, blanched for smooth shells—Bob’s Red Mill is my go-to)
- Powdered sugar (for that delicate texture)
- Egg whites (room temperature; separate ahead for best results)
- Granulated sugar (helps stabilize the meringue)
- Unsweetened cocoa powder (Dutch-processed, if possible, for deep chocolate flavor)
- Cream of tartar (optional, helps with meringue stability)
- Pinch of salt (brings out the chocolate notes)
-
For the Toasted Marshmallow Filling:
- Unsalted butter (softened, for a smooth buttercream base)
- Marshmallow fluff or creme (I use Jet-Puffed, but store brand works)
- Powdered sugar (for structure and sweetness)
- Vanilla extract (real vanilla makes a difference)
- Mini marshmallows (for toasting—don’t skip this step!)
- Pinch of salt (to balance out the sweetness)
-
For Assembly & Garnish:
- Graham crackers (crushed, for sprinkling—classic Honey Maid is a favorite)
- Milk chocolate (melted, for drizzling or sandwiching, if you want extra chocolate punch)
Ingredient notes: If you need gluten-free, just make sure your graham crackers are certified gluten-free. For dairy-free, swap the butter with a plant-based stick and check your marshmallow fluff (some brands contain egg or gelatin). You can use homemade marshmallow fluff if you’re ambitious, but honestly, the store stuff works just fine here. I’ve tried these with both natural and Dutch cocoa powders—the Dutch gives a darker, richer shell, but both will work.
If you’re out of almond flour, you can try hazelnut flour for a “Nutella s’mores” vibe (so good). For a richer filling, add a spoonful of cream cheese to the buttercream—talk about decadent. And if you’re making these in winter, don’t worry, you can toast the marshmallows under your broiler or with a kitchen torch (no campfire required).
Equipment Needed
- Kitchen scale (for accurate measurements—macarons are picky, I learned this the hard way!)
- Electric mixer (stand or handheld, both work)
- Mixing bowls (glass or stainless steel, no plastic if you can help it—egg whites whip better)
- Fine-mesh sieve (for sifting almond flour and cocoa)
- Silicone spatula (for gentle folding)
- Piping bags and round tip (Wilton 1A or similar)
- Baking sheets
- Silicone baking mats or parchment paper (I prefer silicone mats for smoother bottoms)
- Oven thermometer (optional, but helps with accuracy—my old oven runs hot and ruined a few batches until I figured this out)
- Kitchen torch (for toasting marshmallows—broiler works in a pinch, but a torch is more fun!)
- Cooling rack
No kitchen torch? Use your broiler for toasting marshmallows, just keep a close eye on them. If you don’t have a piping bag, a large zip-top bag with the corner snipped off works in a pinch. For budget-friendly tools, I’ve found great silicone mats and basic piping tips at discount stores—they work just as well as the pricier options. Keep your equipment grease-free for best meringue results: wipe bowls with a bit of vinegar if needed.
Preparation Method
-
Prep the dry ingredients:
Sift together 100g almond flour, 100g powdered sugar, and 15g unsweetened cocoa powder into a large bowl. Discard any lumps—this makes for smoother shells. -
Make the meringue:
In a clean, grease-free bowl, start beating 90g room-temperature egg whites with a pinch of salt and 1/8 tsp cream of tartar (if using) on medium speed. When foamy, slowly add 90g granulated sugar. Beat until stiff, glossy peaks form—about 5–7 minutes. The bowl should flip upside down without the meringue sliding (trust me, it’s worth checking!). -
Combine and fold:
Gently fold the sifted dry ingredients into the meringue using a silicone spatula. Use a “J” motion, scraping around and cutting through the middle. Stop folding when the batter flows slowly off the spatula in thick ribbons—think “lava-like.” Overmixing leads to flat macarons, so go slow and check often. -
Pipe the shells:
Transfer batter to a piping bag fitted with a round tip. Pipe 1.5-inch circles onto silicone mats or parchment-lined baking sheets, spacing an inch apart. Bang the trays on the counter a couple of times to release air bubbles. Pop stubborn bubbles with a toothpick. -
Dry the shells:
Let the piped shells rest at room temperature for 30–60 minutes, until a skin forms. They should not stick to your finger when gently touched. Humid day? They might take longer—be patient here. -
Bake:
Preheat oven to 300°F (150°C). Bake one tray at a time for 13–15 minutes. Shells are done when they lift cleanly off the mat, with “feet” around the edges. If they stick or seem wet, bake for a minute or two longer. -
Cool completely:
Let macarons cool fully on the baking sheet before transferring to a rack. Warm shells are fragile! -
Make the filling:
Cream 1/2 cup (113g) softened butter until light and fluffy. Add 1 cup (100g) powdered sugar, 1 cup marshmallow fluff, and 1/2 tsp vanilla extract. Beat until smooth. For extra marshmallow flavor, toast a handful of mini marshmallows with a kitchen torch or under the broiler and fold them in. Add a pinch of salt to taste. -
Assemble:
Pipe the marshmallow filling onto half the shells. Top with the remaining shells to create sandwiches. If desired, drizzle with melted milk chocolate and sprinkle with crushed graham crackers. -
Mature (optional, but worth it!):
Store finished macarons in an airtight container in the fridge for 12–24 hours before eating. This helps the flavors meld and the texture become perfectly chewy.
If your shells crack or spread, chances are the batter was overmixed or the oven was too hot—don’t sweat it, they’ll still taste great! For perfectly even shells, trace circles on the underside of your parchment as a guide. And remember, every batch gets easier.
Cooking Tips & Techniques
Making macarons can feel intimidating, but I promise, with a little practice you’ll get the hang of it. Here’s what I’ve learned (sometimes the hard way!) to help guarantee smores macarons success:
- Measure by weight: Macarons are sensitive to even tiny measurement changes. A kitchen scale is your best friend here.
- Room temp egg whites: They whip better and give you more stable meringue. I usually separate mine the night before and let them sit, covered, at room temp.
- Don’t overmix the batter: Stop folding when it flows like lava. Too much folding equals flat, footless macarons.
- Drying the shells: This step is key for smooth tops and proper “feet.” If it’s humid, use a fan to speed things up.
- Bake one tray at a time: The heat distribution is more even, and you’ll dodge the heartbreak of underbaked bottoms.
- Practice makes perfect: My first batch was a mess, but every attempt got easier. If they aren’t bakery-perfect, don’t stress—they’ll still taste amazing!
- Use a kitchen torch for marshmallows: It’s the quickest way to toast them without melting the buttercream. If you don’t have one, toast the marshmallows under the broiler on a lined baking sheet, but keep a close eye—they go from golden to burnt fast.
- Let them mature: Resist the urge to eat them right away. Waiting a day makes the texture just right and the flavors blend beautifully.
If you ever end up with hollow shells, try lowering your oven temp or adjusting the baking time—every oven is a little different. And, honestly, even the “ugly” ones disappear quickly in my house!
Variations & Adaptations
Macarons are endlessly customizable, and this smores macarons recipe is no exception. Here are some fun ways to make it your own:
- Gluten-Free: Use certified gluten-free graham crackers or skip the garnish altogether. The shells and filling are naturally gluten-free!
- Vegan Option: Swap the egg whites for aquafaba (chickpea brine), use a dairy-free butter, and grab vegan marshmallow fluff. The texture is a little different, but the flavor is on point.
- Flavor Twists: Add a spoonful of peanut butter to the filling for “PB s’mores,” or stir in a bit of instant espresso powder to the shells for a mocha marshmallow treat.
- Seasonal Additions: In the fall, sprinkle cinnamon into your shells or filling for warm, cozy vibes. In the spring, try strawberry marshmallow fluff for a fruity spin.
- Different Cooking Methods: If you want to make mini macarons for party platters, just pipe them smaller and reduce the bake time by a couple minutes.
One of my favorite personal twists was using dark chocolate shells and a salted caramel marshmallow filling—absolutely dreamy. Don’t be afraid to experiment! The base recipe is sturdy, so go wild with flavors and fillings that make you smile.
Serving & Storage Suggestions
These smores macarons are best enjoyed at room temperature, so take them out of the fridge about 30 minutes before serving for the perfect chewy texture. They look gorgeous arranged on a serving platter with extra graham cracker crumbs and chocolate shavings for a little pizzazz.
Pair them with hot chocolate in winter or cold brew coffee in summer—they’re rich enough to stand up to strong drinks. If you’re feeling fancy, serve them with a scoop of vanilla ice cream for a fun dessert twist.
For storage, keep your macarons in an airtight container in the fridge for up to 5 days. They actually taste better after a day or two when the filling softens the shells just a bit. To freeze, layer them between sheets of parchment in a freezer-safe box for up to one month. Thaw in the fridge overnight, then bring to room temp before serving. If the marshmallow filling gets a little sticky, a quick chill firms it up again. The flavors deepen over time—if you can wait that long!
Nutritional Information & Benefits
Each smores macaron clocks in at about 100–120 calories, depending on the size and amount of filling. They’re gluten-free (as long as you use gluten-free graham crackers) and can be made dairy-free with the right swaps.
Key ingredients like almond flour add a bit of protein and healthy fats, while the marshmallow and chocolate bring the fun. While these are definitely a treat, I love knowing I can control the ingredients and skip the preservatives you find in store-bought cookies.
Allergens to note: these contain nuts, eggs, and dairy (unless adapted). Keep this in mind if you’re baking for friends. For me, these cookies are all about balance—indulgence with a little homemade goodness mixed in.
Conclusion
If you’ve ever wanted to bring the magic of a campfire into your kitchen, this smores macarons recipe is the answer. They’re fun, a little bit fancy, and bursting with all the flavors you love from classic s’mores—no sticky hands or smoky clothes required.
Don’t be afraid to make them your own—swap fillings, add flavors, or get creative with decorations. That’s half the fun! Every time I bake a batch, I’m reminded of why I love sharing recipes: it’s about making memories, not just cookies.
I hope you’ll give these a try and let me know how they turn out! Drop a comment, share your twists, or tag me on social media with your creations. Happy baking, and here’s to more sweet, toasty moments—no campfire needed.
Frequently Asked Questions
How do I know when my macaron shells are done baking?
They should have firm “feet” and lift cleanly off the baking mat. If they stick or seem wet, give them another minute or two in the oven.
Can I make these smores macarons ahead of time?
Absolutely! They actually taste better after a day in the fridge, so feel free to make them up to 2 days in advance.
What if I don’t have a kitchen torch for toasting marshmallows?
No worries—just use your oven’s broiler. Place marshmallows on a lined baking sheet and broil for 1–2 minutes, watching very closely.
Are these macarons gluten-free?
The shells and filling are gluten-free. Just use gluten-free graham crackers or skip them for a fully gluten-free treat.
How do I store leftover smores macarons?
Keep them in an airtight container in the fridge for up to 5 days, or freeze for up to a month. Bring to room temperature before serving for best texture.
Pin This Recipe!

Smores Macarons Recipe: Easy Homemade Cookies with Toasted Marshmallow Filling

These bakery-worthy s’mores macarons combine crisp chocolate almond shells, gooey toasted marshmallow buttercream, and a sprinkle of crushed graham crackers for a nostalgic campfire treat in elegant cookie form. Perfect for parties, gifting, or whenever you crave a sweet, toasty bite.
- Prep Time: 45 minutes
- Cook Time: 15 minutes
- Total Time: 1 hour
- Yield: 24 macarons 1x
- Category: Dessert
- Cuisine: French-American
Ingredients
- 1 cup (100g) almond flour (super-fine, blanched)
- 1 cup (100g) powdered sugar (plus 1 cup for filling)
- 3 large egg whites (90g, room temperature)
- 1/2 cup (90g) granulated sugar
- 2 tablespoons (15g) unsweetened cocoa powder (Dutch-processed preferred)
- 1/8 teaspoon cream of tartar (optional)
- Pinch of salt (for shells and filling)
- 1/2 cup (113g) unsalted butter, softened
- 1 cup marshmallow fluff or creme
- 1/2 teaspoon vanilla extract
- 1/2 cup mini marshmallows (for toasting and folding into filling)
- 2 graham crackers, crushed (for garnish)
- 2 ounces milk chocolate, melted (for drizzling or sandwiching, optional)
Instructions
- Sift together almond flour, powdered sugar, and cocoa powder into a large bowl. Discard any lumps.
- In a clean, grease-free bowl, beat egg whites with a pinch of salt and cream of tartar (if using) on medium speed until foamy. Gradually add granulated sugar and beat until stiff, glossy peaks form (about 5–7 minutes).
- Gently fold the sifted dry ingredients into the meringue using a silicone spatula until the batter flows in thick ribbons (lava-like consistency).
- Transfer batter to a piping bag fitted with a round tip. Pipe 1.5-inch circles onto silicone mats or parchment-lined baking sheets, spacing an inch apart. Tap trays to release air bubbles and pop any with a toothpick.
- Let piped shells rest at room temperature for 30–60 minutes until a skin forms and they do not stick to your finger.
- Preheat oven to 300°F (150°C). Bake one tray at a time for 13–15 minutes, until shells lift cleanly off the mat and have ‘feet.’
- Cool macarons completely on the baking sheet before transferring to a rack.
- For the filling: Cream softened butter until light and fluffy. Add powdered sugar, marshmallow fluff, and vanilla extract; beat until smooth. Toast mini marshmallows with a kitchen torch or under the broiler, then fold into the buttercream. Add a pinch of salt to taste.
- Pipe marshmallow filling onto half the shells. Top with remaining shells to create sandwiches.
- Drizzle with melted milk chocolate and sprinkle with crushed graham crackers, if desired.
- For best texture, store macarons in an airtight container in the fridge for 12–24 hours before serving.
Notes
Measure ingredients by weight for best results. Let egg whites come to room temperature before whipping. Dry shells thoroughly before baking for smooth tops and proper feet. Use a kitchen torch for best marshmallow toasting, or broil carefully. Macarons taste best after maturing in the fridge for 12–24 hours. For gluten-free, use certified GF graham crackers or omit garnish.
Nutrition
- Serving Size: 1 macaron
- Calories: 110
- Sugar: 11
- Sodium: 30
- Fat: 6
- Saturated Fat: 3
- Carbohydrates: 13
- Fiber: 1
- Protein: 2
Keywords: smores macarons, toasted marshmallow filling, chocolate macaron, graham cracker, campfire dessert, homemade macarons, gluten-free dessert, summer cookies, party treats, marshmallow buttercream


