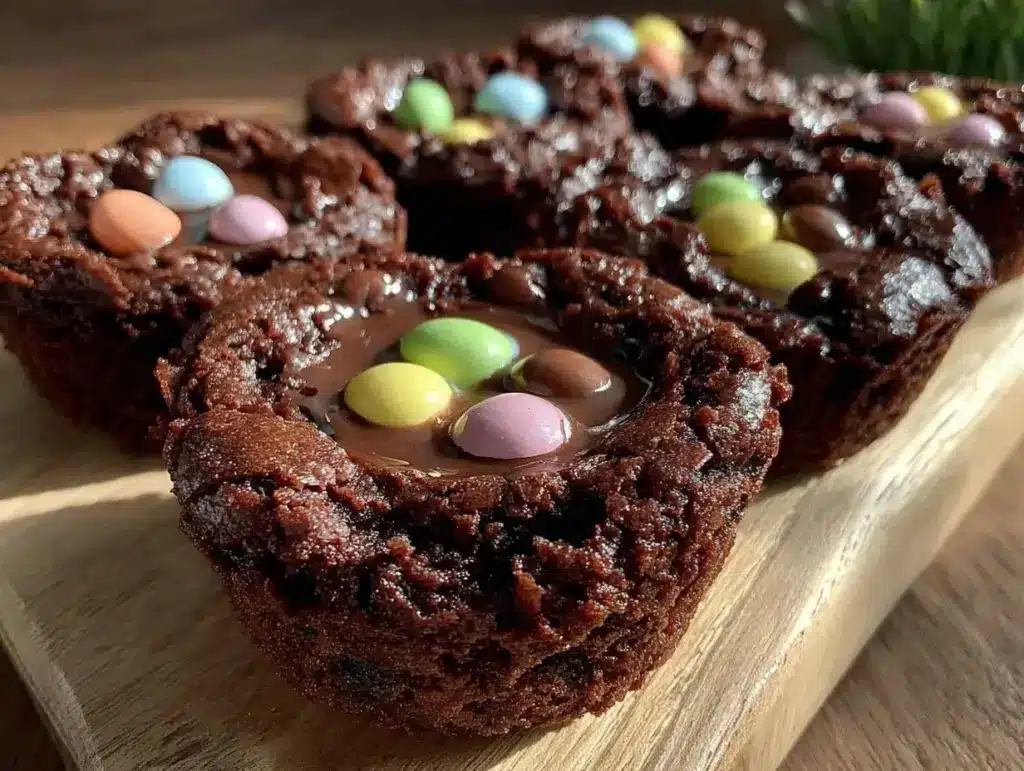
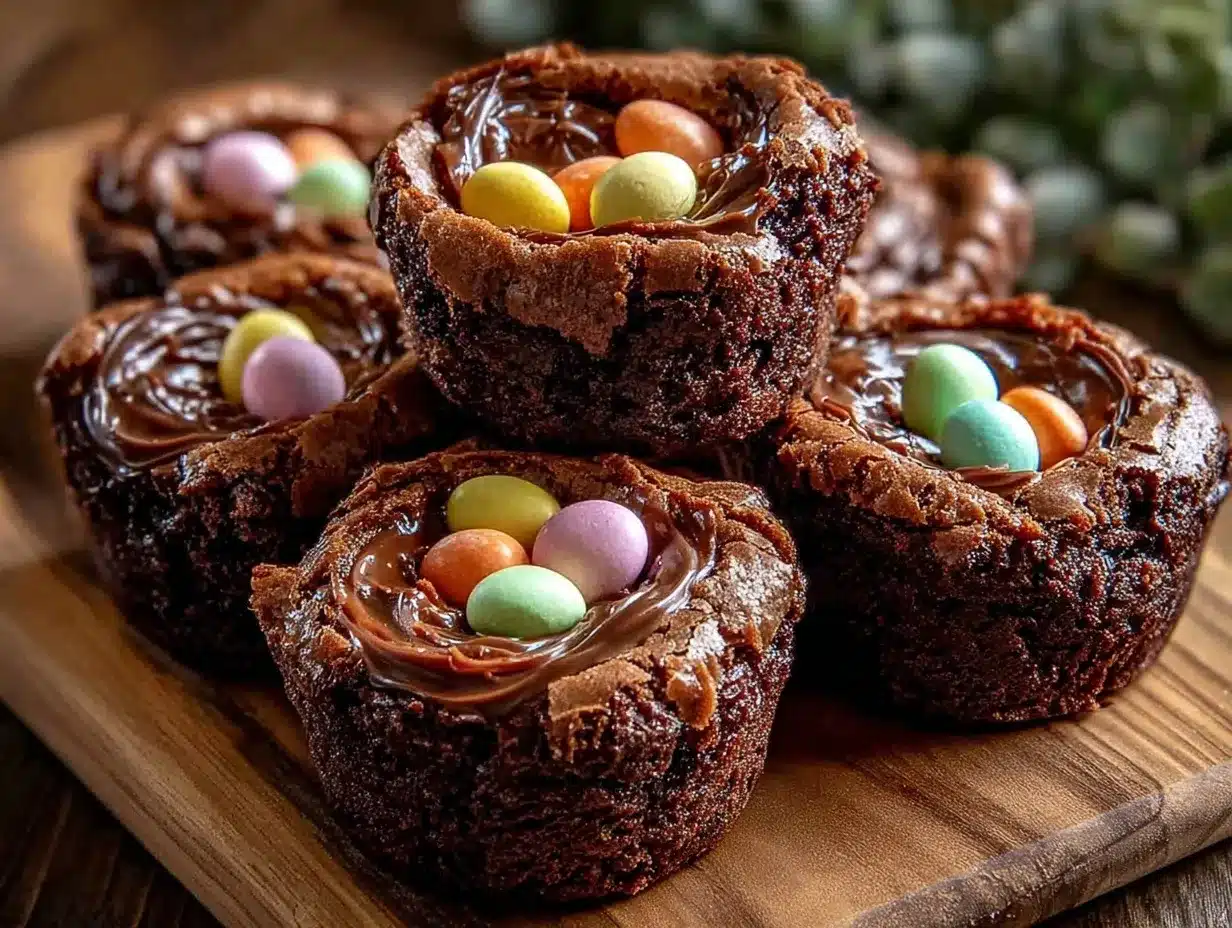
The smell of rich chocolate brownies mingled with sweet, colorful mini eggs instantly takes me back to childhood Easter mornings. Honestly, there’s something magical about those tiny candy-coated chocolates nestled perfectly in a fudgy brownie base—it’s almost like a little edible nest bursting with springtime joy. I first stumbled upon this recipe a few years ago when I wanted to create a festive treat that was both easy and impressive for an Easter gathering. Since then, these mini egg nest brownies have become a favorite in my kitchen, popping up every spring (and sometimes outside of Easter because, well, why not?).
What I love most about this recipe is how simple it is, yet it looks like you spent hours crafting something special. The chewy, gooey brownie texture paired with the crunchy mini eggs on top is just the right combo to satisfy any chocolate lover’s cravings. Plus, it’s a fun project to do with kids or friends, making the whole baking experience feel festive and hands-on.
If you’re hunting for a homemade Easter treat that’s quick, adorable, and downright delicious, these mini egg nest brownies are calling your name. Whether you’re serving them at brunch, gifting them to neighbors, or just sneaking a few bites yourself, this recipe hits the sweet spot every time.
Why You’ll Love This Recipe
- Quick & Easy: Whip up the batter in under 15 minutes, and bake in just 20. Perfect for last-minute Easter prep or sweet cravings.
- Simple Ingredients: You probably already have everything on hand—no need for a special trip to the store.
- Perfect for Easter: The mini eggs on top create that iconic nest look, making them ideal for holiday parties and festive tables.
- Crowd-Pleaser: Kids adore the colorful candy eggs, and adults can’t get enough of the rich chocolatey brownie base.
- Unbelievably Delicious: The fudgy texture combined with the crisp candy shells is a match made in dessert heaven.
What sets this recipe apart is the balance between ease and wow factor. Instead of complicated piping or fancy decorations, the mini eggs do all the work, creating a playful and inviting look with zero stress. I always recommend using a good-quality cocoa powder or a trusted brownie mix if you’re in a pinch (I like Ghirardelli for that deep chocolate flavor). Plus, you get the joy of making something from scratch that tastes way better than store-bought treats.
Honestly, after baking these a dozen times, I’ve seen how they bring smiles and a little festive magic to every table. It’s not just a dessert—it’s a small celebration in every bite.
What Ingredients You Will Need
This recipe uses simple, wholesome ingredients to deliver bold flavor and a satisfying fudgy texture without overcomplicating things. Most are pantry staples, and the mini eggs add that perfect seasonal charm.
- Unsalted butter (1/2 cup / 115g, melted) – adds richness and moisture
- Granulated sugar (1 cup / 200g) – balances the chocolate’s bitterness
- Brown sugar (1/4 cup / 50g, packed) – gives a slight caramel note and chewiness
- Large eggs (2, room temperature) – binds the ingredients and adds structure
- Vanilla extract (1 teaspoon) – enhances the overall flavor
- All-purpose flour (3/4 cup / 95g) – the base for the brownies (can swap with gluten-free flour blend)
- Cocoa powder (1/3 cup / 35g, unsweetened) – for that deep chocolate taste (I prefer Hershey’s Special Dark)
- Salt (1/4 teaspoon) – balances sweetness and intensifies flavor
- Mini chocolate eggs (1 cup / about 150g) – the star of the show for that nest effect (Cadbury mini eggs work great)
Substitution tips: Use dairy-free butter and coconut sugar for a vegan twist, and swap eggs with flax eggs if needed. In a pinch, store-bought brownie mix can be used, just top with mini eggs after baking.
Equipment Needed
- 8×8 inch (20×20 cm) square baking pan – lined with parchment paper or lightly greased
- Mixing bowls – one for wet ingredients, one for dry
- Whisk or electric mixer – to blend ingredients smoothly
- Rubber spatula – for folding ingredients without deflating batter
- Measuring cups and spoons – precise measurements make a difference
- Cooling rack – to let brownies cool evenly
If you don’t have an 8×8 pan, a similar-sized round pan works fine; just adjust baking time slightly. I’ve also used silicone loaf pans with success for a different shape. For budget-friendly options, simple metal pans from any store work just as well. Keeping your baking pan well-greased or lined with parchment helps with easy removal and cleanup.
Detailed Preparation Method
- Preheat your oven: to 350°F (175°C). Line your 8×8 inch pan with parchment paper, leaving extra to lift brownies easily after baking. This step saves you from a sticky mess later.
- Melt the butter: in a microwave-safe bowl or on the stove, then whisk in the granulated and brown sugars until smooth and slightly glossy. This usually takes about 2 minutes. The melted butter helps create that fudgy texture you want.
- Add eggs and vanilla: one at a time, mixing thoroughly after each addition. The batter should thicken slightly and become shiny—if it looks curdled, keep mixing; it’ll come together.
- Combine dry ingredients: sift together flour, cocoa powder, and salt in a separate bowl to avoid lumps and ensure even distribution.
- Fold dry ingredients into wet: using a rubber spatula, gently fold the flour mixture into the wet batter until just combined. Don’t overmix—some streaks of flour are okay. Overmixing can make brownies cakey instead of fudgy.
- Pour batter into pan: spread evenly with the spatula, smoothing the top. Tap the pan lightly on the counter to release any air bubbles.
- Bake: for 18-22 minutes. Start checking at 18 minutes by inserting a toothpick into the center; it should come out with moist crumbs but not wet batter. This is key for fudgy brownies.
- Remove from oven: and immediately press mini eggs onto the warm surface to create the nest effect. Don’t wait, or the eggs won’t stick properly.
- Cool completely: in the pan on a wire rack for at least 1 hour. This helps brownies set and makes cutting easier without crumbling.
- Slice and serve: using a sharp knife (wipe blade between cuts for cleaner edges). Enjoy your festive mini egg nest brownies fresh or store as below.
Cooking Tips & Techniques
When making these brownies, timing is everything. I’ve learned that baking just until moist crumbs appear on the toothpick makes all the difference between fudgy and dry. It’s tempting to overbake, but trust me—patience pays off.
Using melted butter instead of softened butter helps create that dense, chewy texture. Also, I always recommend sifting cocoa powder and flour to avoid clumps—nobody enjoys digging through dry pockets in their brownies.
Pressing the mini eggs onto the warm brownies right after baking is a small but crucial step. I once waited too long, and the eggs slid right off. Lesson learned: timing and temperature matter!
Multitasking tip: while brownies bake, clean your mixing bowls and prep your serving plate so you’re ready to go straight from oven to table.
Variations & Adaptations
- Peanut Butter Swirl: Drop spoonfuls of peanut butter on the batter before baking and swirl with a knife for a nutty twist.
- Gluten-Free: Swap all-purpose flour with a 1:1 gluten-free blend. The texture stays fudgy and delicious!
- Vegan Version: Use flax eggs (1 tbsp ground flax + 3 tbsp water per egg) and dairy-free butter. Coconut sugar works well here.
- Seasonal Twist: Replace mini eggs with chopped dried cranberries and white chocolate chips for a winter holiday feel.
- Nutty Add-In: Stir in chopped toasted pecans or walnuts for crunch beneath the candy eggs.
I tried the peanut butter swirl once, and it was a total hit at a family brunch—everyone asked for the recipe. It’s a fun way to customize these brownies without complicating the process.
Serving & Storage Suggestions
Serve these mini egg nest brownies at room temperature for the best texture. They pair wonderfully with a scoop of vanilla ice cream or a dollop of whipped cream if you want to feel fancy.
For drinks, a cup of fresh coffee or a glass of cold milk balances the rich chocolate perfectly. They also make adorable Easter basket treats or party favors when wrapped individually in clear cellophane with a ribbon.
Store brownies in an airtight container at room temperature for up to 3 days. If you want them longer, refrigerate for up to a week or freeze for up to 3 months. When reheating, a quick 10-second zap in the microwave softens them beautifully—just watch out for melting those mini eggs!
Flavors actually deepen a bit after resting overnight, so they’re perfect to make ahead and enjoy the next day.
Nutritional Information & Benefits
Each mini egg nest brownie (based on 12 servings) contains approximately:
| Calories | 220 |
|---|---|
| Fat | 11g |
| Sugar | 20g |
| Protein | 2g |
| Carbohydrates | 28g |
The use of real cocoa powder provides antioxidants, and the inclusion of eggs adds protein. While this is definitely a treat, making it homemade means you can control ingredients—no preservatives or artificial flavors here. You can also adapt this recipe for gluten-free or vegan diets as mentioned, making it versatile for many dietary needs.
Just a heads up: these contain dairy, eggs, and wheat, so watch out for allergies. For those mindful of sugar intake, consider reducing sugar slightly or swapping mini eggs for fresh fruit toppings.
Conclusion
These mini egg nest brownies are a surefire way to impress without stress. They bring that perfect blend of fudgy chocolate and festive fun with minimal effort. Whether you’re baking for a crowd or just treating yourself, this recipe is a little slice of Easter happiness.
Feel free to make it your own—try different mix-ins or toppings to match your taste. I love coming back to this recipe year after year because it never fails to bring smiles and a sense of celebration.
Give this recipe a try, and don’t forget to share how yours turned out! Comments, photos, or tweaks are always welcome. Happy baking and have a wonderful Easter filled with delicious moments!
FAQs
Can I use regular-sized chocolate eggs instead of mini eggs?
You can, but mini eggs are easier to arrange and create that classic nest look. Larger eggs might sink into the brownies or spread out unevenly.
How do I keep the brownies fudgy and not cakey?
Don’t overbake! Check at 18 minutes and look for moist crumbs on your toothpick. Also, use melted butter and avoid overmixing the batter.
Can I make these brownies ahead of time?
Absolutely! They store well at room temperature for a few days, and flavors improve after resting overnight. Just keep them airtight.
What’s the best way to cut brownies with mini eggs on top?
Use a sharp knife and wipe it between cuts to get clean slices without dragging the candy eggs.
Can I freeze these mini egg nest brownies?
Yes, wrap them tightly in plastic wrap and aluminum foil, then freeze for up to 3 months. Thaw at room temperature before serving.
Pin This Recipe!

Mini Egg Nest Brownies

These mini egg nest brownies are a quick, easy, and festive homemade Easter treat featuring a fudgy chocolate brownie base topped with colorful mini chocolate eggs for a playful nest effect.
- Prep Time: 15 minutes
- Cook Time: 20 minutes
- Total Time: 35 minutes
- Yield: 12 servings 1x
- Category: Dessert
- Cuisine: American
Ingredients
- 1/2 cup (115g) unsalted butter, melted
- 1 cup (200g) granulated sugar
- 1/4 cup (50g) packed brown sugar
- 2 large eggs, room temperature
- 1 teaspoon vanilla extract
- 3/4 cup (95g) all-purpose flour (can swap with gluten-free flour blend)
- 1/3 cup (35g) unsweetened cocoa powder
- 1/4 teaspoon salt
- 1 cup (about 150g) mini chocolate eggs
Instructions
- Preheat your oven to 350°F (175°C). Line an 8×8 inch (20×20 cm) square baking pan with parchment paper, leaving extra to lift brownies easily after baking.
- Melt the butter in a microwave-safe bowl or on the stove, then whisk in the granulated and brown sugars until smooth and slightly glossy, about 2 minutes.
- Add eggs and vanilla extract one at a time, mixing thoroughly after each addition until the batter thickens slightly and becomes shiny.
- Sift together the flour, cocoa powder, and salt in a separate bowl to avoid lumps and ensure even distribution.
- Gently fold the dry ingredients into the wet batter using a rubber spatula until just combined. Do not overmix; some streaks of flour are okay.
- Pour the batter evenly into the prepared pan and smooth the top. Tap the pan lightly on the counter to release any air bubbles.
- Bake for 18-22 minutes. Start checking at 18 minutes by inserting a toothpick into the center; it should come out with moist crumbs but not wet batter.
- Remove from oven and immediately press mini eggs onto the warm surface to create the nest effect. Do not wait, or the eggs won’t stick properly.
- Cool completely in the pan on a wire rack for at least 1 hour to help brownies set and make cutting easier.
- Slice using a sharp knife, wiping the blade between cuts for cleaner edges. Serve and enjoy.
Notes
Use good-quality cocoa powder or a trusted brownie mix if in a pinch. Press mini eggs onto warm brownies immediately after baking to ensure they stick. Avoid overbaking to keep brownies fudgy. Sifting dry ingredients prevents lumps. For vegan version, use flax eggs and dairy-free butter. Store brownies airtight at room temperature for up to 3 days, refrigerate up to a week, or freeze up to 3 months.
Nutrition
- Serving Size: 1 brownie (1/12th of
- Calories: 220
- Sugar: 20
- Fat: 11
- Carbohydrates: 28
- Protein: 2
Keywords: brownies, mini egg nest brownies, Easter treats, chocolate brownies, fudgy brownies, easy brownies, homemade brownies, festive desserts


