The first time I baked this loaded raspberry tart, the scent of buttery crust mingled with the sweet tang of fresh raspberries instantly transported me to a sunny summer afternoon. Honestly, there’s something about a tart bursting with juicy berries and a creamy filling that feels like a celebration on a plate. I stumbled upon this recipe during a weekend baking session when I wanted something impressive yet straightforward — and let me tell you, it quickly became my go-to summer dessert.
This loaded raspberry tart recipe is like summer in dessert form. It’s got that perfect balance of crisp, flaky crust, luscious creaminess, and juicy, vibrant berries stacked high. What’s cool is that it’s not just delicious; it’s surprisingly simple to whip up, even if you’re not a seasoned baker. You’ll love how fresh raspberries shine but get a little extra oomph with a rich filling and a sprinkle of toppings.
Over the years, I’ve made this tart dozens of times, tweaking the filling and crust until I landed on the perfect combo. If you’re looking for a dessert that impresses but won’t have you sweating in the kitchen, this loaded raspberry tart recipe is your new best friend. Whether you’re hosting a summer gathering or just craving something sweet and fresh, it’s guaranteed to hit the spot.
Why You’ll Love This Recipe
- Quick & Easy: You can pull this tart together in about 45 minutes, making it perfect for last-minute dessert plans or casual weekend baking.
- Simple Ingredients: Most of what you need is probably already in your pantry or fridge — fresh raspberries, cream cheese, butter, and a few basics.
- Perfect for Summer: Bright and refreshing, this tart shines at barbecues, brunches, or even just a sunny afternoon treat.
- Crowd-Pleaser: Kids adore it, and adults often ask for seconds. The mix of creamy and tart flavors is irresistible!
- Unbelievably Delicious: The combination of a flaky crust with a luscious filling and juicy berries creates a flavor and texture combo that’s downright addictive.
What sets this loaded raspberry tart recipe apart is the way the filling comes together — creamy, smooth, with just the right hint of sweetness to complement the tart berries. I blend the cream cheese and a touch of vanilla to get that silky texture that feels fancy but is so easy to make. Plus, adding a crumble topping or a dusting of powdered sugar gives it that wow factor every time.
Honestly, it’s the kind of dessert that makes you close your eyes with the first bite and smile. It’s summer, comfort, and a little bit of indulgence all wrapped into one beautiful tart. I’ve shared it with friends and family, and it always brings out the “wow, you made this?” moments — without the stress!
What Ingredients You Will Need
This loaded raspberry tart recipe relies on straightforward, fresh ingredients to create bold flavors and a satisfying texture without fuss. Here’s what you’ll want to gather before you start:
- For the crust:
- All-purpose flour – 1 ½ cups (190g), for that perfect flaky base
- Unsalted butter, cold and cubed – ½ cup (115g) (I like using Kerry Gold for richness)
- Granulated sugar – 2 tablespoons, to add a subtle sweetness
- Salt – ¼ teaspoon, to balance flavors
- Ice water – 3 to 4 tablespoons, to bring the dough together
- For the filling:
- Cream cheese, softened – 8 oz (225g), the creamy heart of the tart
- Powdered sugar – ½ cup (60g), to sweeten the filling gently
- Vanilla extract – 1 teaspoon, adds warmth and depth
- Heavy cream – ½ cup (120ml), whipped slightly to lighten up the filling
- For the topping:
- Fresh raspberries – 2 cups (about 300g), ripe and juicy
- Optional: sliced almonds or a crumble topping for an added crunch
- Powdered sugar for dusting – just a light sprinkle
You can swap the all-purpose flour for a gluten-free blend if you want a gluten-free version. I’ve also tried adding a little lemon zest to the filling for a bright twist — highly recommend! For the berries, if fresh raspberries aren’t in season, frozen ones work fine; just thaw and drain them well to avoid sogginess.
Equipment Needed
- Tart pan: A 9-inch (23cm) removable-bottom tart pan is ideal for easy removal and beautiful presentation. If you don’t have one, a regular pie dish works too, but the edges won’t be as defined.
- Mixing bowls: One large and one medium for the crust and filling respectively.
- Electric mixer or hand mixer: Helpful for whipping the cream and blending the filling smoothly. I’ve done it by hand when in a pinch, but the mixer makes it faster.
- Rolling pin: For rolling out your crust evenly. If you don’t have one, a clean bottle or smooth cylindrical object can do the trick.
- Measuring cups and spoons: Accurate measurements help keep the crust tender and filling just right.
Personally, I keep a silicone baking mat handy when rolling out dough — it’s a game-changer for cleanup and prevents sticking. For budget-friendly alternatives, a non-stick pie dish and wooden spoon for mixing can get you started without fancy gadgets.
Detailed Preparation Method
- Prepare the crust: In a large bowl, whisk together 1 ½ cups (190g) all-purpose flour, 2 tablespoons granulated sugar, and ¼ teaspoon salt. Add the cold, cubed ½ cup (115g) unsalted butter. Using a pastry cutter or your fingers, cut the butter into the flour until the mixture resembles coarse crumbs with pea-sized pieces. This usually takes about 5 minutes. Keep the butter cold to ensure a flaky crust.
- Add ice water: Slowly add 3 to 4 tablespoons of ice water, one tablespoon at a time, mixing gently with a fork until the dough just comes together. Avoid overworking the dough. Once it holds together when squeezed, form the dough into a disk, wrap it in plastic wrap, and chill in the fridge for at least 30 minutes. This rest period helps relax the gluten and makes rolling easier.
- Roll out the dough: On a lightly floured surface or silicone mat, roll the dough into a 12-inch (30cm) circle, about ⅛ inch (3mm) thick. Carefully transfer it to a 9-inch (23cm) tart pan, pressing gently to fit the pan shape, and trim any excess dough hanging over the edges. Prick the bottom lightly with a fork to prevent bubbling during baking. Chill again for 10 minutes if the dough feels soft.
- Bake the crust: Preheat your oven to 375°F (190°C). Line the crust with parchment paper and fill with pie weights or dried beans. Bake for 15 minutes, then remove weights and parchment, returning the crust to the oven for another 10 minutes until golden and crisp. Let it cool completely on a wire rack — patience here really pays off!
- Make the filling: In a medium bowl, beat 8 oz (225g) softened cream cheese with ½ cup (60g) powdered sugar and 1 teaspoon vanilla extract until smooth and creamy. In a separate bowl, lightly whip ½ cup (120ml) heavy cream until it just holds soft peaks. Gently fold the whipped cream into the cream cheese mixture until combined but still fluffy.
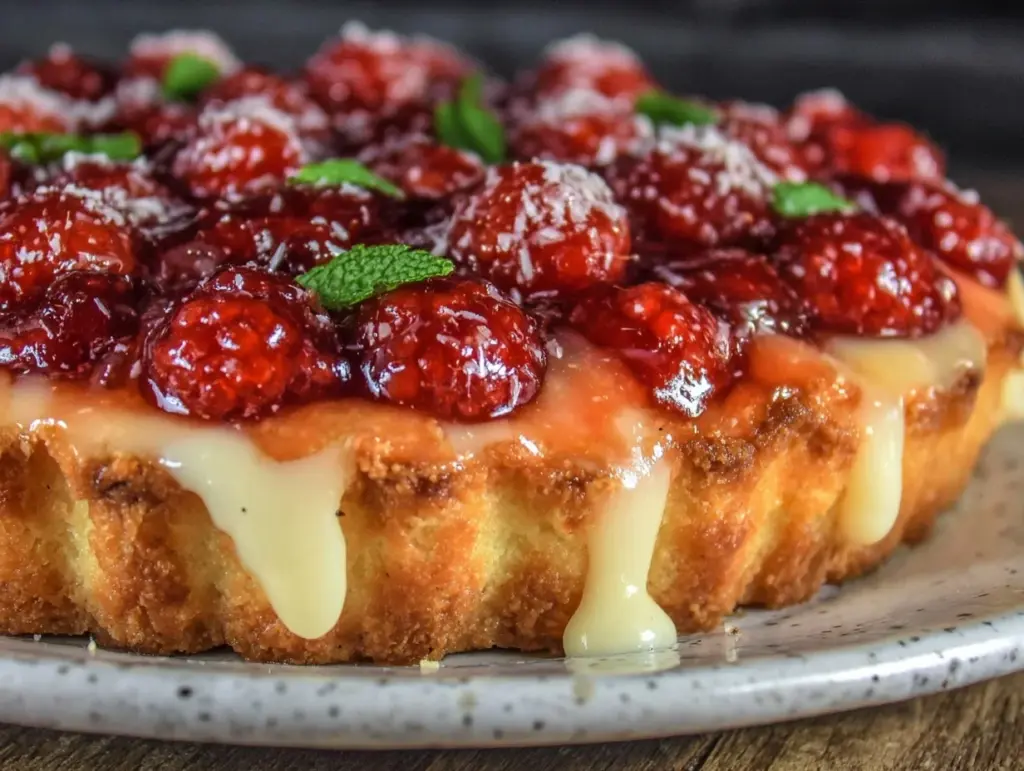
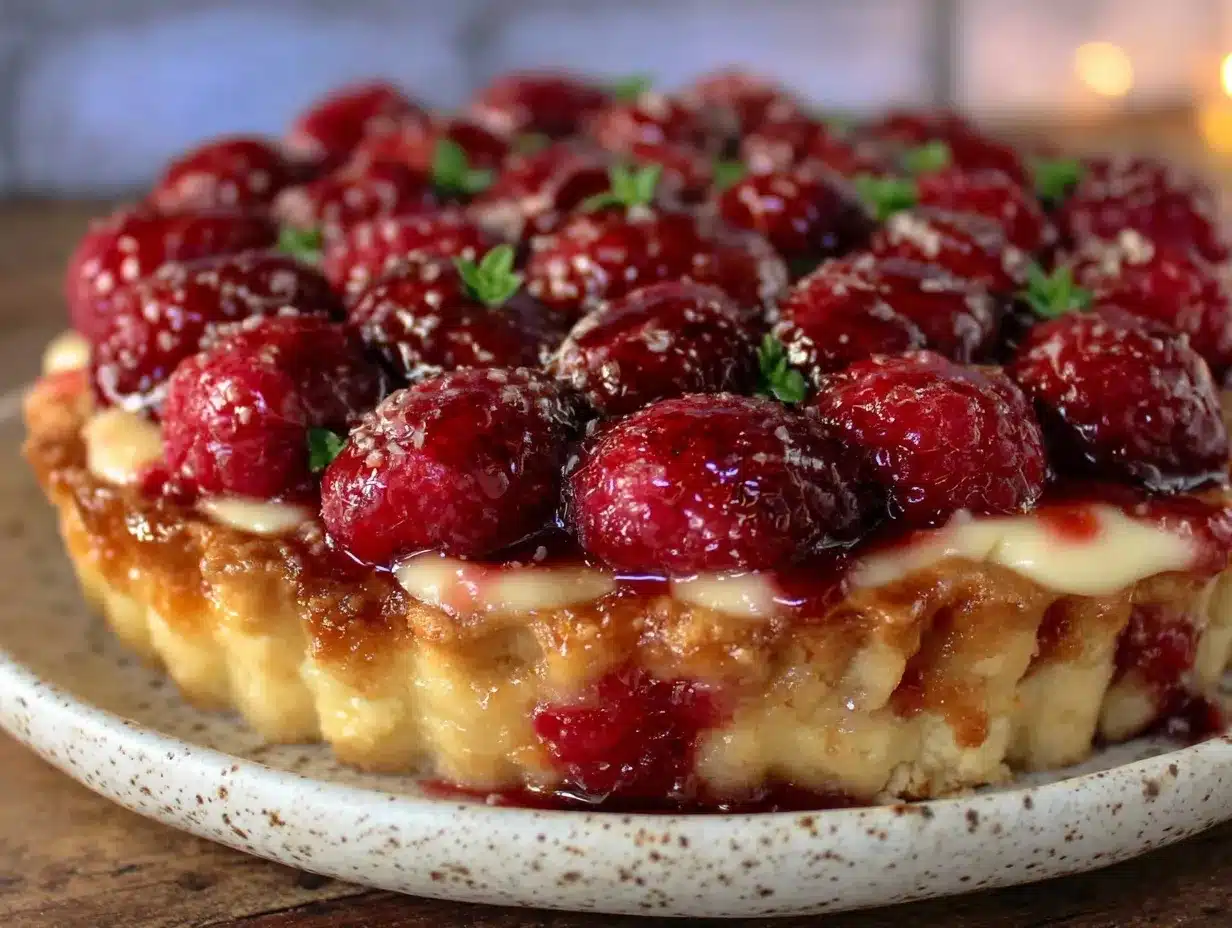
- Assemble the tart: Spoon the creamy filling evenly into the cooled tart shell, smoothing the top with a spatula. Pile 2 cups (300g) fresh raspberries generously over the filling, arranging them however you like — I love a rustic, piled-high look. Optionally, sprinkle sliced almonds or crumble topping over for texture.
- Final touches: Dust the tart lightly with powdered sugar before serving or chill it for an hour to let the flavors meld. Serve chilled or at room temperature for best taste.
Pro tip: If your dough cracks while rolling, just press it back together gently—no big deal! Also, keep your butter cold throughout to get that flaky crust we all crave. And don’t rush cooling the baked crust; it keeps it from getting soggy once the filling goes in.
Cooking Tips & Techniques
Getting this loaded raspberry tart just right comes down to a few key tricks I’ve picked up over the years. First off, cold ingredients are your best friend when making the crust. Cold butter creates flaky layers, so don’t let it soften too much before mixing. If your kitchen’s warm, pop the dough back in the fridge frequently.
When rolling out the dough, avoid over-flouring your surface, or the crust can turn tough. I like to dust lightly, just enough to keep things from sticking. If your dough tries to spring back, give it a 10-minute rest in the fridge — it helps relax the gluten, making rolling easier.
For the filling, it’s important not to over-whip the cream cheese mixture. You want it smooth and creamy but not too loose. Folding in whipped cream gently keeps the texture light and fluffy. And don’t skip chilling the tart shell before adding the filling — this prevents sogginess and keeps that beautiful crunch.
Lastly, when arranging raspberries, be gentle so they don’t break and release too much juice. A rustic pile looks charming and lets the berries shine. If you want to save time, you can use store-bought pie weights, but dried beans work just fine and are cost-effective.
Variations & Adaptations
This loaded raspberry tart recipe is quite flexible, and I’ve had fun trying out different twists over time. Here are some ideas to make it your own:
- Dietary twist: Swap the all-purpose flour for almond flour or a gluten-free mix to make the crust gluten-free. Use coconut cream instead of heavy cream for a dairy-free filling.
- Seasonal flavors: In place of raspberries, try fresh blueberries, blackberries, or sliced peaches for a different fruity vibe. A mix of berries works beautifully too.
- Flavor boost: Add a tablespoon of lemon zest or a splash of liqueur (like Chambord) to the filling for extra zing. I’ve also stirred in a handful of chopped fresh mint for a refreshing lift.
- Baking method: You can make mini tarts using tartlet pans for individual servings. The baking time will be shorter (around 12-15 minutes for the crust), so keep an eye on them.
One personal favorite variation is adding a thin layer of raspberry jam on the baked crust before spooning on the cream cheese filling — it amps up the raspberry flavor and adds a pleasant sticky sweetness. Give it a try if you want a little extra pop!
Serving & Storage Suggestions
This loaded raspberry tart is best served chilled or at room temperature. I like to let it sit out for about 15 minutes after refrigeration so the flavors come alive without the filling being too cold or stiff. It’s a stunning centerpiece for summer gatherings or a delightful finish to a casual dinner.
Pair the tart with a glass of sparkling wine, iced tea, or even a cup of freshly brewed coffee or herbal tea. The tartness of the berries balances beautifully with drinks that have a bit of acidity or sweetness.
To store, cover the tart loosely with plastic wrap or place it in an airtight container and keep it in the fridge for up to 3 days. The crust is best eaten within the first day or two to avoid sogginess, but chilling does help keep the filling fresh. You can also freeze the crust alone for up to a month — just thaw and fill when ready.
When reheating, it’s better to enjoy the tart cold or at room temp. If you prefer a warm crust, briefly warm individual slices in a 300°F (150°C) oven for 5 minutes, but skip warming the filling to avoid melting.
Nutritional Information & Benefits
Each slice of this loaded raspberry tart (assuming 8 servings) roughly contains about 280 calories, with 18 grams of fat, 25 grams of carbohydrates, and 4 grams of protein. The fresh raspberries provide a good dose of vitamin C, fiber, and antioxidants, which support immune health and digestion.
The cream cheese and heavy cream add richness and calcium, making this dessert a more satisfying treat compared to sugary baked goods loaded with refined ingredients. You can lighten it up by swapping heavy cream for Greek yogurt or using a reduced-fat cream cheese.
This tart is naturally gluten-free if you use gluten-free flour, and you can make it dairy-free with simple substitutions. Just keep in mind the allergens if serving to guests — nuts in toppings or dairy in the filling.
From a wellness perspective, I appreciate how this recipe balances indulgence with fresh fruit, so you get that sweet fix without feeling weighed down. It’s a dessert that feels like a reward, not a regret!
Conclusion
If you’ve been searching for a summer dessert that’s both impressive and straightforward, this loaded raspberry tart recipe is a winner. It combines a flaky, buttery crust with a creamy, dreamy filling and a generous pile of fresh raspberries that make every bite sing. I love how versatile it is — you can tweak it to your taste, dietary needs, or the berries you have on hand.
Give it a try, and don’t be shy about making it your own. Whether you stick to the classic or add your favorite twist, this tart is sure to become a staple in your dessert rotation. I’d love to hear how your version turns out — drop a comment, share your photos, or tell me about your favorite variations. Baking is more fun when we share the love!
Remember, the best desserts are the ones made with a little patience, a lot of heart, and a dash of summer sunshine. Happy baking!
FAQs
Can I use frozen raspberries for this tart?
Yes, you can! Just thaw and drain them well to avoid excess moisture that could make the crust soggy.
How do I prevent the crust from getting soggy?
Baking the crust with pie weights helps it stay crisp. Also, chilling the baked crust before adding the filling keeps moisture from seeping in.
Can I make this tart ahead of time?
Absolutely! You can prepare the crust and filling a day ahead and assemble before serving. Just store it covered in the fridge.
What can I substitute for heavy cream in the filling?
Whipped coconut cream or Greek yogurt works well for a lighter or dairy-free option, though the texture and flavor will be slightly different.
How long does this tart keep in the refrigerator?
Store it in an airtight container for up to 3 days. The crust is best enjoyed within the first couple of days to maintain its flakiness.
Pin This Recipe!

Loaded Raspberry Tart

A quick and easy summer dessert featuring a flaky buttery crust, creamy filling, and piled-high fresh raspberries for a perfect balance of flavors and textures.
- Prep Time: 15 minutes
- Cook Time: 25 minutes
- Total Time: 45 minutes
- Yield: 8 servings 1x
- Category: Dessert
- Cuisine: American
Ingredients
- 1 ½ cups (190g) all-purpose flour
- ½ cup (115g) unsalted butter, cold and cubed
- 2 tablespoons granulated sugar
- ¼ teaspoon salt
- 3 to 4 tablespoons ice water
- 8 oz (225g) cream cheese, softened
- ½ cup (60g) powdered sugar
- 1 teaspoon vanilla extract
- ½ cup (120ml) heavy cream, lightly whipped
- 2 cups (about 300g) fresh raspberries
- Optional: sliced almonds or crumble topping
- Powdered sugar for dusting
Instructions
- Prepare the crust: In a large bowl, whisk together flour, granulated sugar, and salt. Add cold, cubed butter and cut into the flour until mixture resembles coarse crumbs with pea-sized pieces.
- Add ice water: Slowly add ice water one tablespoon at a time, mixing gently until dough just comes together. Form dough into a disk, wrap in plastic wrap, and chill for at least 30 minutes.
- Roll out the dough: On a lightly floured surface or silicone mat, roll dough into a 12-inch circle about ⅛ inch thick. Transfer to a 9-inch tart pan, press to fit, trim excess, and prick bottom with a fork. Chill for 10 minutes if soft.
- Bake the crust: Preheat oven to 375°F (190°C). Line crust with parchment and fill with pie weights or dried beans. Bake 15 minutes, remove weights and parchment, bake another 10 minutes until golden. Cool completely on wire rack.
- Make the filling: Beat cream cheese, powdered sugar, and vanilla until smooth. Whip heavy cream until soft peaks form, then fold into cream cheese mixture gently.
- Assemble the tart: Spoon filling evenly into cooled crust and smooth top. Pile fresh raspberries on top and optionally sprinkle sliced almonds or crumble topping.
- Final touches: Dust tart lightly with powdered sugar before serving or chill for an hour. Serve chilled or at room temperature.
Notes
Keep butter cold for a flaky crust. Chill dough before rolling and after placing in pan to relax gluten and prevent shrinking. Avoid overworking dough. Bake crust with weights to prevent bubbling and sogginess. Fold whipped cream gently into filling to keep it light and fluffy. Use frozen raspberries thawed and drained if fresh are unavailable. Dust with powdered sugar before serving for a pretty finish.
Nutrition
- Serving Size: 1 slice (1/8 of tart
- Calories: 280
- Fat: 18
- Carbohydrates: 25
- Protein: 4
Keywords: raspberry tart, summer dessert, easy tart recipe, berry tart, cream cheese filling, flaky crust


